Lighting / Fixtures
Installation Guide for PacLights FTFN Center Basket LED Troffer
Comprehensive installation guide for the PacLights FTFN Center Basket LED Troffer. Includes wiring instructions, T-Grid mounting, surface mounting, recessed flange installation, and Bluetooth network control setup.
Quick answers from the manual
Quick answer
- The PacLights FTFN Center Basket LED Troffer can be installed via T-Grid, Surface Mount, or Drywall Recessed Flange. Wiring requires connecting ACL (Black), ACN (White), and Ground (Green) to the driver. Bluetooth controls can be reset by holding the 'Reset' button on the driver for 5 seconds. p. 1, 2, 3
Key actions
- Reset Bluetooth driver p. 1
- Install PIR Sensor p. 1
First start
- Wiring connection p. 1
Show 3 more answers Show less
Problems and fixes
De-commissioning from Network Zone
Long press the 'Reset' button on the Bluetooth driver for 5 seconds.
p. 1Maintenance and reset
- Bluetooth Driver Reset p. 1
Where to find it in the PDF
- Safety and Wiring p. 1
- T-Grid Mounting p. 2
- Surface and Recessed Mounting p. 3
Table of contents
Manual images
Click an image to enlargeImportant Safety Information
Before installing the fixture, ensure the power is turned OFF. All wiring must be performed in accordance with the National Electrical Code and applicable local codes. Proper grounding is required for safety. This product must be installed by a person familiar with the construction and operation of the product and the hazards involved. Do not expose wiring to sharp edges to prevent damage.
Wiring Instructions
Connect the ACL (Hot/Black) and ACN (Neutral/White) from the FTFN fixture to the conduit with the AC power supply cable. Ensure the ground (Green) wire is properly connected.
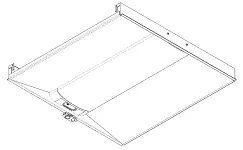
Bluetooth Network Lighting Controls (NLC)
All FTFN models are Bluetooth Network Control enabled. To install the PIR sensor:
- Remove the sensor cover.
- Attach the connector to the PIR sensor.
- Press the sensor into place on the fixture.
To de-commission a fixture from a Network Zone, locate the 'Reset' button on the Bluetooth driver inside the fixture panel. Long-press the button for 5 seconds.
T-Grid Mounting
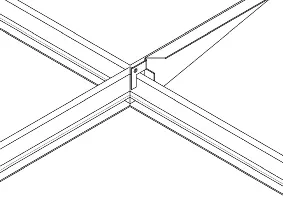
- Bend the four mounting tabs out to 90 degrees.
- If necessary, use metal shears to adjust the tab height to the T-Grid.
- Lay the fixture onto the T-Grid.
- Bend tabs flush against the T-Grid and use a sheet metal screw to fasten the fixture.
- Use a safety cable (hanger wire) to tie off at the tabs.
- Run the power supply cable through the conduit and complete wiring connections inside the panel cover.
Surface Mount Installation
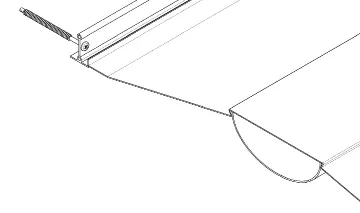
- Assemble three channels together using screws and angles.
- Fasten the channels to the ceiling surface (bolts/screws not provided).
- Slide the FTFN fixture through the open side of the surface mount and complete wiring.
- Fasten the remaining angles and side channel to enclose the fixture.
Drywall Recessed Flange Installation
- Assemble the recessed flanges using screws at the corners.
- Notch the ceiling drywall and insert the preassembled frame flush to the ceiling.
- If the ceiling is thin, install support cables (not included).
- If the ceiling is at least 1 inch thick, the frame can be fastened from the sides.
- Mount the FTFN fixture into the recessed frame and adjust cables as necessary.
Practical help
Common problems
Fixture needs to be removed from a Network Zone
Locate the 'Reset' button on the Bluetooth driver inside the fixture panel and long-press it for 5 seconds.
Mounting tabs do not fit the T-Grid height
Use metal shears or cutters to carefully adjust each mounting tab to the proper height.
Before use
- Ensure power is turned OFF before installation.
- Verify compliance with National Electrical Code and local codes.
- Ensure proper grounding is established.
- Check that all gaskets are seated properly for weatherproof function.
- Apply weatherproof silicone sealant around the edge of the Back Box or Junction Box.
Show more Show less
Images and diagrams
- Wiring diagram shows connection of AC power supply to the FTFN driver.
- Mounting diagrams illustrate bending tabs for T-Grid, assembling surface mount channels, and installing recessed flanges.
Model compatibility
- Compatible with T-Grid ceiling systems.
- Compatible with Surface Mount kits.
- Compatible with Drywall Recessed Flange frames.

Manual page author
Emily Carter
User documentation editor