Lighting / Fixtures
Assembly and User Manual for River Of Goods 1-Light Floor Lamp
Quick guide for assembling and maintaining your River Of Goods 1-Light floor lamp. Includes step-by-step assembly instructions, bulb requirements, and safety guidelines.
Quick answers from the manual
Quick answer
- This document provides assembly instructions for the River of Goods 1-Light Floor Lamp, including steps to attach the base, posts, harp, shade, and bulb. p. 1
Key actions
- Assemble the lamp structure by attaching Post 'B' to Base 'A' and Assembly 'C' to Post 'B'. p. 1
- Install the harp and shade by clipping Harp 'D' to Harp Holder 'C' and securing Shade 'F' with Finial 'G'. p. 1
- Install the light bulb. p. 1
First start
- Place all parts on a flat smooth surface before beginning assembly. p. 1
- Follow the assembly steps to connect the base, posts, harp, and shade, then install the bulb. p. 1
Show 2 more answers Show less
Technical specifications
| Parameter | Value | Meaning | Pages |
|---|---|---|---|
| Bulb Type A | 60W | Maximum wattage for E26 Type A bulb | p. 1 |
| Bulb Type CFL | 13W | Maximum wattage for E26 CFL bulb | p. 1 |
Where to find it in the PDF
- Assembly Instructions p. 1
Table of contents
Quick assembly guide
This guide provides instructions for assembling your River Of Goods 1-Light floor lamp. Ensure all parts are present and laid out on a flat, smooth surface before beginning assembly. Always check the wattage label near the lamp holder to ensure you do not exceed the maximum allowed wattage.
Assembly instructions
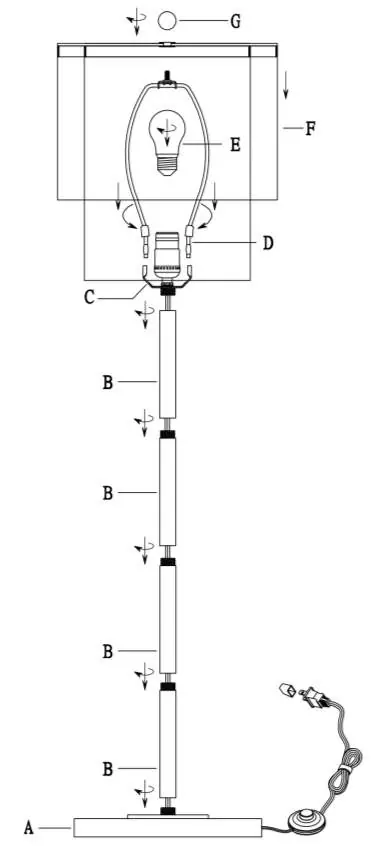
- Attach Post B to Base A.
- Attach Assembly C to Post B.
- Clip Harp D to Harp Holder C by squeezing the two posts.
- Mount Shade F and secure it with Finial G.
- Install the bulb E (not included).
Bulb requirements
Use only the specified bulb types to avoid damage or fire hazards:
- E26 Type A: Maximum 60W
- E26 CFL: Maximum 13W
Safety and care
Safety: This lamp features a polarized plug (one blade wider than the other) as a safety feature to reduce the risk of electric shock. If the plug does not fit into your outlet, reverse the plug. Do not force it or alter the plug. Never use with an extension cord unless the plug can be fully inserted. Do not attempt to replace the bulb while the lamp is plugged into a wall receptacle.
Care: Use only a soft cloth for cleaning. Do not use any chemicals or abrasive cleaners.
Practical help
Common problems
Plug does not fit the wall outlet
The lamp has a polarized plug. Try reversing the plug. If it still does not fit, contact a qualified electrician. Do not alter the plug.
Bulb replacement safety
Always unplug the lamp from the wall receptacle before attempting to replace the bulb.
Before use
- Ensure all parts are laid out on a flat, smooth surface.
- Check the wattage label near the lamp holder to avoid exceeding maximum wattage.
- Verify the bulb type matches E26 Type A (60W) or E26 CFL (13W).
Show more Show less
Specs in practice
- Polarized plug
- Safety feature with one blade wider than the other to reduce electric shock risk.
Images and diagrams
- The diagram shows the assembly sequence from the base (A) up through the posts (B), harp holder (C), harp (D), bulb (E), shade (F), and finial (G).
Model compatibility
- Not compatible with extension cords unless the plug can be fully inserted.

Manual page author
Michael Turner
Technical manual editor