Lighting / Fixtures
Saxby EcoLinear LED Batten 73534/90129 User Manual
Quick guide for the Saxby EcoLinear LED Batten (73534, 90129). Includes installation steps, wiring diagrams, safety warnings, and technical specifications.
Quick answers from the manual
Quick answer
- The Saxby EcoLinear LED Batten is a non-dimmable, double-insulated light fitting. It must be installed by a qualified electrician and connected to a circuit with a 30mA RCD. p. 1, 2
Key actions
- Install the fixing brackets, connect the wiring (Neutral/Blue, Switched Live/Brown), and clip the batten into place. p. 2
Problems and fixes
Light not working
Check connections and ensure the circuit breaker/fuse is active.
p. 2Show 3 more answers Show less
Maintenance and reset
- Clean with a soft dry cloth. Do not use solvents or abrasive cleaners. p. 1
Technical specifications
| Parameter | Value | Meaning | Pages |
|---|---|---|---|
| Voltage | 220-240 V~, 50 Hz | Operating voltage | p. 1 |
| Power (73534) | 22W | Power consumption | p. 1 |
| Power (90129) | 18W | Power consumption | p. 1 |
Where to find it in the PDF
- Technical Data and Safety p. 1
- Installation and Wiring p. 2
Table of contents
Manual images
Click an image to enlargeImportant Information
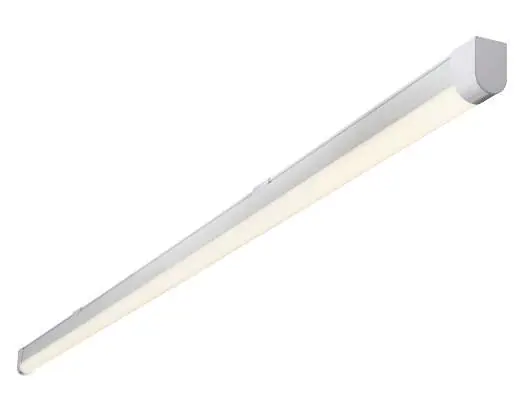
The Saxby EcoLinear LED Batten is a fixed light fitting designed for indoor use. This product is double insulated and does not require an earth connection. It is not suitable for dimming. Installation must be performed by a competent and qualified electrician in accordance with IEE Wiring Regulations and current Building Regulations.
Safety Precautions
- Always switch off the power supply at the mains before installing or maintaining the fitting.
- Ensure other persons cannot restore the electrical supply without your knowledge.
- This light fitting should be connected to a circuit with a 30mA RCD fitted.
- If replacing an existing fitting, carefully note the connections.
- Do not use solvents or abrasive cleaners on the finish.
- The light source and control gear are non-replaceable.
Installation
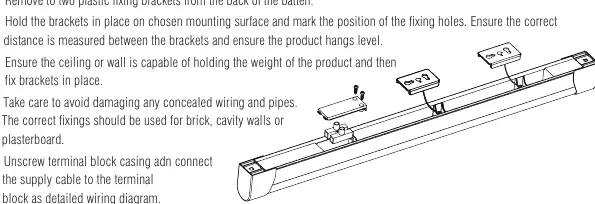
- Preparation: Ensure the mounting surface is flat and smooth. Remove the two plastic fixing brackets from the back of the batten.
- Marking: Hold the brackets in place on the chosen mounting surface and mark the position of the fixing holes. Ensure the correct distance is measured between the brackets so the product hangs level.
- Fixing: Ensure the ceiling or wall is capable of holding the weight of the product. Use appropriate fixings for the surface (brick, cavity wall, or plasterboard). Take care to avoid damaging concealed wiring and pipes.
- Wiring: Unscrew the terminal block casing and connect the supply cable as detailed in the wiring diagram.
- Finalizing: Clip the product back onto the fixing brackets by pushing until securely held. Replace the fuse or circuit breaker and switch on.
Wiring
This product is double insulated and must not be earthed. If there are any incoming earth cables, they must be joined together and well insulated with good quality insulation tape to ensure earth continuity throughout your property.
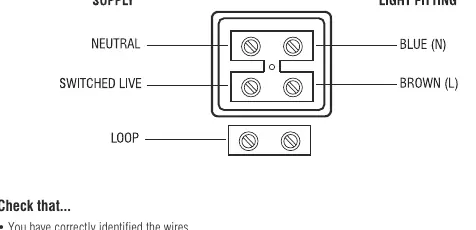
Connect the supply cable to the terminal block as follows:
- Neutral: Blue (N)
- Switched Live: Brown (L)
Care and Maintenance
For your safety, always switch off the power supply before cleaning. We recommend cleaning with a soft dry cloth. Do not use solvents or abrasive cleaners as these could damage the finish.
Technical Data
- Supply Voltage: 220-240 V~, 50 Hz
- 73534: 22W LED module (SMD), 4000K
- 90129: 18W LED module (SMD), 4000K
- Energy Efficiency: Class D
Practical help
Common problems
Light does not turn on
Check that the power is switched on, the fuse or circuit breaker is intact, and all wiring connections are tight.
Dimming not working
This product is not suitable for dimming. Do not connect to a dimmer switch.
Before use
- Ensure power is switched off at the mains.
- Verify the mounting surface is flat and smooth.
- Check that you have all parts listed in the pack.
- Ensure the ceiling or wall can support the weight of the product.
- Confirm the presence of a 30mA RCD on the circuit.
Show more Show less
Specs in practice
- Double Insulated
- The product does not require an earth connection.
Images and diagrams
- The wiring diagram illustrates the connection of the Neutral (Blue) and Switched Live (Brown) wires to the terminal block.
- The installation diagram shows the removal and placement of the two plastic fixing brackets.
Model compatibility
- Not suitable for dimming.
- Requires 30mA RCD circuit.
- Mains supply cable must have a minimum cross-sectional area of 1.0mm².

Manual page author
David Miller
Documentation analyst