Lighting / Fixtures
Traxon Media Tube HO Mounting Guide
Official mounting and installation guide for the Traxon Media Tube HO. Includes technical specifications, mounting diagrams, thermal expansion clearance requirements, and essential safety instructions.
Quick answers from the manual
Quick answer
- The Traxon Media Tube HO must be installed by qualified personnel. Key requirements include a torque setting of 1–1.2 Nm for mounting studs and a minimum clearance of >4mm between tubes to allow for thermal expansion. p. 1
Key actions
- Mounting the fixture p. 1
- Maintaining thermal clearance p. 1
Problems and fixes
Water ingress
Do not loosen mounting studs.
p. 1Show 3 more answers Show less
Maintenance and reset
- Use only original parts for maintenance. p. 2
Technical specifications
| Parameter | Value | Meaning | Pages |
|---|---|---|---|
| Torque | 1-1.2 Nm | Tightening force for mounting studs | p. 1 |
| Thermal Clearance | >4mm (0.16") | Minimum gap between tubes | p. 1 |
| Mounting Stud | M6 x 23mm | Stud dimensions | p. 1 |
Where to find it in the PDF
- Mounting Diagrams and Specs p. 1
- Safety Instructions p. 2
Table of contents
Quick Guide
This guide provides essential mounting instructions for the Traxon Media Tube HO. Ensure all installation and maintenance are performed by qualified personnel. Key technical requirements include maintaining specific thermal expansion clearance and adhering to torque specifications for mounting studs.
Mounting Instructions
The Media Tube HO can be mounted using rear studs. Follow these critical guidelines to ensure proper installation:
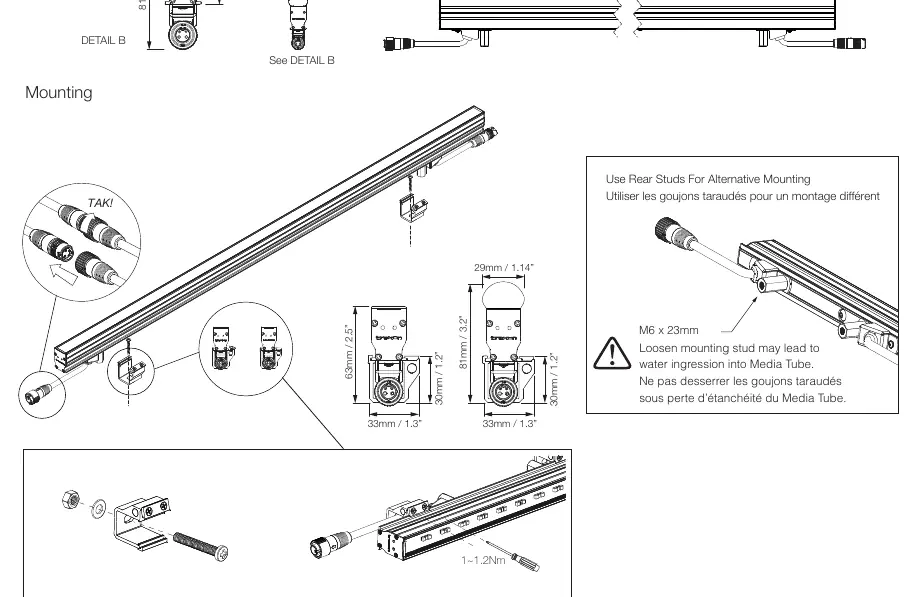
- Torque Specification: Tighten mounting hardware to 1–1.2 Nm.
- Water Ingress Warning: Do not loosen the mounting studs, as this may compromise the seal and lead to water ingress into the Media Tube.
- Alternative Mounting: Use the rear studs for alternative mounting configurations as shown in the diagrams.
Thermal Expansion and Clearance
To maintain a consistent LED pitch and allow for thermal expansion of the Media Tubes, you must observe the following clearance:
- Tube-to-Tube Clearance: Maintain a gap of at least 4mm (0.16") between tubes.
Safety and Maintenance
Adhere to the following safety protocols:
- Qualified Personnel: Installation and maintenance must be performed only by skilled personnel.
- Power Supply: Connect to the power supply in accordance with national regulations.
- Cable Damage: If the external flexible cable is damaged, it must be replaced exclusively by the manufacturer or a similarly qualified person to avoid hazards.
- Light Source: The light source of this luminaire is not replaceable. When it reaches the end of its life, the entire luminaire must be replaced.
- Modifications: If the luminaire is modified, the person responsible for the modification is considered the manufacturer.
- Spare Parts: Use only original parts during overhaul or maintenance.
Practical help
Common problems
Water ingress into the Media Tube
Ensure mounting studs are not loosened. Loosening them compromises the seal.
Inconsistent LED pitch or thermal stress
Ensure a minimum clearance of >4mm (0.16") between tubes to allow for thermal expansion.
Before use
- Verify that installation is performed by qualified personnel.
- Ensure the power supply connection complies with national regulations.
- Check that the mounting surface is suitable for the M6 x 23mm studs.
- Confirm that the correct end cap seal is installed on the last tube.
Show more Show less
Specs in practice
- Tube-to-Tube Clearance
- >4mm (0.16") is the minimum gap required to accommodate thermal expansion.
- Mounting Stud
- M6 x 23mm is the standard mounting stud size.
Images and diagrams
- The guide provides detailed dimensions for both Direct View and Diffused Tube models.
- Diagrams illustrate the correct mounting stud usage and the necessity of maintaining the gap between tubes.
Model compatibility
- The light source is not replaceable; the entire unit must be replaced at end-of-life.

Manual page author
David Miller
Documentation analyst