Tools / Power Tools
User Manual for Ronix 3250 Angle Grinder 180mm
Quick guide for the Ronix 3250 180mm angle grinder. Learn how to install the side handle, adjust the wheel guard, change discs, and operate the tool safely.
Quick answers from the manual
Quick answer
- To start the Ronix 3250, plug it in, press the safety lock button, and then press the trigger. For continuous operation, press the lock-on button while the trigger is engaged. p. 10
Key actions
- Adjusting the wheel guard p. 8
- Installing the side handle p. 9
- Fixing the grinding disc p. 9
First start
- Ensure the tool is unplugged, install the side handle, mount the grinding disc, and adjust the wheel guard before connecting to power. p. 8, 9
Maintenance and reset
- Regularly clean air vents and have carbon brushes inspected/replaced by an authorized service center. p. 11
Technical specifications
| Parameter | Value | Meaning | Pages |
|---|---|---|---|
| Power | 2200W | Motor power consumption | p. 3 |
| Wheel Diameter | 180mm | Compatible disc size | p. 3 |
| No-load RPM | 8500RPM | Rotational speed without load | p. 3 |
Where to find it in the PDF
- Technical Specifications p. 3
- Safety Warnings p. 4, 5, 6, 7
- Preparation and Setup p. 8, 9
- Operation p. 10, 11
Table of contents
Manual images
Click an image to enlargeQuick guide from the manual
This manual provides essential instructions for the safe operation and maintenance of the Ronix 3250 180mm angle grinder. Before using the tool, ensure you are familiar with the safety warnings, proper installation of the wheel guard, and correct disc mounting procedures. Always disconnect the power supply before performing any adjustments or maintenance.
Technical Specifications
- Model: 3250
- Power: 2200W
- Voltage: 220-240V
- Frequency: 50-60Hz
- Wheel Diameter: 180mm
- Spindle Size: M14
- No-load RPM: 8500RPM
- Weight: 4.16Kg
Safety Warnings
Operating a power tool involves risks. Always follow these guidelines:
- Personal Safety: Wear eye protection, dust masks, and non-skid safety shoes. Keep hair and loose clothing away from moving parts.
- Work Area: Keep the area clean and well-lit. Do not operate in explosive atmospheres.
- Electrical Safety: Ensure the plug matches the outlet. Use an RCD-protected supply in damp locations.
- Grinding Operations: Always use the proper wheel guard. Never use wood-cutting or saw blades. Inspect the wheel for cracks before use.
Preparation for Use
Adjusting the Wheel Guard
Never use the tool without the wheel guard properly installed.
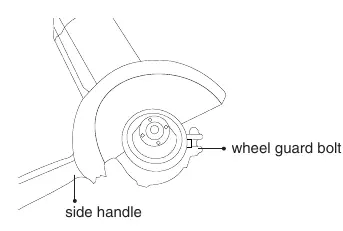
- Loosen the wheel guard bolt.
- Rotate the guard to the desired position to shield yourself from sparks and debris.
- Tighten the bolt securely.
- Verify the guard is firmly in place before proceeding.
Installing the Side Handle
The side handle must be installed for safe operation.
- The handle can be installed on either side of the gear case.
- Screw the threaded end of the handle into the selected position and tighten securely.
Fixing the Grinding Disc
- Ensure the tool is unplugged.
- Depress and hold the spindle lock button to lock the shaft.
- Remove the outer flange using the provided wrench.
- Place the desired disc on the inner flange.
- Replace the outer flange and tighten it securely with the wrench.
- Release the spindle lock.
Operation
Switching On/Off
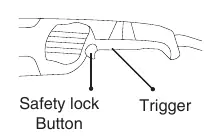
- Plug the tool into a power socket.
- Press the safety lock button, then press the trigger to start.
- For continuous operation, press the lock-on button while the trigger is held.
- Release the trigger to turn the tool off.
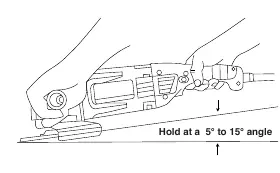
Grinding and Cutting
Hold the tool firmly by the main and side handles. Avoid blocking ventilation slots to prevent overheating. For grinding, hold the tool at a 5-15° angle to the workpiece. Move the grinder gently; do not apply excessive pressure.
Maintenance
Always unplug the tool before inspection or maintenance. Regularly clean the air vents to prevent obstruction. Repairs, carbon brush inspection, and replacements must be performed by authorized Ronix service centers.
Manufacturer information
Ronix Tools
Practical help
Common problems
Tool overheating
Ensure ventilation slots are not blocked by your hand during operation.
Excessive vibration or wobbling
Check for poor installation or a poorly balanced wheel. Stop immediately and inspect.
Wheel breakage
Ensure you are using the correct flanges and that the wheel is not cracked. Never use wood-cutting blades.
Before use
- Ensure the tool is switched off and unplugged before adjustments.
- Check the grinding wheel for cracks or damage.
- Verify the wheel guard is securely installed.
- Ensure the side handle is attached.
- Wear appropriate personal protective equipment (eye protection, gloves).
- Ensure the switch is in the off position before plugging in.
Specs in practice
- 180mm Wheel Diameter
- The maximum size of the grinding disc compatible with this tool.
- M14 Spindle Size
- The standard thread size for mounting discs and flanges.
Images and diagrams
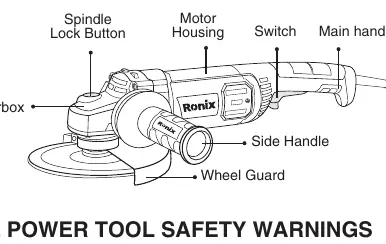
- The part list diagram identifies the Spindle Lock Button, Motor Housing, Switch, Main Handle, Gearbox, Wheel Guard, and Side Handle.
- The grinding operation diagram illustrates the recommended 5-15 degree angle for optimal grinding efficiency.
Model compatibility
- Only use wheels with a maximum safe operating speed rated at or above the RPM listed on the tool's nameplate.
- Do not use wood-cutting blades or saw blades.

Manual page author
Emily Carter
User documentation editor
Prepares concise manual descriptions and highlights the most useful setup, operation, and maintenance information for readers.