Tools / Saws
Ronix 8630 Cordless LED Work Light User Manual
Comprehensive user manual for the Ronix 8630 20V Cordless LED Work Light. Includes technical specifications, battery installation, bulb replacement, and safety instructions.
Quick answers from the manual
Quick answer
- The Ronix 8630 is a 20V cordless LED work light. It features a 90-degree adjustable head, 250lm brightness, and approximately 6 hours of runtime on a full 2000mAh battery charge. p. 3, 7, 8
Key actions
- Installing/Removing Battery p. 6, 7
- Replacing Bulb p. 8
First start
- Charge the battery using the matched charger before use. p. 6
Problems and fixes
Light goes out
Low voltage; recharge the battery.
p. 7Maintenance and reset
- Repairs and maintenance should be performed by an Authorized Service Center. p. 8
Technical specifications
| Parameter | Value | Meaning | Pages |
|---|---|---|---|
| Power | 5W | Power consumption | p. 3 |
| Runtime | 6H | Operating time on a single charge | p. 3, 7 |
Where to find it in the PDF
- Technical Specifications p. 3
- Part List p. 4
- Safety Instructions p. 5, 6
Table of contents
Manual images
Click an image to enlargeQuick guide from the manual
The Ronix 8630 is a 20V cordless LED work light designed for portable illumination. Before use, ensure the battery is fully charged using the provided charger. Always switch off the tool before inserting or removing the battery. Do not expose the light to water or wet conditions, and avoid looking directly into the light source.
Technical Specifications
- Model: 8630
- Power: 5W
- Battery: 2000mAh / 20V
- Flux: 250lm
- Illumination Range: >100m
- CCT: 6500K
- Rotation Angle: 90°
- Runtime: 6 hours
- Charging Time: 60 minutes
- Degree of Protection: IP54
- Weight: 0.8kg
Parts Overview
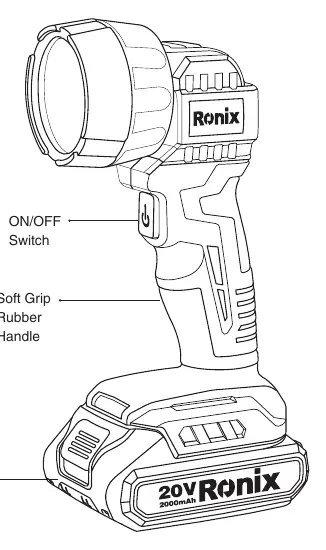
- ON/OFF Switch: Located on the handle for easy operation.
- Soft Grip Rubber Handle: Provides ergonomic handling.
- Release Button: Used to detach the battery cartridge.
Battery Installation
To install or remove the battery cartridge:
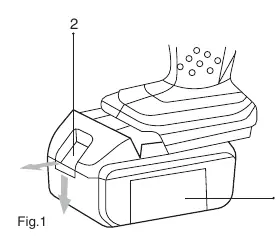
- Always switch off the tool before insertion or removal.
- To remove, slide the button on the front of the cartridge and withdraw it from the tool.
- To insert, align the tongue on the battery cartridge with the groove in the housing and slide it into place until it locks with a click.
- Ensure the red part on the upper side of the button is not visible; if it is, the battery is not fully locked.
Operation
Lighting up the bulb: Push the switch to turn the light on. Push it again to turn it off. The light will automatically go out at low voltage; recharge the battery when this occurs.
Head Angle: The head angle can be adjusted in four stages to direct the light as desired.
Maintenance and Bulb Replacement
Bulb Replacement:

- Wait for the bulb to cool down completely after operation to avoid burns.
- Turn the ring counterclockwise to remove the reflector.
- Replace the bulb.
Repairs, maintenance, or adjustments should be carried out by an Authorized Service Center to maintain product safety and reliability.
Safety Instructions
- Do not use in damp or wet locations; the tool is not waterproof.
- Do not touch the inside of the flashlight head with metal tools.
- Do not touch battery terminals with conductive materials.
- Do not store the tool or battery in temperatures exceeding 50°C (122°F).
- Do not expose eyes to the light continuously.
- Do not cover the lit tool with cloth or carton to prevent fire risks.
Manufacturer information
Ronix Tools
Practical help
Common problems
Light turns off during use
The battery voltage is low. Recharge the battery cartridge.
Battery does not lock into place
Ensure the battery is inserted fully until the red part on the button is no longer visible.
Bulb is too hot to handle
Wait for the bulb to cool down completely before attempting replacement.
Before use
- Charge the battery cartridge fully before first use.
- Ensure the battery is compatible with the 20V system.
- Check that the environment is dry (not waterproof).
- Verify the switch is in the OFF position before inserting the battery.
Images and diagrams
- Fig 1: Shows the battery release button and insertion path.
- Fig 2: Shows the switch location and head rotation.
- Fig 3 & 4: Illustrates the process of removing the reflector and replacing the bulb.

Manual page author
Emily Carter
User documentation editor
Prepares concise manual descriptions and highlights the most useful setup, operation, and maintenance information for readers.