Tools / Saws
User Manual for Ronix 8680 20V Brushless Cordless Mini Angle Grinder
Comprehensive user guide for the Ronix 8680 20V Brushless Cordless Mini Angle Grinder. Includes setup, battery maintenance, safety precautions, operation instructions, and troubleshooting.
Quick answers from the manual
Quick answer
- The Ronix 8680 is a 20V brushless cordless mini angle grinder. It features built-in protection systems for overload, overheat, and over-discharge. Always ensure the battery is charged before use and that the grinding wheel cover is properly installed for safety. p. 1, 13
Key actions
- Installing the battery pack p. 12
- Starting the tool p. 15
First start
- Charge the battery fully before first use. p. 20
Problems and fixes
Tool stops automatically
Check for overload, overheat, or low battery. Wait for the tool to cool or charge the battery.
p. 13Error codes
| Code | Meaning | Action | Pages |
|---|---|---|---|
| LED flash | Undervoltage protection | Charge the battery. | p. 14, 15 |
| LED continuous full flash once | Short circuit protection | Check for short circuit. | p. 14, 15 |
| LED full flash 2 times | Battery pack over-temperature protection | Allow battery to cool. | p. 15 |
Maintenance and reset
- Charge the battery before it is completely discharged. p. 11
Technical specifications
| Parameter | Value | Meaning | Pages |
|---|---|---|---|
| Model | 8680 | Product model number | p. 3 |
| Battery Capacity | 4.0 Ah / 20V | Battery voltage and capacity | p. 3 |
| Wheel Diameter | 125mm | Compatible disc size | p. 3 |
Where to find it in the PDF
- Technical Specifications p. 3
- Part List p. 4
- Battery Charging p. 20
Table of contents
Manual images
Click an image to enlargeQuick guide from the manual
The Ronix 8680 is a 20V brushless cordless mini angle grinder designed for grinding, sanding, wire brushing, and cutting metal and stone materials. Before first use, ensure the battery is fully charged. Always wear appropriate personal protective equipment, including goggles, and ensure the grinding wheel cover and side handle are correctly installed before operation.
Technical Specifications
- Model: 8680
- Battery: 4.0 Ah / 20V Lithium-ion
- Wheel Diameter: 125mm
- Spindle Size: M14
- No-load Speed: 2600/8500 RPM
- Weight: 1.96kg (with 1pc battery pack)
Part List and Components
The tool consists of the following main components:
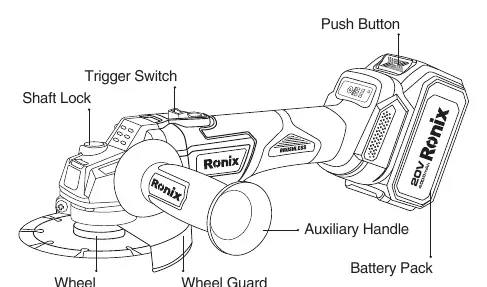
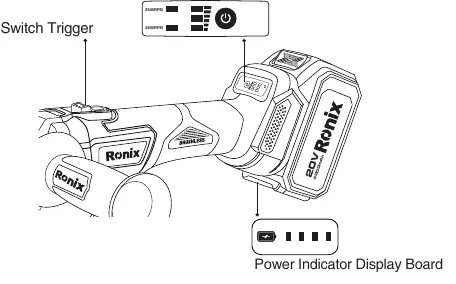
- Trigger Switch
- Shaft Lock
- Auxiliary Handle
- Wheel Guard
- Battery Pack
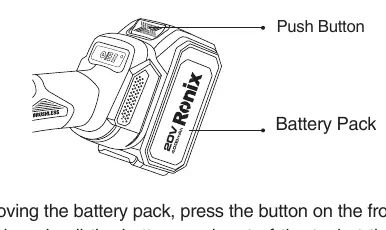
- Push Button (for battery release)
Safety Precautions
Workplace Safety: Keep the area clean and bright. Do not operate in explosive environments (flammable liquids, gas, or dust).
Electrical Safety: Do not expose the tool to rain or damp environments. Use RCD protection if operating in humid conditions.
Personal Safety: Always wear goggles (ANSI Z87.7 or equivalent). Do not wear loose clothing or cloth work gloves that may tangle in moving parts. Keep hands away from rotating parts.
Battery Pack Operation
Installation: Align the tongue spring on the battery pack with the groove on the tool and slide it into place until it clicks. If the red indicator is visible, it is not fully locked.
Charging: Charge indoors at temperatures between 5°C and 40°C. Use only the charger specified by the manufacturer. The red light indicates charging; the green light indicates standby or charging completed.
Maintenance: Charge the battery before it is completely discharged. If not used for a long time (more than six months), charge it. Store in an environment between 0°C and 45°C.
Assembling the Tool
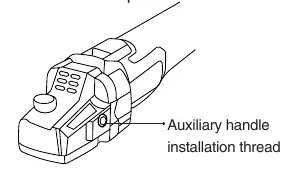
Side Handle: Install the auxiliary handle into the designated thread on the tool body.
Grinding Wheel Cover: When using grinding wheels, blades, or wire brushes, the cover must be installed with the closed side facing the operator. Press the locking lever to install and ensure the convex part aligns with the notch on the bearing housing.
Operation and Protection Systems
Starting the Tool: Push the rear of the slide switch and slide it to the 'I' (open) position. For continuous operation, press the front of the slide switch to lock it.
Protection Systems: The tool features automatic protection for:
- Overload: Activated by abnormally high current. Stop the tool and restart.
- Overheat: Tool stops automatically. Wait for it to cool.
- Over-discharge: Activated when battery power is low. Remove and charge the battery.
Troubleshooting and Fault Prompts
The tool uses LED indicators to signal faults. If the tool stops, check the LED flash pattern:
- Undervoltage: LED flash.
- Short circuit: LED continuous full flash once.
- Battery over-temperature: LED full flash 2 times.
- Motor locked-rotor: LED flashes 4 times.
Manufacturer information
Ronix Tools
Practical help
Common problems
Tool stops running automatically
The protection system has been triggered (overload, overheat, or low battery). Allow the tool to cool or charge the battery.
Battery is difficult to insert
Do not force the battery. Check for obstructions and ensure the insertion method is correct.
Excessive vibration
Ensure the inner flange is fitted correctly to the inner diameter of the grinding wheel/blade.
Before use
- Ensure the battery is fully charged.
- Check that the switch is in the OFF position before inserting the battery.
- Install the side handle securely.
- Install the grinding wheel cover with the closed side facing the operator.
- Wear safety goggles and appropriate protective gear.
Specs in practice
- No-load Speed
- The rotational speed of the tool without a load, adjustable between 2600 and 8500 RPM.
- Wheel Diameter
- The maximum size of the grinding or cutting disc compatible with this tool (125mm).
- Spindle Size
- The thread size for mounting accessories (M14).
Images and diagrams
- The Part List diagram identifies the trigger switch, shaft lock, and battery release button.
- The battery indicator board shows remaining power levels and fault codes.
Model compatibility
- Use only original Ronix batteries and chargers.
- Do not use non-original or modified batteries.

Manual page author
Emily Carter
User documentation editor
Prepares concise manual descriptions and highlights the most useful setup, operation, and maintenance information for readers.