Tools / Power Tools
User Manual for Ronix 8625 20V Cordless Ratchet Wrench
Quick guide for the Ronix 8625 20V Cordless Ratchet Wrench. Includes setup, battery installation, socket attachment, safety warnings, and maintenance tips.
Quick answers from the manual
Quick answer
- The Ronix 8625 is a 20V cordless ratchet wrench with a 3/8 inch drive, 80N.m max torque, and variable speed up to 2000 RPM. p. 2
Key actions
- Install battery: Slide into housing until it clicks. p. 8, 9
- Change socket: Push onto anvil until locked. p. 10
First start
- Ensure battery is charged, insert into tool, select rotation direction, and pull switch lever. p. 8, 9
Problems and fixes
Battery not locking
Ensure the red indicator on the button is not visible.
p. 9Maintenance and reset
- Charge battery every six months if not in use. p. 8
Technical specifications
| Parameter | Value | Meaning | Pages |
|---|---|---|---|
| Max. Torque | 80N.m | Maximum fastening force | p. 2 |
| No-Load Speed | 0-2000RPM | Rotational speed without load | p. 2 |
Where to find it in the PDF
- Specifications p. 2
- Safety Warnings p. 3, 4, 5, 6
- Operation p. 8, 9, 10
Table of contents
Manual images
Click an image to enlargeQuick guide from the manual
The Ronix 8625 is a 20V cordless ratchet wrench designed for fastening tasks. Before using the tool, ensure the battery is charged and the correct socket size is selected. Always remove the battery before performing any maintenance or adjustments to the tool.
Product Overview
The tool consists of the following main components:
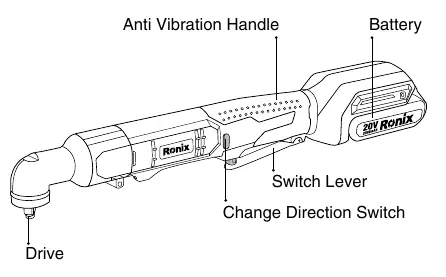
- Anti-Vibration Handle: Provides grip and comfort.
- Battery: 20V Lithium power source.
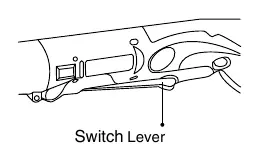
- Switch Lever: Controls the tool speed; pull to start, release to stop.
- Change Direction Switch: Used to toggle between clockwise and counterclockwise rotation.
- Drive: The anvil where the socket is attached.
Battery Operation
Installation: Align the tongue on the battery cartridge with the groove in the housing and slide it into place until it locks with a click. If you can see the red indicator on the button, it is not locked completely.
Removal: Slide the battery from the tool while pressing the button on the front of the cartridge.
Maintenance: Charge the battery before it is completely discharged. Do not recharge a fully charged battery. Charge at room temperature (10°C - 40°C).
Tool Operation
Switch Action: Pull the switch lever to start the tool. Increasing pressure on the lever increases the tool speed.
Reversing Switch: Use the reversing switch lever to change the direction of rotation. Depress from the A side for clockwise rotation or the B side for counterclockwise rotation. Always ensure the tool has come to a complete stop before changing direction.
Assembly
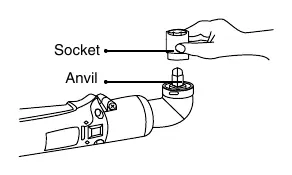
Selecting and Installing Socket: Always use the correct size socket for the bolt or nut to ensure accurate torque. To install, push the socket onto the anvil until it locks into place. To remove, simply pull the socket off.
Safety Warnings
- Always wear eye protection and ear protectors.
- Hold the tool by insulated gripping surfaces when working near hidden wiring.
- Check the socket for wear, cracks, or damage before use.
- Do not operate in explosive atmospheres.
- Keep the work area clean and well-lit.
- Store idle tools out of the reach of children.
Maintenance
Always ensure the tool is switched off and the battery is removed before inspection. Do not use gasoline, benzine, thinner, or alcohol for cleaning. Repairs should be performed by Ronix Authorized or Factory Service Centers using identical replacement parts.
Manufacturer information
Ronix Tools
Practical help
Common problems
Battery falls out of the tool
The battery is not fully inserted. Ensure the red indicator on the button is not visible.
Tool does not start
Check if the battery is charged and properly inserted. Ensure the switch lever is not obstructed.
Inaccurate fastening torque
Ensure you are using the correct size socket for the bolt or nut.
Before use
- Check battery charge level.
- Ensure the switch is in the OFF position before inserting the battery.
- Inspect the socket for wear, cracks, or damage.
- Verify the direction of rotation using the reversing switch.
- Ensure the work area is clear and well-lit.
Specs in practice
- No-Load Speed
- 0-2000RPM - The speed of the tool when not under load.
- Battery Voltage
- 20V - The electrical potential of the battery system.
Images and diagrams
- The part list diagram identifies the handle, battery, switch lever, and drive anvil.
- The socket installation diagram shows pushing the socket onto the anvil until it locks.
Model compatibility
- Use only Ronix specified battery packs and chargers.
- Use only accessories recommended for this tool.

Manual page author
David Miller
Documentation analyst
Organizes user manual content into clear summaries, with attention to model details, product context, and everyday usability.