Tools / Saws
User Manual for Ronix 1105 Heat Gun 2000W
Get the most out of your Ronix 1105 Heat Gun 2000W with this comprehensive user guide. Learn about technical specifications, safety precautions, operating procedures, and nozzle applications.
Quick answers from the manual
Quick answer
- The Ronix 1105 is a 2000W heat gun with adjustable temperature (100-600°C) and airflow settings, suitable for tasks like paint removal, shrink tubing, and plastic welding. p. 3, 7
Key actions
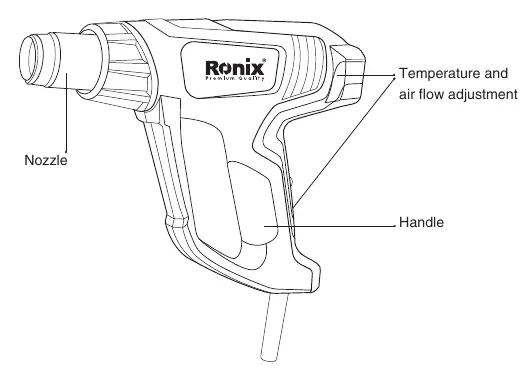
- Adjusting temperature and airflow p. 8
First start
- Ensure the switch is in the 'Off' position before plugging into a 220-240V outlet. p. 5, 8
Technical specifications
| Parameter | Value | Meaning | Pages |
|---|---|---|---|
| Power | 2000W | Power consumption | p. 3 |
| Temperature Range | 100°C - 600°C | Operating temperature | p. 3 |
Where to find it in the PDF
- Technical Specification p. 3
- Part List p. 4
- Operating Procedures p. 7, 8
- Nozzle Guide p. 9
Table of contents
Manual images
Click an image to enlargeQuick guide from the manual
The Ronix 1105 is a 2000W heat gun designed for various tasks such as paint removal, shrink tubing, and plastic welding. The device features adjustable airflow and temperature settings, controlled by a slide switch and a master temperature control knob. Always ensure the switch is in the 'Off' position before plugging the device into a power source.
Technical Specifications
The device operates on a 220-240V power supply (50-60Hz) and consumes 2000W of power. It features a ceramic heating element and a brushless motor. The operating temperature ranges from 100°C to 600°C, with three airflow settings: 150L/min, 300L/min, and 500L/min.
Safety Warnings
Electrical Safety: Ensure the plug matches the outlet and never modify it. Avoid contact with earthed surfaces and do not expose the tool to rain or wet conditions. Use an RCD-protected supply if operating in damp locations.
Personal Safety: Always wear eye protection and appropriate safety equipment. Keep the work area clean, well-lit, and free of flammable materials. Keep children and bystanders away while operating the tool.
Operating Procedures
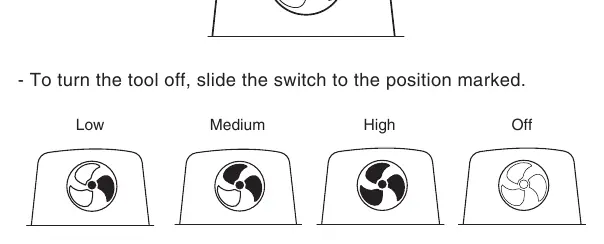
The slide switch controls both the ventilation fan speed and the heat output. To operate the tool, slide the switch to the desired speed setting (Low, Medium, or High). Use the master temperature control knob to adjust the heat output as needed. For optimal results, test the machine on a small, inconspicuous part of the workpiece before proceeding.
Nozzle Usage
The heat gun comes with several nozzles for specific applications:
- Glass protection nozzle: Protects windows when stripping frames.
- Fish tail surface nozzle: Used for drying and thawing, spreading heat over a wider area.
- Concentrating nozzle: Ideal for edge banding, decolorization of seams, and working on corners or cracks.
- Cone nozzle: Designed for plastic welding and soldering.
Manufacturer information
Ronix Tools
Practical help
Common problems
Tool does not turn on
Check the power supply connection and ensure the slide switch is not in the 'Off' position.
Tool overheating or not heating
Ensure the air intake is not blocked and the temperature control knob is set to the appropriate level.
Before use
- Check for damaged cord or plug
- Ensure the work area is clean and well-lit
- Wear eye protection
- Ensure the switch is in the 'Off' position before plugging in
- Verify the power source is 220-240V
Specs in practice
- Operating Temperature
- Adjustable range from 100°C to 600°C for various material requirements.
Images and diagrams
- The slide switch on the handle controls the fan speed (Low, Medium, High, Off).
- The temperature control knob on the back of the unit adjusts the heat output.
- Nozzles attach to the front mouthpiece for specific tasks.
Model compatibility
- Designed for 220-240V power sources.

Manual page author
David Miller
Documentation analyst
Organizes user manual content into clear summaries, with attention to model details, product context, and everyday usability.