Tools / Drills
User Manual for Ronix 8653 230Nm Brushless Impact Screwdriver
Comprehensive user guide for the Ronix 8653 230Nm Brushless Impact Screwdriver. Includes technical specifications, operating instructions, battery charging procedures, and safety guidelines.
Quick answers from the manual
Quick answer
- The Ronix 8653 is a 20V brushless impact screwdriver featuring 4 speed settings, a maximum torque of 230Nm, and a 1/4 inch square drive. p. 3
Key actions
- Adjusting speed settings p. 10
- Charging the battery p. 8
First start
- Insert the charged battery into the handle until it engages. p. 9
- Set the rotational direction switch to the desired position. p. 9
Show 4 more answers Show less
Problems and fixes
Battery does not discharge/charge
Check that the electrical outlet has voltage and charger contacts are undamaged.
p. 8Maintenance and reset
- Recharge the battery at least once a year to maintain battery life. p. 8
Technical specifications
| Parameter | Value | Meaning | Pages |
|---|---|---|---|
| Battery Voltage | 20V | Operating voltage | p. 3 |
| Max Torque | 230Nm | Maximum tightening force | p. 3 |
| Chuck Size | 6.35mm | Drive size | p. 3 |
Where to find it in the PDF
- Technical Specifications p. 3
- Part List p. 4
- Operation p. 9, 10
Table of contents
Quick Guide
The Ronix 8653 is a 20V brushless impact screwdriver designed for driving fasteners. It features four speed settings, a 1/4 inch square drive, and an electronic clutch control panel. Always ensure the battery is charged and the directional switch is in the center position before performing any maintenance or changing accessories.
Technical Specifications
The tool operates on a 20V Lithium battery system. Key performance metrics include:
- Max Torque: 230Nm
- Chuck Size: 1/4 inch (6.35mm)
- Speed Settings: 4 levels (1200, 1900, 2500, 3200 RPM)
- Impact Rates: 1400, 2200, 3000, 4000 IPM
- Weight: 1.39kg (with 2.0Ah battery)
Product Overview
The tool consists of the following main components:
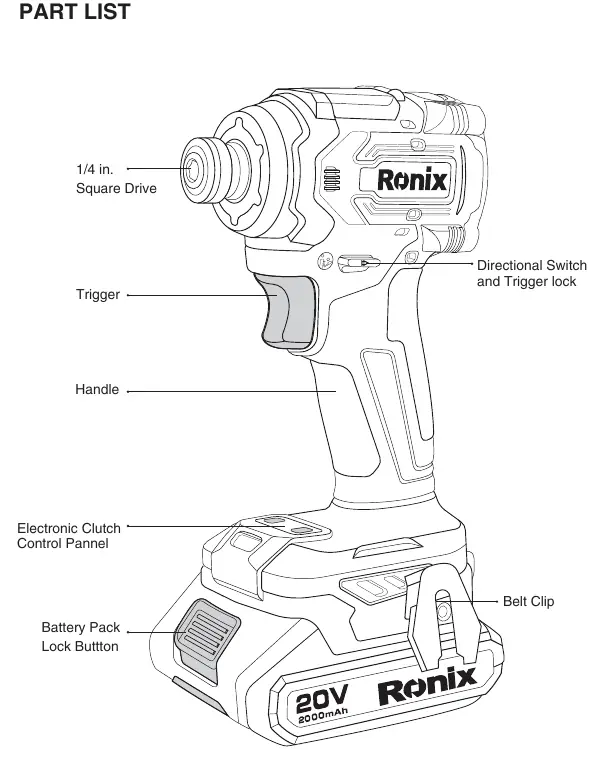
- 1/4 in. Square Drive: The output shaft for attaching sockets.
- Trigger: Variable speed control.
- Directional Switch and Trigger Lock: Controls forward/reverse rotation and locks the trigger.
- Electronic Clutch Control Panel: Located on the base, used to cycle through the 4 speed settings.
- Battery Pack Lock Button: Used to release the battery from the handle.
- Belt Clip: For carrying the tool.
Safety Instructions
Warning: Read all instructions before use. Failure to follow safety guidelines may result in injury or void the warranty.
- Workplace: Keep the area clean and well-lit. Do not use in explosive environments.
- Electrical: Avoid contact with grounded surfaces. Do not expose to rain or wet conditions.
- Personal: Wear eye protection, dust masks, and appropriate safety gear. Do not operate if tired or under the influence of substances.
- Tool Maintenance: Disconnect the battery before changing accessories or storing. Do not force the tool.
Battery Charging
To charge the battery pack:
- Remove the battery pack from the handle by pressing the lock button.
- Slide the battery onto the charger.
- The red LED indicates charging. When finished, the red LED turns off and the green LED illuminates.
- A full charge takes approximately 1 hour.
- Check the battery status by pressing the power display button on the rear of the battery.
Operation
Before Use: Always lock the trigger switch (center position) and remove the battery before working on the machine.
Speed Settings: The motor has four forward speed settings. Use the button on the Electronic Clutch Control Panel to cycle through them. The number of illuminated green LEDs indicates the current speed level (1 to 4).
Trigger: The trigger is variable speed. Light pressure results in low speed; increased pressure increases the speed.
Maintenance
- Recharge the battery at least once a year.
- Clean the tool regularly with a damp cloth and a little soap. Do not use harsh detergents.
- Ensure no water enters the tool.
- Repairs must be performed by a qualified expert using identical replacement parts.
Manufacturer information
Ronix Tools
Practical help
Common problems
Battery not charging
Ensure the electrical outlet has voltage and the charger contacts are clean and making proper contact with the battery leads.
Tool will not start
Check if the battery is inserted correctly and the directional switch is not in the center (locked) position.
Before use
- Ensure the battery is fully charged.
- Check that the rotational direction switch is in the center position to prevent accidental starting.
- Wear appropriate safety equipment (eye protection, dust mask).
- Ensure the work area is clean and well-lit.
- Verify the battery is securely engaged in the handle.
Show more Show less
Specs in practice
- Max Torque (230Nm)
- The maximum rotational force the tool can apply to a fastener.
- No-load Speed (1200-3200 RPM)
- The rotational speed of the drive without any resistance, adjustable via 4 settings.
- Impact Rate (1400-4000 IPM)
- The frequency of hammer blows per minute, which increases with speed settings.
Images and diagrams
- The Electronic Clutch Control Panel on the base allows cycling through 4 speed settings.
- The Directional Switch serves as both a forward/reverse selector and a trigger lock when in the center position.
Model compatibility
- Use only the charger specified by the manufacturer.
- Do not use batteries other than those specified for this tool.

Manual page author
Emily Carter
User documentation editor