Tools / Drills
User Manual for Ronix 2106B and 2106C Electric Drill
Quick guide for the Ronix 2106B and 2106C electric drill. Learn how to install drill bits, operate the switch, perform maintenance, and follow safety guidelines.
Quick answers from the manual
Quick answer
- This manual covers the operation and maintenance of the Ronix 2106B (keyed chuck) and 2106C (keyless chuck) electric drills. p. 1, 2
Key actions
- Installing a drill bit (2106B) p. 6
- Installing a drill bit (2106C) p. 7
First start
- Check switch trigger p. 7
Show 4 more answers Show less
Problems and fixes
Carbon brushes worn out
Replace both brushes if they are burned, broken, or shorter than 5mm.
p. 8Maintenance and reset
- Run tool after brush replacement p. 8
Technical specifications
| Parameter | Value | Meaning | Pages |
|---|---|---|---|
| Power | 400W | Motor power | p. 2 |
Where to find it in the PDF
- Technical Specifications p. 2
- Operation p. 6, 7
Table of contents
Manual images
Click an image to enlargeQuick guide from the manual
This manual provides essential operating and safety instructions for the Ronix 2106B (keyed chuck) and 2106C (keyless chuck) electric drills. Always ensure the tool is unplugged before performing any adjustments, such as changing drill bits or maintenance. Wear appropriate personal protective equipment, including eye protection, when operating the tool.
Technical Specifications
The Ronix 2106B electric drill features a 400W motor with a no-load speed of 0-3800 RPM. It is designed for drilling in wood (up to 25mm) and steel (up to 6.5mm). The tool weighs 1kg and operates on 220-240V power.
Part List
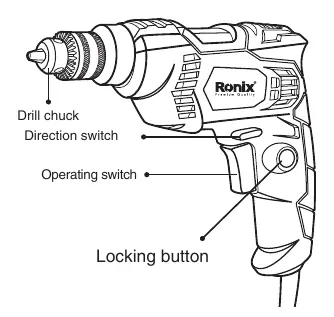
The drill consists of the following main components: drill chuck, direction switch, operating switch, and a locking button for continuous operation.
Safety Instructions
Work Area Safety: Keep the work area clean and well-lit. Do not operate power tools in explosive atmospheres, such as near flammable liquids, gases, or dust.
Electric Safety: Ensure the power plug matches the outlet. Do not modify the plug. Avoid body contact with earthed surfaces like pipes or radiators. Do not expose the tool to rain or wet conditions.
Personal Safety: Stay alert and use common sense. Wear personal protective equipment. Ensure the switch is in the OFF position before connecting to a power source. Remove any adjusting keys or wrenches before turning the tool on.
Operation
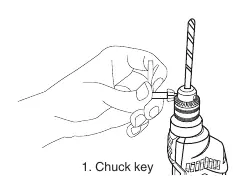
Installing or Removing Drill Bit (Model 2106B - Keyed Chuck): Place the bit in the chuck as far as it will go. Tighten the chuck by hand. Insert the chuck key into each of the three holes and tighten clockwise, ensuring all three are tightened evenly. To remove, turn the chuck key counterclockwise in one hole, then loosen by hand.
Installing or Removing Drill Bit (Model 2106C - Keyless Chuck): Loosen the chuck by hand and insert the bit as far as it will go. Tighten the chuck by hand. To secure the bit, hold the chuck and switch on the machine for a few seconds.
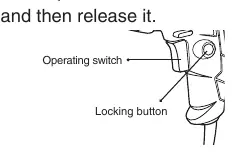
Switch Action: Pull the switch trigger to start the tool. Release the trigger to stop. For continuous operation, pull the trigger and push in the locking button. To stop from the locked position, pull the trigger fully and release.
Drilling Operation
When drilling in wood, use bits equipped with a guide screw for better results. To prevent the bit from slipping, create an indentation with a center-punch and hammer before starting. Drill metals dry, except for iron and brass.
Service and Maintenance
Always disconnect the tool before inspection or cleaning. Clean the tool by brushing it; do not use water or liquids. Regularly clean the air vents to prevent overheating. Replace carbon brushes if they are worn out (shorter than 5mm), burned, or broken. Always replace both brushes at the same time using original parts from a Ronix service center.
Manufacturer information
Ronix Tools
Practical help
Common problems
Tool does not run or sparks too much
Check carbon brushes. If they are worn out (shorter than 5mm), broken, or burned, replace both at the same time at a Ronix service center.
Bit slips when starting a hole
Make an indentation with a center-punch and hammer at the drilling point before starting.
Before use
- Ensure the switch is in the OFF position before plugging in.
- Check that the drill bit is correctly and securely fixed in the chuck.
- Ensure the work area is clean and well-lit.
- Wear personal protective equipment (eye protection, dust mask).
- Check the cable for damage.
Show more Show less
Specs in practice
- Max Capacity in Steel
- 6.5mm maximum drilling diameter.
Images and diagrams
- The drill features a drill chuck, direction switch, operating switch, and a locking button for continuous operation.
Model compatibility
- Model 2106B uses a keyed chuck.
- Model 2106C uses a keyless chuck.

Manual page author
David Miller
Documentation analyst