Tools / Measuring Tools
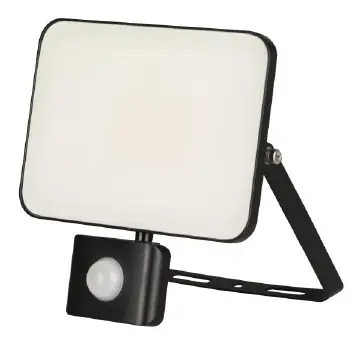
User Manual for RS PRO iSpot II 10W PIR LED Floodlight
Quick guide for the RS PRO iSpot II 10W PIR LED Floodlight. Includes installation height, PIR sensor settings (lux, time, range), and technical specifications.
Table of contents
Quick guide from the manual
The RS PRO iSpot II 10W PIR LED Floodlight is designed for residential applications, including houses, driveways, and patios. This guide provides essential configuration and installation parameters for the unit.
Installation
The unit features an extra-long angled mounting bracket that allows for full rotation. For optimal performance, adhere to the following installation guidelines:
- Recommended Installation Height: 1.8m to 3m.
- Electrical Safety: This is a Class I device and must be earthed.
- Power Supply: 220-240V, 50-60Hz.
PIR Sensor Settings
The PIR sensor is fully adjustable to suit your environment. You can configure the following settings:
- Lux Settings: 2 to 2000 lux (controls ambient light level for activation).
- Time Delay Settings: 10 seconds to 8 minutes.
- Detection Range: 8 meters maximum.
Technical Specifications
- Power: 10W
- Colour Temperature: 4000K (Cool White)
- Luminous Flux: 1050lm
- IP Rating: IP65 (protected against dust and low-pressure water jets)
- IK Rating: IK04
- Operating Temperature: -10°C to +40°C
- Dimmable: No
Safety and Maintenance
The unit is constructed with a die-cast aluminium body and a toughened glass lens. It is maintenance-free regarding the light source, as the LED is non-replaceable. Ensure the unit is installed in a location that complies with its IP65 rating to maintain protection against environmental elements.
Manufacturer information
RS PRO
Practical help
Common problems
Light does not activate
Check if the lux setting is too high for the current ambient light or if the PIR sensor is obstructed.
Light stays on constantly
Ensure the time delay setting is not set to the maximum duration and check for moving objects within the detection range.
Before use
- Verify the power supply is 220-240V.
- Ensure the mounting surface is stable and suitable for the bracket.
- Confirm the installation height is between 1.8m and 3m.
- Ensure the earth connection is properly secured (Class I device).
- Check that the PIR sensor has a clear line of sight to the area to be monitored.
Specs in practice
- Lux Settings
- Determines the ambient light level at which the sensor will trigger the light (2-2000 lux).
Images and diagrams
- The unit includes an adjustable bracket for rotational positioning.
- The PIR sensor is located at the bottom of the floodlight housing.
Model compatibility
- Not dimmable.
- Non-replaceable LED light source.
- Must be earthed.

Manual page author
Michael Turner
Technical manual editor
Reviews PDF manuals for structure, safety notes, and practical product details so readers can find the right information quickly.