Electronics / Cable Management
User Manual for RS PRO RSiLDM-150H Laser Distance Meter
Quick guide for the RS PRO RSiLDM-150H Laser Distance Meter. Includes setup, measurement modes, Bluetooth connectivity, troubleshooting, and technical specifications.
Table of contents
Manual images
Click an image to enlargeQuick guide from the manual
The RS PRO RSiLDM-150H is a compact laser distance meter designed for indoor applications. It features various calculation modes, Bluetooth connectivity, and a tilt sensor. Always ensure the laser is not aimed at people or into the sun. Use alkaline batteries and remove them if the device will not be used for a long period.
Device Overview
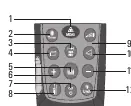
The device features a keypad for operation and an LCD display for results. Key buttons include ON/MEAS, Bluetooth/Timer, Area/Volume, Storage, Plus/Minus, Clear/Off, Reference, Tilt/Stake out, Indirect measurement, and Illuminating/UNITS.
Initial Operation and Setting
- Switching On/Off: Press the ON/MEAS button to turn on. Hold the Clear/Off button to turn off. The device auto-powers off after 3 minutes of inactivity.
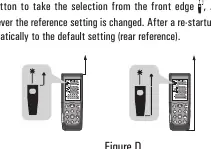
- Reference Setting: The default reference is the rear of the instrument. Press the Reference button to switch to the front edge.
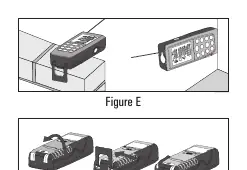
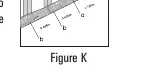
- Multifunctional End Piece: Fold out the positioning bracket for measurements from edges or corners.
- Units: Hold the Illuminating/UNITS button to cycle through distance, area, and volume units.
Measuring Functions
Single and Continuous Measurement
Press ON/MEAS to activate the laser and trigger a single measurement. For continuous measurement (tracking), press the Single/Continuous button until the indicator appears. The device updates the value approximately every 0.5 seconds.
Area and Volume
Press the Area/Volume button once for Area (length x width) or twice for Volume (length x width x height). Follow the on-screen prompts to measure each dimension.
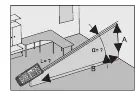
Indirect Measurement
Use the Indirect measurement button to calculate distances using 2 or 3 auxiliary measurements (Pythagorean theorem). Keep the instrument as horizontal as possible during these measurements.
Stake Out Function
Enter two distances (a and b) to mark off defined lengths. The device will beep when you are within 0.1m of the target distance.
Tilt Measurement
Press the Tilt button to activate the sensor. The device measures tilts up to ±90 degrees. Ensure the device is held without transverse tilt (±10 degrees).
Bluetooth and Timer
Hold the Bluetooth/Timer button to enable Bluetooth. Connect via the Meterbox app. If prompted for a PIN, enter 0000. Use the same button to set a self-triggering timer (up to 60 seconds).
Troubleshooting
If an error code appears, refer to the following:
- 204: Calculation error. Repeat the procedure.
- 208: Signal too weak. Use a target plate.
- 209: Signal too strong. Target is too reflective; use a target plate.
- 252: Temperature too high. Cool down the instrument.
- 253: Temperature too low. Warm up the instrument.
- 255: Hardware error. Restart the device.
Technical Data
- Range: 0.05 to 70m
- Accuracy: Typically ±1.5mm
- Laser Class: Class II
- Protection: IP54 (Dust/Splash proof)
- Memory: 20 records
Manufacturer information
RS PRO
Practical help
Common problems
Calculation error (Code 204)
Repeat the measurement procedure.
Signal too weak (Code 208)
The measurement time is too long or distance > 50m. Use a target plate.
Signal too strong (Code 209)
Target is too reflective. Use a target plate.
Temperature too high/low (Code 252/253)
Cool down or warm up the instrument to operating temperature (0°C to 40°C).
Hardware error (Code 255)
Switch the device on and off several times. If the error persists, contact your dealer.
Before use
- Insert 2x AA alkaline batteries observing correct polarity.
- Ensure the target surface is not colorless liquid, glass, or Styrofoam, as these may cause errors.
- Use a target plate for daylight measurements or poor reflection surfaces.
- Ensure the device is within the operating temperature range (0°C to 40°C).
- Check that the reference level (front/rear/tripod) is set correctly for your measurement.
Images and diagrams
- Figure A: Battery compartment location and polarity.
- Figure B: Keypad layout for all functions.
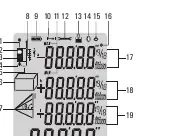
- Figure C: LCD display icons including reference levels and measurement modes.
- Figure D: Setting the reference level (front vs rear).
- Figure E/F: Using the multifunctional end piece for edges and corners.
Model compatibility
- Bluetooth 4.0 (10m range)
- Compatible with Meterbox APP
- Supports Apple iPod/iPhone
- Supports SPP (Serial Port Profile)

Manual page author
David Miller
Documentation analyst
Organizes user manual content into clear summaries, with attention to model details, product context, and everyday usability.