Garden / Brushcutters & Trimmers
Operator's Manual for Ryobi 2-Cycle String Trimmer
Comprehensive operator's manual for the Ryobi 2-Cycle 25cc String Trimmer. Includes detailed instructions for assembly, fuel mixing, safe operation, maintenance, and troubleshooting.
Quick answers from the manual
Quick answer
- The Ryobi 2-Cycle String Trimmer requires a 50:1 fuel-to-oil mixture. To start, prime the bulb 10 times, set the choke to Position 1, squeeze the throttle, and pull the starter rope 5 times. Then, move the choke to Position 2 and pull 5-10 times to start. p. 18, 20
Key actions
- Mix fuel at a 50:1 ratio p. 18
- Clean the air filter p. 25
First start
- Prime the bulb 10 times, set choke to Pos 1, squeeze throttle, pull 5 times. Move choke to Pos 2, pull 5-10 times to start. p. 20
Problems and fixes
Engine will not start
Fill fuel tank, press primer bulb 10 times, or replace spark plug.
p. 29Technical specifications
| Parameter | Value | Meaning | Pages |
|---|---|---|---|
| Engine Type | Air-Cooled, 2-Cycle | 25 cc displacement | p. 12 |
Where to find it in the PDF
- Assembly p. 12, 13, 14, 15
- Maintenance p. 25, 26, 27
Table of contents
Manual images
Click an image to enlargeQuick guide from the manual
This manual provides essential instructions for the safe and efficient operation of your Ryobi 2-Cycle String Trimmer. Key points include:
- Fuel Mixing: Use a 50:1 gasoline-to-oil ratio. Always use fresh, clean unleaded gasoline and 2-cycle oil.
- Starting Procedure: Prime the bulb 10 times, set the choke to Position 1, squeeze the throttle, and pull the starter rope 5 times. Move the choke to Position 2 and pull 5-10 times to start.
- Safety: Always wear eye, hearing, hand, and foot protection. Keep bystanders at least 50 feet (15 m) away.
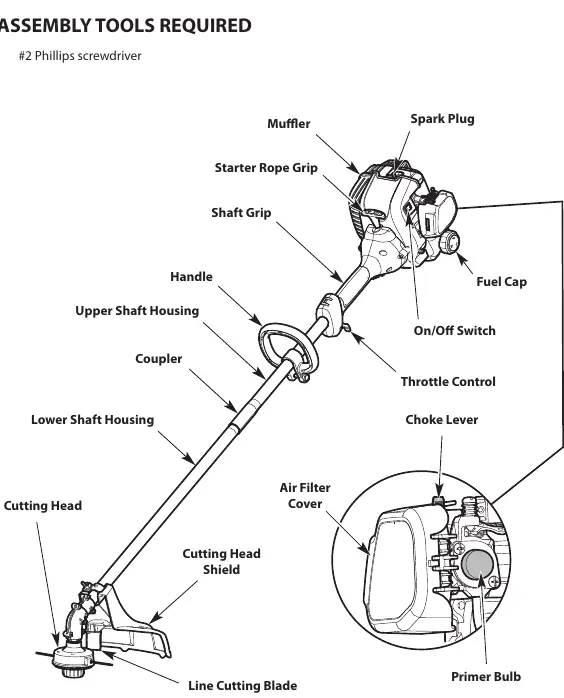
Know Your Unit
Familiarize yourself with the main components of your trimmer, including the cutting head, shaft housing, handle, throttle control, choke lever, and primer bulb. Refer to the diagram on page 11 for specific part identification.
Assembly
Follow these steps to prepare your unit for use:
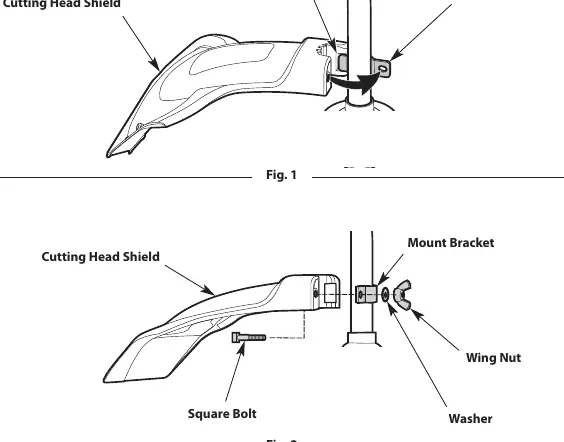
- Cutting Head Shield: Install the shield using the provided wing nut, washer, and bolt. Ensure it is firmly in place before operation.
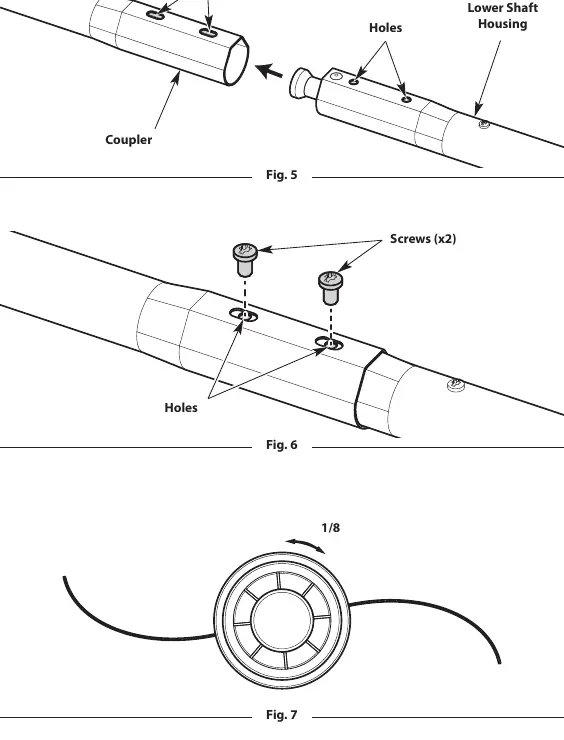
- Shaft Connection: Connect the upper and lower shaft housings by aligning the holes and securing them with the provided screws using a #2 Phillips screwdriver.
- Handle Adjustment: Attach the handle to the upper shaft and adjust it to a comfortable operating position, ensuring it is positioned beyond the safety label.
Oil and Fuel
Proper fuel mixture is critical for engine performance. Use a 50:1 ratio (1 gallon of unleaded gasoline to 2.6 fl. oz. of 2-cycle oil). Do not use E85 fuel, as it will damage the engine and void the warranty.
Operation
Hold the unit with both hands at waist level, keeping the cutting head a few inches above the ground. For units with bump heads, tap the bump knob on the ground while operating at high speed to release more trimming line.

Maintenance
Regular maintenance ensures longevity and performance:


- Air Filter: Clean and re-oil every 10 hours of use.
- Spark Plug: Check condition and gap (0.025 in. / 0.635 mm) every 25 hours.
- Idle Speed: If the engine does not idle properly, adjust the idle speed screw clockwise in 1/8 turn increments.
Troubleshooting
If the engine fails to start, check if the fuel tank is empty, press the primer bulb 10 times, or check for a fouled spark plug. If the cutting head fails to advance line, clean the head or refill with new line.
Manufacturer information
Ryobi
Practical help
Common problems
Engine will not start
Check if fuel tank is empty, press primer bulb 10 times, check if engine is flooded, or replace fouled spark plug.
Engine will not idle
Clean or replace air filter, check fuel quality, or adjust idle speed.
Cutting head will not advance line
Clean cutting head, refill with new line, or rewind line if twisted.
Before use
- Check for damaged parts and fuel leaks
- Ensure all guards and safety attachments are installed
- Mix fuel at 50:1 ratio
- Wear safety glasses, hearing protection, and heavy-duty footwear
Specs in practice
- Fuel/Oil Ratio
- 50:1 (1 gallon unleaded gasoline to 2.6 fl. oz. 2-cycle oil)
- Spark Plug Gap
- 0.025 in. (0.635 mm)
- Cutting Path Diameter
- 16 in. (40.6 cm) for bump head; 14 in. (35.6 cm) for fixed-line head
Images and diagrams
- Figure 11: On/Off switch operation
- Figure 13: Choke lever positions
- Figure 18: Air filter access
Model compatibility
- Use only 2-cycle oil designed for air-cooled engines
- Do not use E85 fuel

Manual page author
David Miller
Documentation analyst
Organizes user manual content into clear summaries, with attention to model details, product context, and everyday usability.