Tools / Drills
Operator's Manual for Ryobi P201 18V 2-Speed Drill-Driver
Comprehensive operator's manual for the Ryobi P201 18V 2-Speed Drill-Driver. Includes instructions for battery charging, drilling, driving, bit changes, and maintenance.
Quick answers from the manual
Quick answer
- The Ryobi P201 is an 18V 2-speed drill-driver. To operate, insert a charged battery, select the direction of rotation, choose the speed (1 or 2), and set the mode (Drill or Drive). p. 8, 9, 11
Key actions
- Charging the battery p. 11
- Changing drill bits p. 14, 15
First start
- Charge the battery fully until the green LED on the charger turns on. Insert the battery into the tool, ensuring latches snap into place. p. 11, 12
Problems and fixes
Drill stalls or jams
Stop the tool immediately, remove the bit from the workpiece, and determine the reason for jamming.
p. 18Maintenance and reset
- Retightening a loose chuck p. 20
Technical specifications
| Parameter | Value | Meaning | Pages |
|---|---|---|---|
| Motor | 18 Volt DC | Operating voltage | p. 8 |
| Torque | Maximum 330 in.lb. | Maximum twisting force | p. 8 |
Where to find it in the PDF
- Features p. 8, 9
- Operation p. 11, 18
- Maintenance p. 19, 20
Table of contents
Manual images
Click an image to enlargeQuick Guide
Before using your Ryobi P201 drill-driver, ensure you have read all safety instructions. Always wear eye protection. The tool is shipped with a low battery charge; charge the battery fully until the green LED on the charger turns on before first use. Always lock the trigger (center position) when not in use or when changing bits.
Product Overview
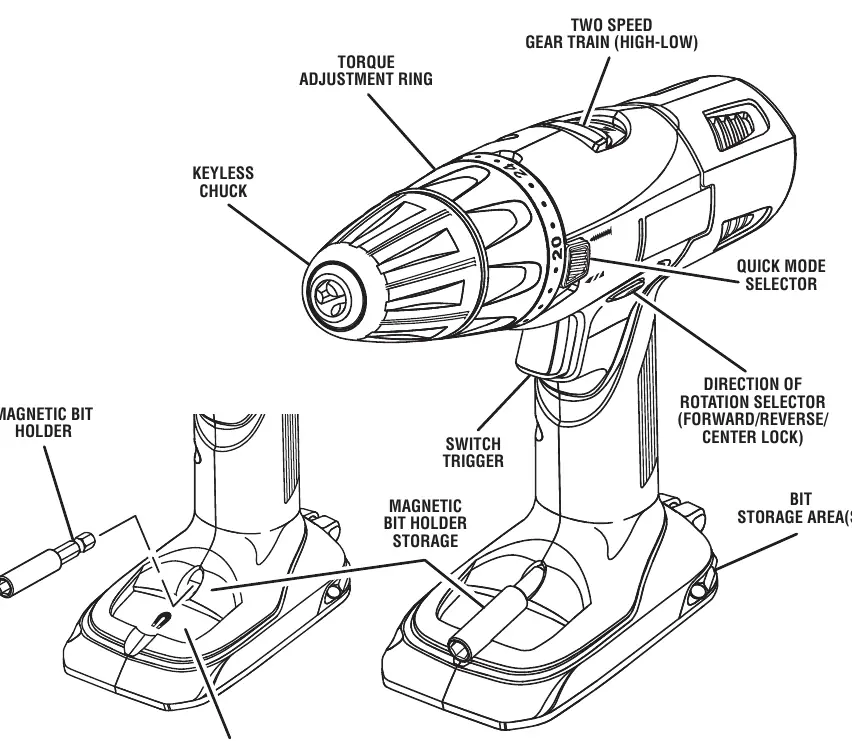
The P201 is an 18V 2-speed drill-driver featuring a keyless chuck, a 24-position torque adjustment ring, and a variable speed trigger. It includes a magnetic bit holder and a Mag Tray for storing small parts.
Operation
Battery Charging
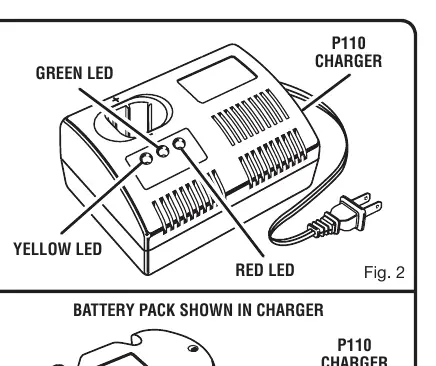
Use only the specified Ryobi charger (P110). Align the raised rib on the battery pack with the groove in the charger. A red LED indicates fast charging; a green LED indicates the battery is fully charged and in maintenance mode. If both yellow and green LEDs are lit, the battery may be deeply discharged or defective.
Drilling and Driving
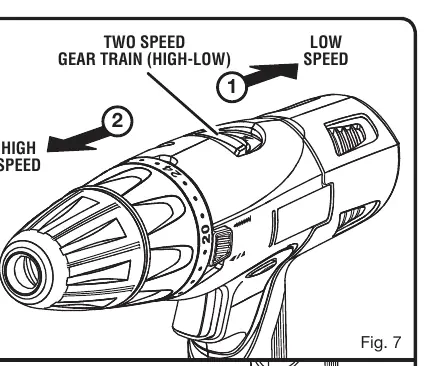
- Speed Selection: Use the slide switch on top of the drill to select LOW (1) for high power/torque or HIGH (2) for fast drilling/driving.
- Mode Selection: Use the Quick Mode Selector to switch between Drill Mode (torque adjustment inactive) and Drive Mode (torque adjustment active).
- Torque Adjustment: In Drive Mode, rotate the torque adjustment ring to select the appropriate torque for the screw size and material to prevent damage.
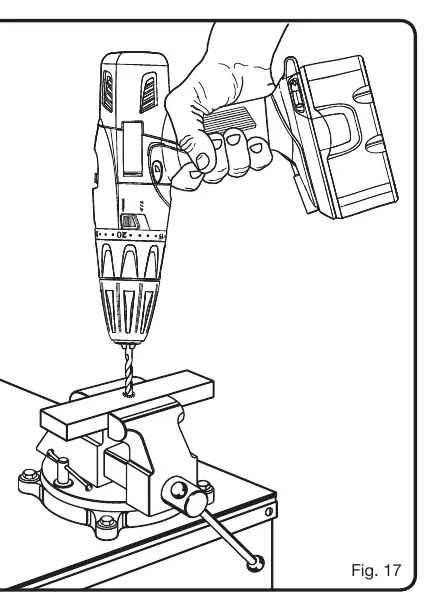
- Drilling: Secure the workpiece with clamps. Use a center punch on hard surfaces to prevent the bit from slipping.
Bit Changes
To install or remove bits, lock the trigger by placing the direction selector in the center position. Open the keyless chuck by rotating the chuck body, insert or remove the bit, and tighten the chuck securely by hand.
Maintenance
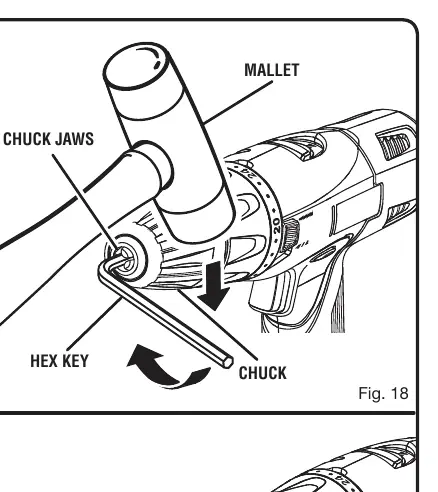
Keep the tool clean and free of oil or grease. Do not use solvents on plastic parts. If the chuck becomes loose or wobbles, it can be retightened using a hex key and a mallet as described in the maintenance section. For battery storage longer than 30 days, store in a discharged condition in a cool, dry place.
Manufacturer information
Ryobi
Practical help
Common problems
Drill will not start
Ensure the battery is fully charged and the direction of rotation selector is not in the center (locked) position.
Battery not charging
Check that the charger is plugged into a live outlet. If yellow and green LEDs are lit, the battery may be deeply discharged or defective; leave in charger for 15-30 minutes to see if it recovers.
Chuck is loose or wobbling
Follow the 'To Retighten a Loose Chuck' procedure in the maintenance section using a hex key and mallet.
Drill stalls during use
Stop the tool immediately, remove the bit from the workpiece, and determine the cause of the jam.
Before use
- Wear safety goggles or glasses with side shields.
- Ensure the battery pack is fully charged.
- Check that the direction of rotation selector is set to the desired direction (not center lock).
- Ensure the drill bit is securely tightened in the chuck.
- Verify the speed (1 or 2) and mode (Drill or Drive) are appropriate for the task.
Specs in practice
- 0-440/0-1,600/min
- The no-load speed ranges for low (1) and high (2) gear settings.
- 120 V, 60 Hz, AC only
- The required power input for the battery charger.
Images and diagrams
- Fig 1: Overview of drill features including chuck, torque ring, and speed selector.
- Fig 2-3: Battery charging process and LED indicators.
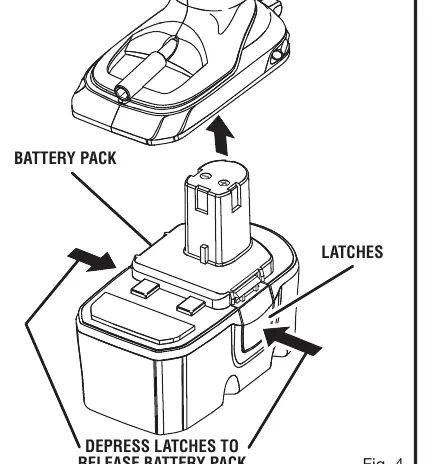
- Fig 4: How to install and remove the battery pack.
- Fig 17: Proper drilling technique with a vise.
Model compatibility
- Use only with Ryobi P100 battery pack.
- Use only with Ryobi P110 charger.

Manual page author
David Miller
Documentation analyst
Organizes user manual content into clear summaries, with attention to model details, product context, and everyday usability.