Power / Power Inverters
User Manual for Ryobi RYi1030A and RYi120A Power Inverters
Comprehensive user guide for Ryobi RYi1030A (1,000W) and RYi120A (120W) power inverters. Includes setup, battery connection, operation, maintenance, and troubleshooting steps.
Quick answers from the manual
Quick answer
- To turn on the Ryobi power inverter, press and hold the power button for 1.5 seconds. The LED will light up green when ready. p. 1, 3
Key actions
- Connect to 18V battery p. 1, 3
- Connect to 12V auto outlet p. 1, 3
- Replace fuse p. 1, 3
First start
- Ensure the inverter is off, connect the power source (battery or 12V outlet), then press and hold the power button for 1.5 seconds. p. 1, 3
Problems and fixes
LED blinks red then turns off
Overload. Disconnect device, check battery, and restart.
p. 1, 3
LED is solid red
Overheated. Allow unit to cool.
p. 1, 3Maintenance and reset
- Replace the 12A glass fuse if blown. p. 1, 3
Technical specifications
| Parameter | Value | Meaning | Pages |
|---|---|---|---|
| Total Power Output (RYi1030A) | 1,000 Watts Max | Continuous power output. | p. 1 |
| Total Power Output (RYi120A) | 120 Watts | Continuous power output. | p. 3 |
Where to find it in the PDF
- RYi1030A Manual (English) p. 1
- RYi120A Manual (English) p. 3
Table of contents
Manual images
Click an image to enlargeQuick guide from the manual
This document provides operating instructions for the Ryobi RYi1030A (1,000W) and RYi120A (120W) power inverters. To turn the inverter on, press and hold the power button for 1.5 seconds. The LED will light up green when ready. Always ensure the inverter is turned off before connecting or disconnecting power sources or devices.
Product overview
These power inverters convert low-voltage DC electricity (from an 18V battery or 12V auto outlet) into 120V AC household power. They are designed for charging and operating USB-powered devices, lighting, small appliances, and tools within the rated wattage capacity.
Safety instructions
- Do not use with life support devices or medical equipment.
- Do not hard-wire this unit into a circuit or AC distribution circuit.
- Do not block air vents; the unit will automatically shut off if overheated.
- Do not use in enclosed areas with automotive lead-acid batteries.
- Do not expose to rain or damp locations.
- Use only the power cord provided and batteries/chargers listed in the tool correlation supplement.
Installation and mounting
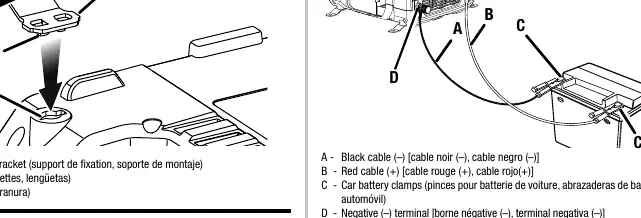
The RYi1030A model includes mounting brackets for stable placement. To install, insert the tabs into the slot and rotate 90 degrees. The unit can be mounted horizontally or vertically.
Operation
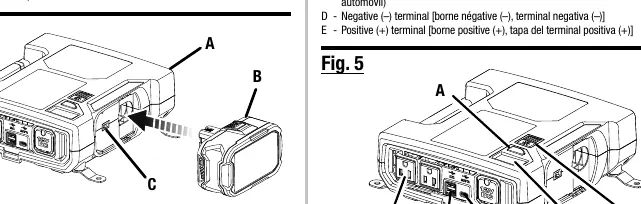
Connecting to an 18V battery
With the inverter turned off, slide the battery pack into the inverter adaptor until it is secured. Ensure the battery is locked in place before operation.
Connecting to a 12V auto accessory outlet
Insert the connector cord plug into the receptacle on the rear of the inverter, then plug the 12V DC plug into the vehicle's accessory outlet. Note that some vehicles require the ignition to be turned on to supply power to the accessory outlet.
Using car battery clamps (RYi1030A only)
Connect the red cable to the positive (+) terminal first, then the black cable to the negative (-) terminal. Ensure all connections are tight before connecting to the inverter.
Maintenance
Always replace the fuse with a 12 Amp fast-blow glass fuse. Never use a higher-rated fuse. To replace: ensure the unit is off, disconnect all devices, unscrew the fuse cover on the 12V plug, remove the fuse cap, replace the blown fuse, and reinstall the cap and cover securely.
Troubleshooting
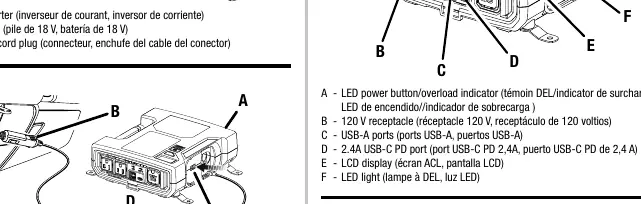
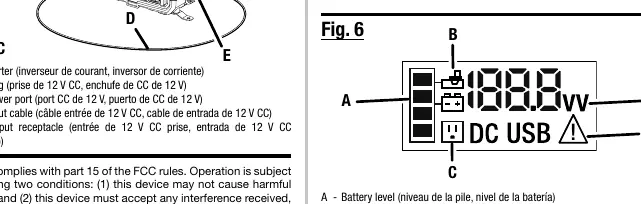
The LED power button serves as an indicator for status and faults:
- Blinking red then off: Overload. Disconnect the device, check battery charge, and restart.
- Solid red: Overheated. Allow the unit to cool until the LED turns green.
- Flashing yellow: Battery pack needs to be recharged.
Manufacturer information
Ryobi
Practical help
Common problems
Inverter LED blinks red then turns off
The unit is overloaded. Disconnect the device, ensure the battery is sufficiently charged, and press the power button to restart.
Inverter LED is solid red
The unit is overheated. Allow the inverter to cool down until the LED turns green before attempting to use it again.
Inverter LED flashes yellow
The battery pack is low and needs to be recharged.
Before use
- Ensure the inverter is turned OFF before connecting to a power source.
- Verify the battery pack is fully charged.
- Check that the device wattage does not exceed the inverter's rated capacity.
- Ensure the 12V DC plug fits firmly into the vehicle's accessory outlet.
- Check that the fuse is intact and properly installed.
Specs in practice
- 12V DC Adaptor
- Allows the inverter to be powered by a vehicle's 12V accessory outlet.
- 18V Battery Connection
- Allows the inverter to be powered by Ryobi 18V battery packs.
- USB-C PD Port
- Provides fast charging for compatible mobile devices (5V, 9V, 12V, 15V, 20V output).
- Modified Sine Wave
- The type of AC output; not recommended for certain sensitive electronics.
Images and diagrams
- Fig 1: Mounting bracket installation for RYi1030A.
- Fig 2: Connecting the inverter to an 18V battery.
- Fig 3: Connecting the inverter to a 12V auto accessory outlet.
- Fig 4: Using car battery clamps to connect to a 12V battery.
- Fig 7: Fuse replacement procedure.
Model compatibility
- Compatible with 12V lead-acid, lithium-ion, and deep-cycle gel batteries.
- Not recommended for sensitive electronics due to modified sine wave output.
- Do not use with cigarette lighter outlets if the adapter does not fit firmly.

Manual page author
Emily Carter
User documentation editor
Prepares concise manual descriptions and highlights the most useful setup, operation, and maintenance information for readers.