Electronics / Monitors
User Manual for Samsung 150S/170S/190S LCD Monitors
Quick guide for Samsung 150S, 170S, and 190S LCD monitors. Includes setup, driver installation, OSD controls, troubleshooting, and technical specifications.
Table of contents
Manual images
Click an image to enlargeQuick guide from the manual
This manual provides essential information for setting up and operating your Samsung 150S, 170S, or 190S LCD monitor. Key procedures include connecting the monitor to your computer, installing the necessary drivers for your operating system, and adjusting display settings via the On-Screen Display (OSD) menu. If you encounter issues, refer to the troubleshooting section for common solutions.
Safety Instructions
Follow these safety guidelines to prevent damage to the equipment or personal injury:
- Power: Use only a properly grounded plug and receptacle. Do not use damaged plugs or cords. Disconnect the plug during storms or if the monitor will not be used for an extended period.
- Installation: Place the monitor on a flat, stable surface. Do not cover the ventilation vents. Keep the monitor away from high humidity and dust.
- Cleaning: Wipe the case and screen with a slightly moistened, soft fabric. Do not spray detergent directly on the monitor.
- Handling: Do not remove the back cover; there are no user-serviceable parts inside. Do not insert metallic objects into the openings.
Introduction
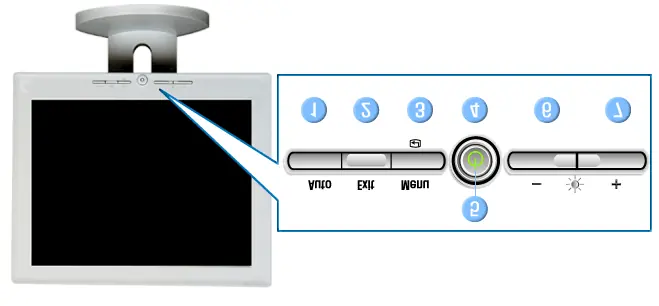
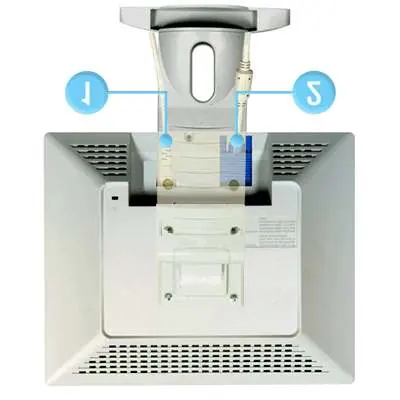
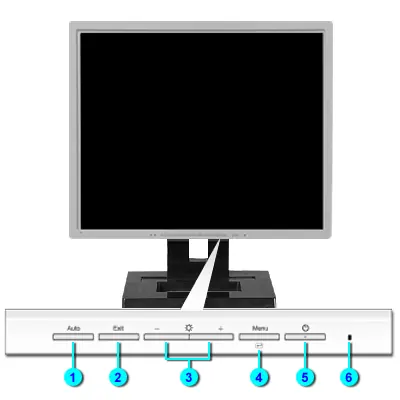
Ensure all items are included in the package: monitor, stand, power cord, signal cable, and the User's Guide/Driver Installation CD. The front panel features buttons for Auto adjustment, Exit, Menu, Power, and brightness/menu navigation. The rear panel contains the power port and signal cable connection.
Setup
To set up your monitor:
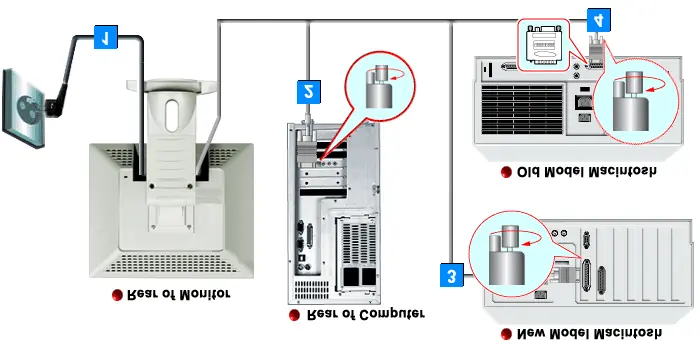
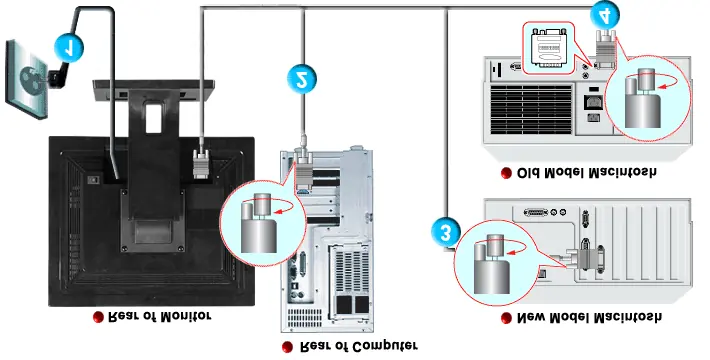
- Connect the power cord to the monitor and a nearby outlet.
- Connect the signal cable to the 15-pin D-sub connector on the back of the monitor and your computer's video port.
- For Macintosh computers, use the appropriate adapter if required.
- Turn on the computer and the monitor.
- Install the monitor driver from the provided CD when prompted by your operating system (Windows 95/98/ME/2000/XP).
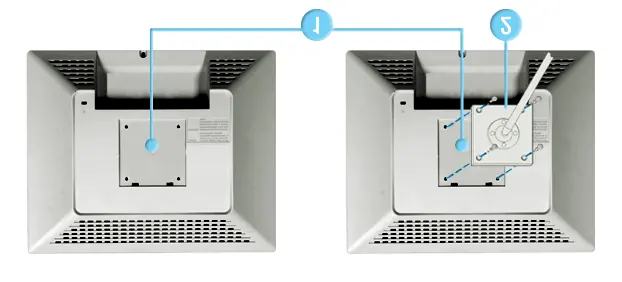
VESA Mounting: To install a VESA-compliant mount, turn off the monitor, lay it face-down on a cushioned surface, remove the four screws, and detach the stand. Align the mounting interface pad with the holes on the rear cover and secure it with the screws provided with your mounting hardware.
On-Screen Display (OSD)
Use the buttons on the front panel to navigate the OSD menu. The Menu button opens the OSD and selects items. The Adjust buttons (+/-) highlight and change settings. The Auto button provides direct access to auto-adjustment features.
Troubleshooting
If you experience issues, check the following:
- No image: Ensure the power cord is connected, the signal cable is secure, and the monitor is not in PowerSaver mode.
- Video mode not supported: Adjust the resolution and frequency of your video card to match the monitor's specifications.
- Strange colors: Check the signal cable connection and ensure the video card is fully inserted.
- OSD locked: Press the MENU button for at least 5 seconds to unlock.
Specifications
The monitor features a PowerSaver system that reduces energy consumption when the monitor is inactive. Refer to the Preset Timing Modes table in the manual to ensure your computer's output matches the monitor's supported resolutions and frequencies.
Manufacturer information
Samsung Electronics
Practical help
Common problems
No image on screen
Check power cord connection, signal cable connection, or if the monitor is in PowerSaver mode (move mouse or press a key).
Video mode not supported
The signal from the video card exceeds the maximum resolution/frequency. Adjust settings in your computer's display properties.
Strange colors or black and white screen
Check the signal cable connection and ensure the video card is fully inserted in its slot.
OSD menu cannot be adjusted
The OSD may be locked. Press the MENU button for at least 5 seconds to unlock it.
Before use
- Verify all items are included: Monitor, Stand, Power Cord, Signal Cable, CD.
- Place the monitor on a flat, stable surface.
- Ensure the power source is properly grounded.
- Check that the video card is fully inserted in its slot.
- Have a blank disk ready if downloading drivers from the website.
Show more Show less
Specs in practice
- Horizontal Frequency
- The time to scan one line connecting the right edge to the left edge of the screen (kHz).
- Vertical Frequency
- The refresh rate or frequency of image repetition per second (Hz).
Images and diagrams
- Front Panel: Buttons for Auto, Exit, Menu, Power, and Adjustments.
- Rear Panel: Power port, Signal port, and Multimedia stand power port.
- VESA Mounting: Instructions for removing the base and attaching a wall mount.
Model compatibility
- Supports Windows 95, 98, ME, 2000, and XP.
- Requires VESA DPMS compliant video card for PowerSaver functionality.
- 150S supports 75x75mm VESA mount.
- 170S/190S supports 100x100mm VESA mount.

Manual page author
Michael Turner
Technical manual editor