Computers / Storage
Installation Guide for Samsung 860 PRO SSD
A comprehensive installation guide for the Samsung 860 PRO SSD, covering safety precautions, notebook and desktop installation procedures, BIOS configuration, and OS setup.
Quick answers from the manual
Quick answer
- To install your Samsung SSD, back up your data, power off the computer, and physically mount the drive in your notebook or desktop. Afterward, enter the BIOS to ensure the drive is detected and set to AHCI mode for optimal performance. p. 3, 5, 9, 12
Key actions
- Back up data and power off the computer. p. 3
- Install SSD in notebook: remove battery, swap drive, secure with screws. p. 5, 6, 7, 8
- Install SSD in desktop: mount in bracket, slide into bay, connect cables. p. 9, 10, 11
First start
- Enter BIOS setup (ESC, F2, F10, or DELETE) and ensure the drive is detected. p. 12
- Enable AHCI mode in Advanced Options for optimal performance. p. 12
Problems and fixes
SSD not detected
Check BIOS settings and ensure Auto detection is enabled or use User Define Mode.
p. 12Where to find it in the PDF
- Notebook Installation p. 5, 6, 7, 8
- Desktop Installation p. 9, 10, 11
- BIOS Configuration p. 12, 13, 14, 15
Table of contents
Manual images
Click an image to enlargeQuick Guide from the Manual
This guide provides essential steps for installing a Samsung SSD. Before beginning, ensure you have a screwdriver and have backed up all critical data. The process involves physical installation in your computer (notebook or desktop) followed by BIOS configuration to ensure the drive is recognized and optimized.
Safety Precautions
- Back up all data: Always create a backup of your computer's data to an external drive or cloud storage before starting.
- Static Electricity: Discharge static electricity by touching an unpainted metal surface of the drive before handling it.
- Power Off: Shut down the computer completely. If unsure, turn it on and shut it down through the operating system.
- Disconnect: Unplug all cables and external hardware devices.
- Warranty Warning: Disassembling the computer may void the manufacturer's warranty; check your computer's documentation first.
Notebook PC Installation

- Turn the computer upside down on a flat, stable surface.
- Remove the battery according to your computer's user guide.
- Locate the current drive, remove the screws from the HDD cover, and slide the cover off.
- Remove the screws holding the HDD in the bay, pull the tab to disconnect, and lift the drive out.
- Disconnect any cables attached to the old drive.
- Detach the spacer brackets or panels from the old HDD and attach them to the new Samsung SSD.
- Secure the SSD in the brackets using M3.0 screws or the original screws.
- Connect the cables to the new SSD, insert it into the bay, and secure it.
- Replace the HDD cover, screws, and battery.
Desktop PC Installation
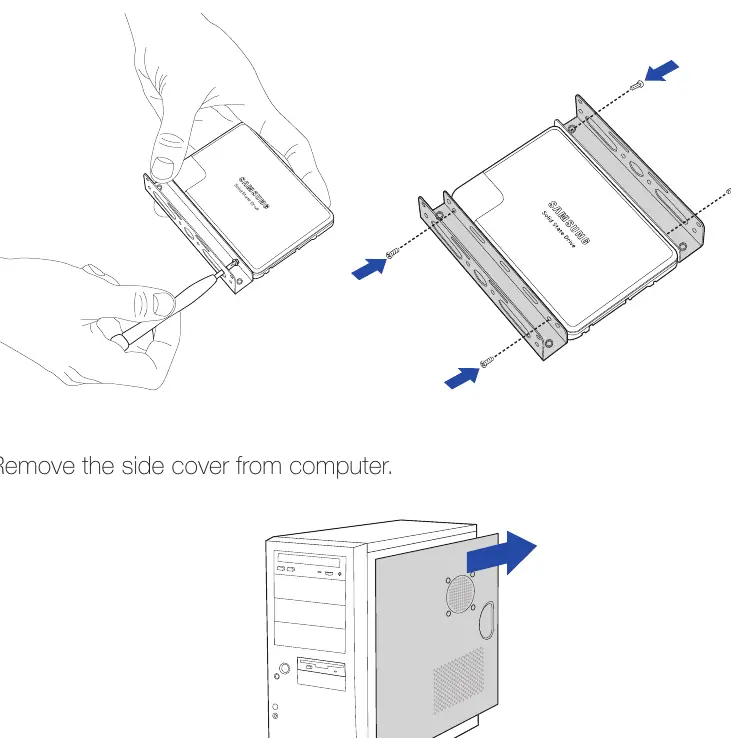
- Attach 3.5-inch brackets (purchased separately) to the SSD and secure with 4 screws.
- Remove the side cover of the computer case.
- Slide the SSD into the drive bay and secure it with 4 screws.
- If replacing an existing HDD, disconnect its cables, remove the screws, and detach it before installing the SSD.
- Connect the SATA interface cable and power cable to the back of the SSD.
- Replace the side cover.
Configuring BIOS
After physical installation, the computer should automatically recognize the SSD. If not, follow these steps:
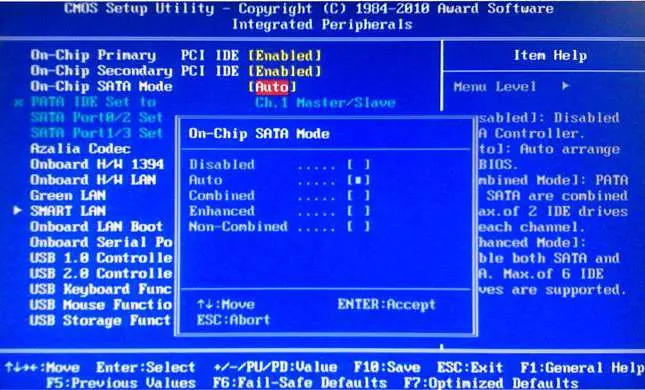
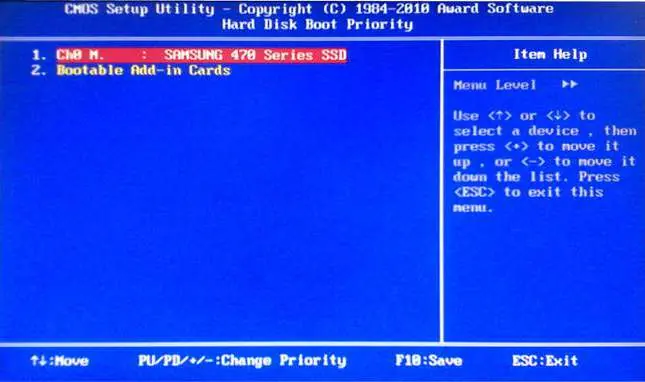
- Restart the computer and enter the BIOS/CMOS setup (usually by pressing ESC, F2, F10, or DELETE during startup).
- Select default settings from the Main menu.
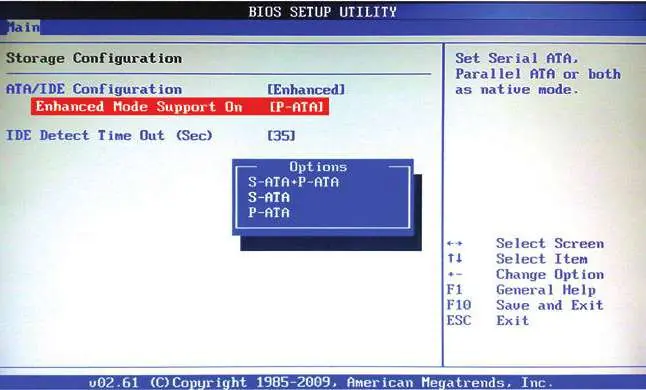
- If the system supports SATA 3Gbps, ensure AHCI mode is enabled in the Advanced Option for optimal performance.
- Save settings and exit the BIOS.
- Restart the computer.
OS Installation
Windows 7 includes the necessary AHCI control driver. For other operating systems, such as Windows XP, you may need to install the AHCI driver during the OS installation process. Visit the official Samsung SSD website for more information.
Manufacturer information
Samsung Electronics
Practical help
Common problems
SSD not detected by the computer
Restart the computer and enter BIOS setup. Ensure the drive is detected in the Main menu or try setting it via 'User Define Mode'.
Performance degradation
Ensure that AHCI mode is enabled in the BIOS Advanced Options. Operating in IDE mode may limit performance.
Before use
- Back up all existing data to an external storage medium.
- Discharge static electricity by touching an unpainted metal surface.
- Shut down the computer completely.
- Disconnect all power cables and external hardware.
- Have a screwdriver ready for installation.
Images and diagrams
- Notebook: Removing the battery and HDD cover.
- Notebook: Disconnecting the HDD and transferring spacer brackets.
- Desktop: Mounting the SSD into a 3.5-inch bracket.
- Desktop: Connecting SATA and power cables.
- BIOS: Navigating to Integrated Peripherals or Storage Configuration.
Model compatibility
- Windows 7 includes AHCI drivers automatically.
- Windows XP requires manual AHCI driver installation during OS setup.
- May not work correctly with previous versions of Mac OS Leopard.

Manual page author
David Miller
Documentation analyst
Organizes user manual content into clear summaries, with attention to model details, product context, and everyday usability.