Electronics / Monitors
User Manual for Samsung SyncMaster 2233BW/2233GW LCD Monitor
Quick guide for the Samsung SyncMaster 2233BW/2233GW LCD monitor, covering setup, cable connections, OSD menu adjustments, software installation, and troubleshooting.
Quick answers from the manual
Quick answer
- To set up your monitor, connect the power and video cables (D-Sub or DVI), install the provided drivers, and adjust your PC resolution to 1680x1050 at 60Hz. p. 10, 15, 18
Key actions
- Unlock OSD menu p. 46
- Run Auto Adjustment p. 31
First start
- Connect cables and set resolution p. 11, 15
Show 4 more answers Show less
Problems and fixes
No image on screen
Check power cord and signal cable connections.
p. 45Maintenance and reset
- Revert to factory defaults p. 41
Technical specifications
| Parameter | Value | Meaning | Pages |
|---|---|---|---|
| Optimum Resolution | 1680 x 1050 @ 60Hz | Recommended resolution for best display quality | p. 50 |
Where to find it in the PDF
- Safety Instructions p. 2, 9
- Connections p. 13, 17
- Adjusting the Monitor p. 31, 43
- Troubleshooting p. 44, 49
- Specifications p. 50, 56
Table of contents
Manual images
Click an image to enlargeQuick guide from the manual
This document provides setup, operation, and troubleshooting instructions for the Samsung SyncMaster 2233BW/2233GW LCD monitor. Ensure you follow all safety instructions provided in the manual to prevent damage or injury.
Package Contents
- Monitor
- Quick Setup Guide
- Warranty Card
- D-Sub cable
- Power cord
- DVI cable (optional)
- Cleaning cloth
- Cable holding ring
Connections
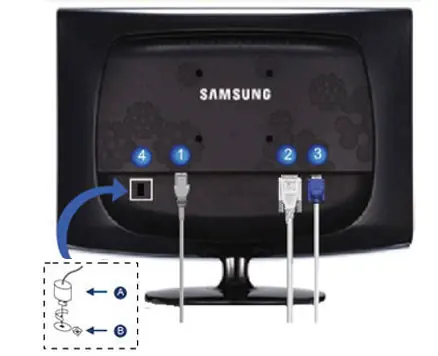
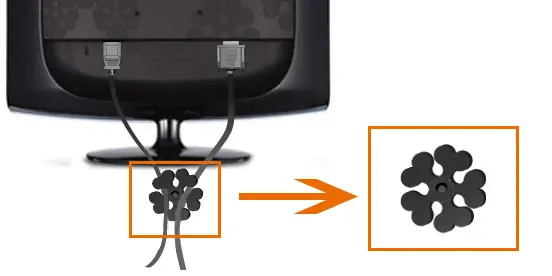
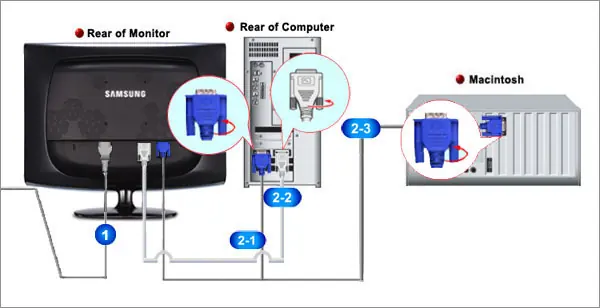
Connect the power cord to the POWER port on the back of the monitor. Connect the video signal cable (D-Sub or DVI) to the corresponding port on the back of the monitor and your computer. Use the cable holding ring to organize cables.
Using the Stand
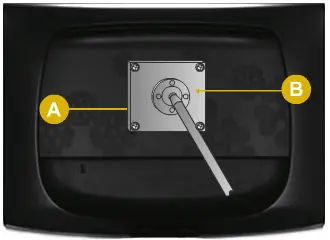
The monitor supports VESA 100mm x 100mm mounting. To attach a base or wall mount, lay the monitor face-down on a cushion, remove the stand, and secure the mounting interface pad with four screws.
Initial Settings
Adjust your PC resolution to the optimal setting of 1680 x 1050 at 60Hz for the best image quality.
Adjusting the Monitor
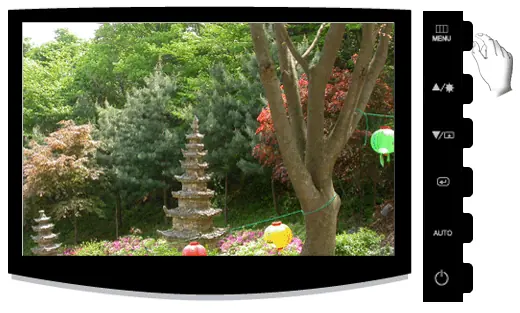
Use the front panel buttons (MENU, Brightness, Customized Key, Enter, AUTO, Power) to navigate the On-Screen Display (OSD) menu. The AUTO button performs automatic adjustments for analog signals.
Software
The monitor supports several software utilities, including monitor drivers, Natural Color (for color management), MagicTune (for monitor adjustments), and MultiScreen.
Troubleshooting
If you encounter issues, check the following:
- No image: Ensure the power cord and signal cables are connected properly. Check if the monitor is in PowerSaver mode.
- Not Optimum Mode: Adjust the PC resolution and frequency to the recommended 1680 x 1050 @ 60Hz.
- OSD locked: Hold the MENU button for at least 5 seconds to unlock.
Safety
Do not disassemble the monitor. Keep it away from moisture, dust, smoke, and heat sources. Use only the provided power cord.
Manufacturer information
Samsung Electronics
Practical help
Common problems
No image on screen
Check power cord and signal cable connections. Ensure the monitor is not in PowerSaver mode by pressing a key on the keyboard.
Not Optimum Mode message
Adjust the PC resolution and frequency to the recommended 1680 x 1050 @ 60Hz.
OSD menu locked
Hold the MENU button for at least 5 seconds to unlock the OSD adjustment lock function.
Strange colors or black and white screen
Check the signal cable connection and ensure the video card is fully inserted in its slot.
Before use
- Ensure the monitor is placed on a stable, level surface.
- Connect the power cord to a grounded outlet.
- Connect the appropriate video cable (D-Sub or DVI) to the monitor and computer.
- Install the monitor driver from the provided CD.
- Set the PC resolution to 1680 x 1050 @ 60Hz.
Show more Show less
Specs in practice
- Optimum Resolution
- 1680 x 1050 @ 60Hz for the best image quality.
- VESA Mounting
- 100mm x 100mm interface for wall or arm mounts.
- Horizontal Frequency
- The time to scan one line connecting the right edge to the left edge of the screen.
Images and diagrams
- Front panel buttons: MENU, Brightness, Customized Key, Enter, AUTO, Power.
- Rear ports: Power, DVI IN, RGB IN, Kensington Lock.
Model compatibility
- Supports Plug & Play on compatible systems.
- Requires VESA DPM compliant video card for PowerSaver functionality.
- MagicTune feature is found only on PC (VGA) with Windows OS that supports Plug and Play.

Manual page author
David Miller
Documentation analyst