Electronics / Microphones
User Manual for Saramonic Ultra Wireless Microphone System
Comprehensive user guide for the Saramonic Ultra 2-channel wireless microphone system. Learn how to pair transmitters, adjust settings, use 32-bit float recording, and connect to cameras or mobile devices.
Quick answers from the manual
Quick answer
- The Saramonic Ultra is a 2-channel wireless microphone system featuring 32-bit float recording, timecode sync, and a touchscreen receiver. It supports connection to cameras and mobile devices via USB-C/Lightning. p. 2
Key actions
- Pairing transmitters p. 8
- Enabling onboard recording p. 5, 14
First start
- Charge the system using the charging case. p. 6, 7
Problems and fixes
Unpaired status
Use the charging case or manual pairing menu.
p. 8Maintenance and reset
- Reset to factory values via the System menu. p. 14
Technical specifications
| Parameter | Value | Meaning | Pages |
|---|---|---|---|
| Operating Range | 300 m | Maximum distance with external antenna. | p. 15, 16 |
Where to find it in the PDF
- Product Structure p. 4, 5, 6
- Specifications p. 15, 16
Table of contents
Manual images
Click an image to enlargeQuick Guide
The Saramonic Ultra is a portable 2-channel wireless microphone system designed for broadcasting, presentations, and mobile journalism. It features 32-bit float on-board recording, timecode synchronization, and a touchscreen receiver. The system provides a transmission range of up to 300 meters.
What's in the Box
- Transmitter (TX) and Receiver (RX) units
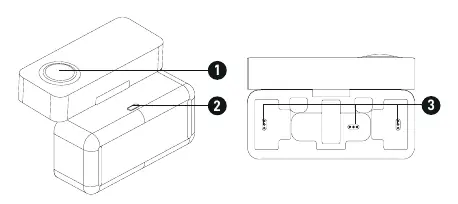
- Charging Case
- USB-C to USB-C Data Cable
- 3.5 mm TRS to TRS Audio Cable
- Lightning and USB-C Adapters
- Fur Windshield, Magnet, External Antenna, and Carrying Bag
Product Structure
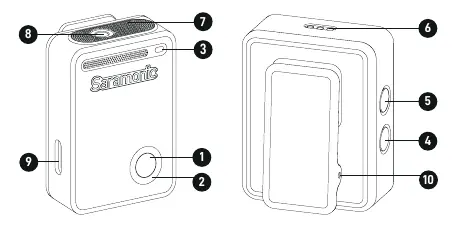
Transmitter (TX)
The transmitter includes a power button, status indicator, recording indicator, REC button, NC (noise cancellation) button, charging contacts, in-built microphone, 3.5 mm TRS input, USB-C port, and a magnetic clip.
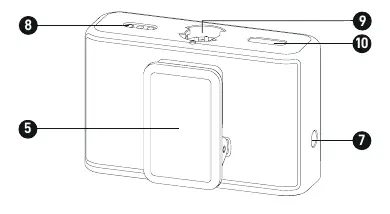
Receiver (RX)
The receiver features a touchscreen, control knob, overload indicator, external antenna port, clip, power button, 3.5 mm multi-functional output, charging contacts, connecting contacts, and a USB-C charging port.
Operation Guide
Placing the Transmitter
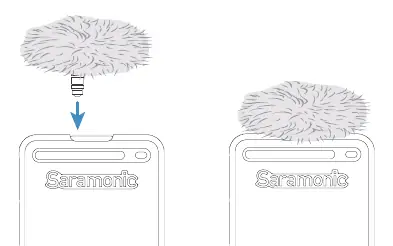
Use the fur windshield for outdoor or windy environments. Connect an external lavalier microphone to the 3.5 mm TRS input if needed. The transmitter can be attached to clothing using the magnetic clip or the included magnet.
Antenna Installation
The receiver has an in-built antenna. Inserting the provided external antenna into the external antenna port automatically switches the system to use the external antenna for improved performance.
Pairing
- Method 1: Place transmitters and receiver in the charging case for 5 seconds.
- Method 2: Press and hold the transmitter power button for 5 seconds to enter pairing mode (blinking blue). On the receiver, navigate to the Pairing menu via the touchscreen and select Pairing.
Using with Devices
Mobile Devices
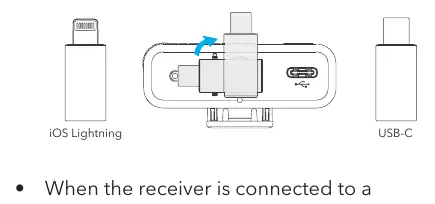
Mount the appropriate adapter (Lightning or USB-C) to the receiver and connect to your device. You can record audio/video and control settings via the Saramonic app.
Cameras
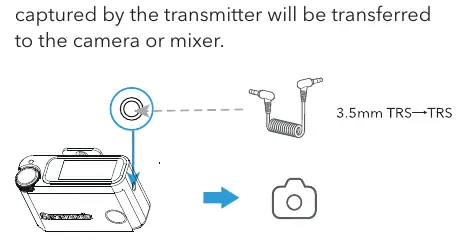
Use the included 3.5 mm TRS to TRS audio cable to connect the receiver's 3.5 mm multi-functional output to the camera or mixer.
Receiver Touchscreen Operation
The home screen displays signal strength, noise cancellation status, battery levels, gain, and timecode. Use the knob to navigate menus:
- Settings Menu: Slide left from the home screen.
- Transmitter Settings: Slide down from the top of the screen (left side for TX1, right side for TX2).
- Quick Settings: Press the knob on the home screen to adjust microphone gain or output volume.
Advanced Features
32-bit Float Recording
This format allows for capturing a wide range of volume levels without distortion. It is applicable to the transmitter's onboard recording.
Timecode Mode
Timecode labels every clip with the exact time, ensuring perfect synchronization in post-production. Five modes are available in the Timecode Mode menu.
Specifications
- Transmission Type: 2.4 GHz
- Operating Range: Up to 300 m (with external antenna)
- Battery Life: Approx. 6 hours
- Storage: 8 GB (Transmitter)
- Charging Time: Approx. 1.5 hours (TX/RX)
Practical help
Common problems
Transmitters not pairing
Place transmitters and receiver in the charging case for 5 seconds or use the manual pairing method via the receiver's settings menu.
Audio distortion
Enable Low Gain Mode via the Saramonic App to handle high sound pressure levels up to 130 dB.
Onboard recording not starting
Ensure the storage is not full and the transmitter is not currently connected to a computer for file reading.
Before use
- Charge the charging case and all units fully.
- Check that the transmitter status indicator is solid blue (paired).
- Attach the fur windshield if recording outdoors.
- Select the correct adapter (Lightning or USB-C) for your mobile device.
- Ensure the external antenna is attached for maximum range.
Specs in practice
- 32-bit float
- Recording format that prevents audio clipping/distortion even if sound exceeds 0 dB.
Images and diagrams
- Transmitter diagram shows button locations and port layout.
- Receiver diagram highlights the touchscreen and output ports.
- Charging case diagram shows indicator lights for battery status.
Model compatibility
- Compatible with cameras, mixers, smartphones, tablets, and computers.
- Supports external lavalier microphones via 3.5 mm TRS input.

Manual page author
Emily Carter
User documentation editor
Prepares concise manual descriptions and highlights the most useful setup, operation, and maintenance information for readers.