Power / Batteries & Chargers
User Manual for ADAM WS 1G8 MC Wireless Microphone
Quick guide for the ADAM WS 1G8 MC wireless microphone system. Learn how to set up the receiver, sync frequencies, adjust transmitter settings, and replace batteries.
Quick answers from the manual
Quick answer
- The ADAM WS 1G8 MC is a wireless microphone system. To pair frequencies, press the automatic frequency matching button on the receiver and align the transmitter's IR window with the receiver's IR window. p. 4, 6
Key actions
- Pairing frequencies p. 6
- Replacing batteries p. 7, 9
Problems and fixes
Battery low
Replace batteries when the indicator light is solid red.
p. 7, 8Technical specifications
| Parameter | Value | Meaning | Pages |
|---|---|---|---|
| Frequency range | 514-542MHz | Operating frequency band | p. 10, 11 |
| Channels | 12 | Maximum number of channels | p. 10, 11 |
Where to find it in the PDF
- Receiver module p. 5, 6
- Hand-held transmitter p. 7
- Beltpack transmitter p. 8, 9
Table of contents
Manual images
Click an image to enlargeQuick guide from the manual
The ADAM WS 1G8 MC is a wireless microphone system designed for audio transmission. To ensure optimal performance, verify your local power supply voltage (110V-120V or 220V-240V) before connecting. The system uses infrared (IR) technology for automatic frequency pairing between the receiver and transmitters. Always turn off the equipment and remove batteries if the system will not be used for an extended period.
System components
The standard system includes:
- Wireless receiver module
- Hand-held transmitter or beltpack transmitter
- Rubber antenna
- Instruction manual
Wireless receiver module
The receiver features a digital channel display and controls for frequency and audio management:

- Digital channel display: Shows the currently selected channel.
- Channel selection: Use the up and down buttons to select the desired channel.
- Squelch Adjustment: Rotate left for longer distance (normal anti-jamming) or right for shorter distance (improved anti-jamming).
- Automatic frequency pairing: Press the sync button to initiate IR data transmission. Align the transmitter's IR window with the receiver's IR window to synchronize.
Hand-held transmitter
The hand-held microphone includes the following controls:
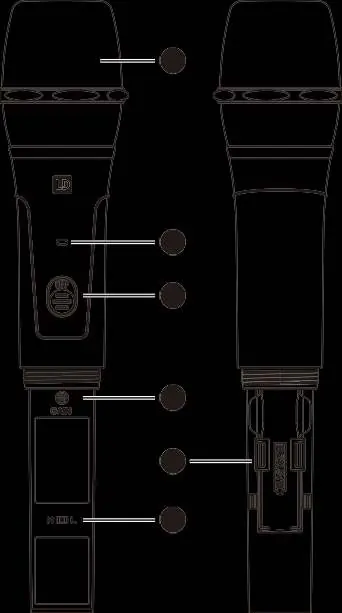
- Power/Battery Indicator: White light indicates power; red blinking indicates IR sync; red solid indicates low battery.
- Power switch: Turns the unit on/off.
- Mic Input Sensitivity: Rotate left to decrease sensitivity, right to increase.
- RF power switch: Toggle between 'H' (high power) and 'L' (low power).
- Battery replacement: Unscrew the bottom section to access the battery compartment. Replace when power is lower than 2V.
Beltpack transmitter
The beltpack transmitter is designed for use with microphones or guitars:

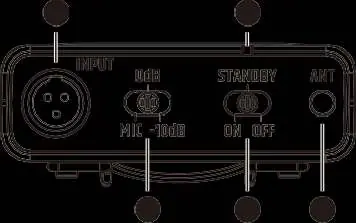
- Gain switch: Set to 'MIC' for microphones, '0' for guitars with passive pickups, or '-10dB' for guitars with active pickups.
- Power/Mute switch: Options include 'ON', 'OFF', and 'STANDBY' (mute state).
- Input: Three-pin connector for microphone or instrument cable.
- Wearing: Attach the clip to a belt or pass a guitar strap through the clip.
Technical specifications
The system operates in the 514-542MHz frequency range with 12 available channels. Audio frequency response is 70-15KHz (±3dB). Both transmitter types provide approximately 8-10 hours of operation on two alkaline batteries.
Safety and maintenance
Do not disassemble the equipment yourself; contact an authorized agent for repairs. Keep the unit away from wet areas and heat sources. Clean the equipment only with a soft, dry cloth after turning off the power.
Practical help
Common problems
Low battery indicator is solid red
Battery voltage is below 2V; replace the two alkaline batteries immediately.
Interference or poor signal
Adjust the Squelch control on the receiver or change the channel to a clearer frequency.
No sound output
Check that the transmitter is on, the gain switch is set correctly, and the receiver volume is turned up.
Before use
- Verify local power supply voltage (110V or 220V).
- Install fresh AA alkaline batteries in the transmitter.
- Ensure the receiver and transmitter are set to the same channel.
- Adjust the Squelch setting based on the required operating distance.
- Set the gain switch on the beltpack to match the input source (Mic/Guitar).
Specs in practice
- Frequency range
- 514-542MHz operating band.
- Gain adjustment
- Adjusts input sensitivity to prevent distortion or low volume.
Images and diagrams
- Receiver front panel: Shows channel display, sync button, and squelch/volume controls.
- Hand-held transmitter: Shows battery compartment, sensitivity adjustment, and RF power switch.
- Beltpack transmitter: Shows input connector, gain switch, and power/mute switch.
Model compatibility
- Beltpack input supports microphones and guitars (passive/active).
- Requires 2x AA alkaline batteries per transmitter.

Manual page author
Michael Turner
Technical manual editor
Reviews PDF manuals for structure, safety notes, and practical product details so readers can find the right information quickly.