Electronics / Audio Interfaces
User Manual for BOYA BOYALINK Wireless Microphone System
Comprehensive user guide for the BOYA BOYALINK 2.4GHz wireless microphone system. Learn how to set up, pair, adjust gain, enable noise cancellation, and troubleshoot your device.
Quick answers from the manual
Quick answer
- The BOYALINK is a 2.4GHz wireless microphone system with automatic pairing, noise cancellation, and multiple adapters for universal compatibility with cameras, smartphones, and computers. p. 2
Key actions
- Enable Noise Cancellation p. 3, 7
- Switch Mono/Stereo Mode p. 4, 7
First start
- Power on and pair p. 6, 7
Problems and fixes
No sound
Check adapter connection, mic gain, and mute status.
p. 8Maintenance and reset
- Cleaning p. 2
Technical specifications
| Parameter | Value | Meaning | Pages |
|---|---|---|---|
| Operating Range | Up to 100m | Maximum distance in open areas | p. 9 |
| Battery Life | TX: ~10h, RX: ~6h | Approximate operating time | p. 9 |
Where to find it in the PDF
- Transmitter Structure p. 3
- Receiver Structure p. 4
- Charging Case p. 5
- Operation Guide p. 6, 7
Table of contents
Manual images
Click an image to enlargeQuick Guide
The BOYA BOYALINK is an ultra-compact 2.4GHz wireless microphone system designed for cameras, smartphones, tablets, and computers. It features automatic pairing, selectable noise cancellation, and includes three adapters (3.5mm TRS, USB-C, and iOS Lightning) for universal compatibility. The system includes a charging case for convenient storage and power.
Product Overview
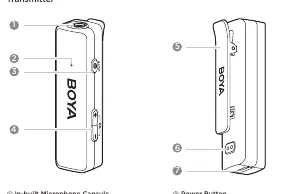
Transmitter
The transmitter features an in-built microphone capsule and a status indicator. Key controls include:
- Power Button: Press and hold to power on/off. Press to mute/unmute.
- +/- Buttons: Adjust mic gain (6 levels). Press both simultaneously to enable/disable noise cancellation.
- Status Indicator: Provides visual feedback on pairing, mute, noise cancellation, and battery status.
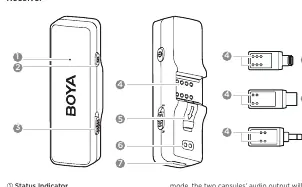
Receiver
The receiver connects to your recording device via interchangeable adapters. Key features include:
- Power Button: Press and hold to power on/off. Press twice to enable/disable the phone's speaker.
- Mono/Stereo Toggle: Switch between mono and stereo output modes.
- Adapters: Includes MFi Certified Lightning, USB-C, and 3.5mm TRS adapters.
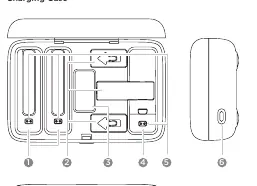
Charging Case
The case provides storage and charging for the transmitter, receiver, adapters, and fur windshield. It features a charging indicator to show battery levels.
Operation Guide
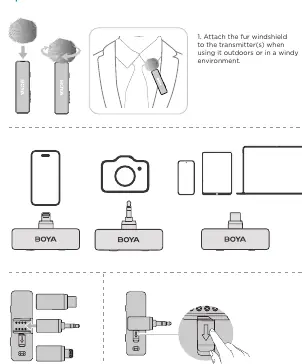
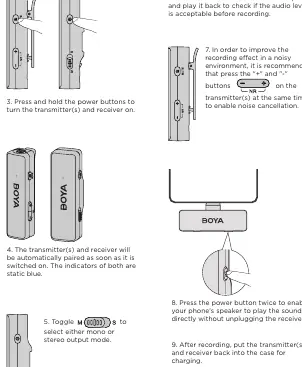
- Preparation: Attach the fur windshield to the transmitter when recording outdoors or in windy environments.
- Connection: Push the selected adapter into the receiver and connect it to your audio device (camera, smartphone, etc.).
- Power On: Press and hold the power buttons on both the transmitter and receiver.
- Pairing: The devices pair automatically upon power-on. Indicators will turn static blue.
- Settings: Use the Mono/Stereo toggle on the receiver to select your preferred output mode.
- Noise Cancellation: Press the '+' and '-' buttons on the transmitter simultaneously to enable noise cancellation in noisy environments.
- Monitoring: It is recommended to record a sample and play it back to check audio levels before starting your main recording.
- Charging: After use, place the transmitter and receiver back into the charging case.
Troubleshooting
If you encounter issues, check the following:
- No Sound: Ensure the adapter is securely connected, mic gain is not at minimum, and the unit is not muted.
- Distorted Sound: Adjust the mic gain to a suitable level for your environment.
- Intermittent Sound: Ensure there is no interference between the transmitter and receiver.
- Howling Noise: Disable the phone's speaker in the receiver's menu.
- Charging Issues: Ensure the charging contacts are clean and the devices are properly seated in the case.
Specifications
Key technical parameters for the transmitter and receiver:
- Transmission Type: 2.4GHz digital frequency
- Polar Pattern: Omnidirectional
- Operating Range: Up to 100m (open area)
- Frequency Response: 20Hz-20kHz
- Sampling Rate: 48kHz
- Battery Life: TX: Approx. 10 hours; RX: Approx. 6 hours
- Operating Temperature: 0°C to +50°C
Practical help
Common problems
No sound from the unit
Check adapter connection, ensure mic gain is not at minimum, and verify the unit is not muted.
Intermittent sound
Check for interference between the transmitter and receiver.
Howling noise when using an adapter
Disable the phone's speaker in the receiver's menu.
Failed to charge
Clean the charging contacts with a soft, dry cloth and ensure the device is properly seated in the case.
Before use
- Charge the transmitter and receiver using the provided case.
- Attach the fur windshield if recording outdoors.
- Select the appropriate adapter (TRS, USB-C, or Lightning) for your device.
- Ensure the receiver is securely connected to your recording device.
- Perform a test recording to check audio levels.
Specs in practice
- Operating Range
- Up to 100m in open areas without obstacles.
- Frequency Response
- 20Hz-20kHz, providing high-quality sound.
- Sampling Rate
- 48kHz, standard for high-quality digital audio.
Images and diagrams
- Transmitter: Shows power button, status indicator, and gain/noise cancellation controls.
- Receiver: Shows power button, mono/stereo toggle, and adapter connection point.
- Charging Case: Shows slots for all components and the charging indicator.
Model compatibility
- Compatible with cameras, smartphones, tablets, and computers.
- Includes 3.5mm TRS, USB-C, and iOS Lightning adapters.

Manual page author
Michael Turner
Technical manual editor
Reviews PDF manuals for structure, safety notes, and practical product details so readers can find the right information quickly.