Electronics / Networking
Quick Start Guide for DJI Mic Mini
Get started with your DJI Mic Mini wireless microphone system. This guide covers pairing, connecting to smartphones and cameras, mounting options, and charging instructions.
Quick answers from the manual
Quick answer
- The DJI Mic Mini (1TX + 1RX) is a wireless microphone system. To use it, power on both units by holding the power button for 2 seconds, then connect the RX to your recording device (phone or camera) using the appropriate adapter or cable. p. 2, 3
Key actions
- Power on TX and RX p. 2, 3
- Connect RX to phone p. 2
- Connect RX to camera p. 3
First start
- Hold the power button on both units for 2 seconds to turn them on. p. 2, 3
Maintenance and reset
- Charge both units simultaneously using the charging dock and splitter cable. p. 5
Where to find it in the PDF
- Connecting to phone p. 2
- Connecting to camera p. 3
- Bluetooth connection p. 4
- Mounting and charging p. 5
Table of contents
Manual images
Click an image to enlargeQuick guide from the manual
This guide provides essential setup instructions for the DJI Mic Mini (1TX + 1RX). The transmitter (TX) and receiver (RX) are paired by default, allowing for immediate use after powering on.
Connecting to a Smartphone
To record audio using a smartphone:
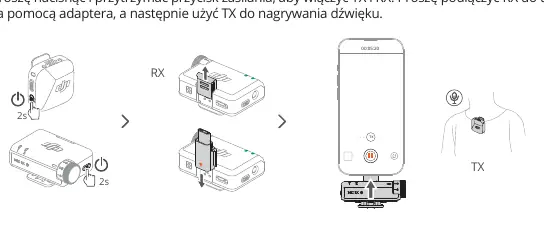
- Connect the RX to your phone using the appropriate adapter.
- Press and hold the power button on both the TX and RX for 2 seconds to turn them on.
- The system is ready for recording once connected.
Connecting to a Camera
To record audio using a camera:
- Mount the RX to the camera's cold shoe.
- Connect the audio cable between the RX and the camera.
- Press and hold the power button on both the TX and RX for 2 seconds to turn them on.
Bluetooth Connection
To connect the TX directly to a phone via Bluetooth:
- Power on the TX.
- Press and hold the link button on the TX for 2 seconds.
- Select "DJI Mic Mini-XXXXXX" from the Bluetooth list on your phone to complete the connection.
Mounting and Accessories
The TX unit offers flexible mounting options:
- Mounting: The TX can be attached to clothing using the built-in clip or the included magnet.
- Windscreen: Use the windscreen to reduce wind noise. It can be removed when recording in calm conditions.
Charging
To charge the devices:
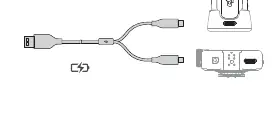
- Mount the TX on the charging dock.
- Use the splitter charging cable to connect both the TX and RX to a power source for simultaneous charging.
Manufacturer information
DJI
Practical help
Common problems
No sound recorded
Ensure both TX and RX are powered on. Verify that the RX is securely connected to the phone adapter or the camera audio cable.
Excessive wind noise
Attach the windscreen to the TX unit.
Before use
- Ensure both TX and RX units are fully charged.
- Verify you have the correct adapter for your smartphone.
- Check that the audio cable is available if connecting to a camera.
- Confirm the TX and RX are powered on (hold power button for 2 seconds).
Images and diagrams
- The TX and RX are paired by default out of the box.
- The TX can be mounted using either the clip or the magnet accessory.
- The charging dock and splitter cable allow charging both units at once.
Model compatibility
- Compatible with smartphones via adapter.
- Compatible with cameras via audio cable.
- Supports direct Bluetooth connection to phones for specific use cases.

Manual page author
Emily Carter
User documentation editor
Prepares concise manual descriptions and highlights the most useful setup, operation, and maintenance information for readers.