Automotive / Bicycle Carriers
User Manual for Saris Guardian Trunk Bike Rack
Comprehensive user guide for the Saris Guardian trunk-mounted bike rack. Includes assembly instructions, vehicle installation steps, bike loading procedures, safety warnings, and maintenance tips for 2-bike and 3-bike models.
Table of contents
Manual images
Click an image to enlargeImportant Information
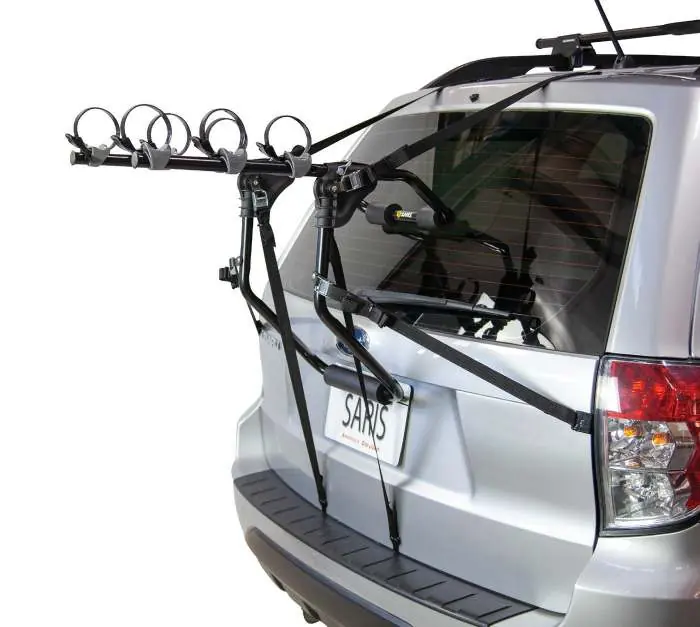
The Saris Guardian is a trunk-mounted bike rack designed for standard bike frames. It is not intended for use with tandem or recumbent bicycles, nor for off-road use. Always follow the Saris vehicle compatibility guide to ensure the rack fits your specific vehicle. Do not mount the rack to any type of trailer or RV, including Class B vehicles.
Assembly
The rack requires minimal assembly. Ensure the main frame is unfolded and locked into position. Use the provided clevis pins to secure the arms in one of the three adjustment positions (1, 2, or 3) to achieve the proper fit for your vehicle. Ensure the arms are positioned slightly above level.

Installation
To install the rack on your vehicle:
- Ensure the vehicle is clean where the rack feet will rest.
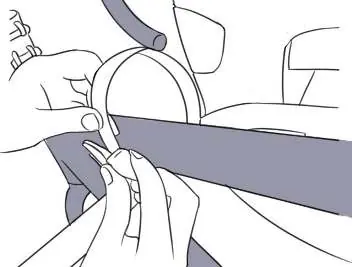
- Hook the attachment straps to the support hinge line of your trunk or hatch.
- Never attach hooks to glass, unsupported plastic, or roof racks.
- Rest the lower legs on the license plate area or the metal of the trunk. Never rest them on lights, glass, or plastic.
- Tighten all straps securely.
Loading Bikes
When loading bicycles:
- Load the heaviest or largest bike first, closest to the vehicle.
- Ensure bike tires are not directly behind the exhaust pipe to prevent heat damage.
- Use the provided straps to secure the bike frame to the cradles.
- Re-tighten all straps once the bikes are loaded.
- If bike wheels are not parallel to the ground, or if the bike is a full-suspension model, use the optional Bike Beam accessory.
- Remove all loose items from the bike, such as child seats, baskets, locks, lights, and pumps, before driving.
Maintenance
Each use:
- Wipe down the trunk rack feet.
- Avoid letting the rack feet touch the ground.
- Check straps for signs of wear.
- Check bike cradles and wheel scoops.
- Check for loose bolts.
Every 90 days:
- Clean the rack with water and mild soap.
- Lubricate locks if applicable (use wet, oil-based lubricant; do not use WD-40).
- Grease hitch bolt threads.
- Check for scratches in the paint.
Specifications
- Max Load (2-Bike): 70 lbs / 32 kg
- Max Load (3-Bike): 105 lbs / 48 kg
- Max Bike Weight: 35 lbs / 16 kg per bike
- Max Speed: 70 mph / 113 km/h
Practical help
Common problems
Bike wheels are not parallel to the ground
Use the optional Bike Beam accessory.
Bike wheels are 12 inches or less from the ground
Use the optional Bike Beam accessory.
Strap wear
Replace mounting straps immediately at the first sign of wear.
Loose bolts
Check for loose bolts before every use and tighten as necessary.
Before use
- Verify vehicle compatibility using the Saris fit guide.
- Clean the vehicle surface where the rack feet will rest.
- Ensure all straps are in good condition.
- Remove all loose accessories from the bike (baskets, child seats, etc.).
- Ensure bike tires are not positioned directly behind the exhaust pipe.
- Check that all bolts are tight.
Specs in practice
- Max Load (2-Bike)
- Total weight capacity of 70 lbs (32 kg).
- Max Load (3-Bike)
- Total weight capacity of 105 lbs (48 kg).
- Max Bike Weight
- Maximum weight per individual bike is 35 lbs (16 kg).
Images and diagrams
- Step 1: Unfolding and locking the rack frame.
- Step 2: Adjusting arm positions 1, 2, or 3 for proper vehicle fit.
- Step 3: Correct hook attachment points on the vehicle trunk/hatch.
- Step 4: Securing bikes with straps and tying off loose ends.
Model compatibility
- Not intended for tandem or recumbent bicycles.
- Do not use for off-road driving.
- Do not mount to trailers or RVs (including Class B vehicles).

Manual page author
David Miller
Documentation analyst
Organizes user manual content into clear summaries, with attention to model details, product context, and everyday usability.