Automotive / Bicycle Carriers
User Manual for Allen Sports 103DN Bicycle Carrier
Quick guide for the Allen Sports 103DN bicycle carrier. Learn how to set up, install on your vehicle, load bicycles safely, and secure them for transport.
Table of contents
Manual images
Click an image to enlargeQuick Guide from the Manual
The Allen Sports 103DN is a trunk-mounted bicycle carrier designed to carry up to 3 bicycles with a maximum capacity of 100 lbs. Before use, ensure your vehicle is compatible and that the rack can be mounted securely. Never use the rack on trailers, the front of vehicles, or on vehicles where the rack cannot be properly attached. Always remove the rack when not in use.
Setting Up the Rack
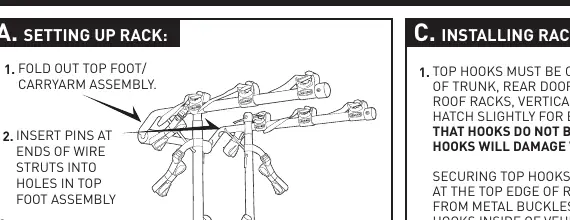
- Fold out the top foot and carry arm assembly.
- Insert the pins at the ends of the wire struts into the holes in the top foot assembly.
- Completely fold out the bottom foot assembly.
- To insert set-up pins: Lay the rack on its side with carry arms perpendicular to the middle section. Pull up on the set-up pin to install it into the hole on the carry arm. Repeat for the other side.
Installing Rack on Vehicle
Preparation: Ensure contact surfaces between the car and rubber feet are clean and free of dirt. Inspect all straps for wear or damage.

- Top Hooks: Must be completely hooked over solid metal edges at the top of the trunk, rear door, or hatchback. Never hook to rain gutters, roof racks, vertical glass, or plastic moldings.
- Positioning: Set the length of the top straps so the carry arms are inclined slightly upwards, keeping bikes away from the road and exhaust.
- Bottom Feet: Hold the bottom foot assembly against the vehicle in its completely open position. Ensure the bottom gray rubber pads are on a surface with proper support. Never install feet on glass.
- Bottom Straps: Thread straps through plastic buckles. Hook bottom hooks to a metal edge below the bumper or at the bottom of the trunk/rear door. Tighten by pulling the free end until the elastic portion is stretched.
- Side Straps: Install the side straps (labeled "SIDE STRAPS") to the left and right sides of the trunk/rear door. Tighten securely.
Alternate Installation Methods
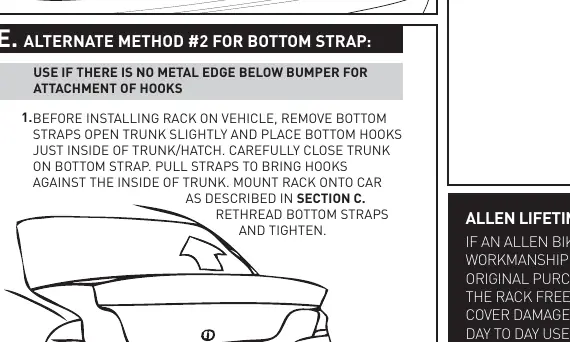
If there is no metal edge below the bumper for bottom hooks, use one of the following methods:
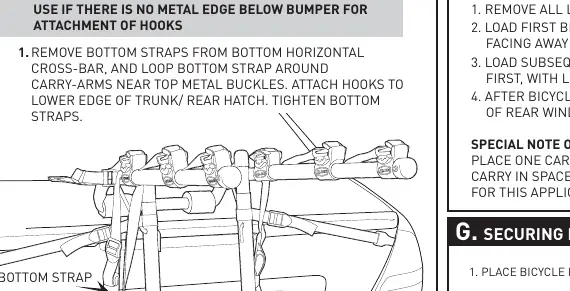
- Method 1: Remove bottom straps from the bottom horizontal cross-bar and loop them around the carry-arms near the top metal buckles. Attach hooks to the lower edge of the trunk/rear hatch and tighten.
- Method 2: Remove bottom straps. Open the trunk slightly and place bottom hooks just inside the trunk/hatch. Carefully close the trunk on the bottom strap. Mount the rack as described in the standard installation, then re-thread and tighten the bottom straps.
Loading Bicycles
- Remove all loose items from bicycles (pumps, bags, etc.) and ensure quick-release hubs are tight.
- Load the first bicycle into the position closest to the vehicle with the chain and gears facing away from the rack.
- Load subsequent bicycles in alternating directions. Place the heaviest bicycles first.
- Women's Style Frames: Place one carry arm under the front top tube. With the other carry arm, rotate the tie-down cradle and place it in the space behind the seat tube and below the rear down-stay. The Allen 900B Adaptor Bar is recommended for this application.
Securing Bicycles
All bikes must be securely tied to the rack using individual tie-down straps or additional straps if necessary.
- Place the bicycle in the cradle.
- Thread the straps.
- Pull the strap tight.
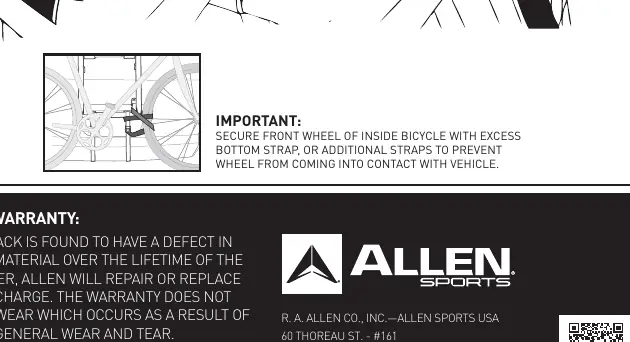
- Important: Secure the front wheel of the inside bicycle with the excess bottom strap or additional straps to prevent it from contacting the vehicle.
Safety Warnings
- Do not open the trunk or rear door when the rack is in place.
- Install the rack and load bicycles only at a safe distance from moving traffic.
- Only rubber feet and hooks should come into contact with the vehicle.
- Drive conservatively, especially over bumps. Never use off-road.
- Do not carry tandems, mopeds, or recumbents.
Practical help
Common problems
Hooks binding when opening trunk/hatch
Ensure hooks do not bind between the frame and door; open the trunk slightly for easier attachment.
No metal edge below bumper for bottom hooks
Use alternate methods D or E to attach bottom straps inside the trunk/hatch.
Bikes touching vehicle
Adjust strap length to keep bikes away from the road and exhaust; use padding between contact points if necessary.
Before use
- Clean contact surfaces between car and rubber feet.
- Ensure top buckles are threaded correctly.
- Inspect all straps for wear or damage.
- Verify rack is not used on trailers or the front of vehicles.
- Check that all quick-release hubs on bicycles are tight.
Specs in practice
- Max Capacity
- 100 LB (approx. 45 kg) - do not exceed this weight.
- Max Bicycles
- 3 bicycles.
Model compatibility
- Do not use on vehicles where the rack cannot be properly mounted.
- Never install bottom feet on glass.
- Not for use with tandems, mopeds, or recumbents.

Manual page author
David Miller
Documentation analyst
Organizes user manual content into clear summaries, with attention to model details, product context, and everyday usability.