Lighting / Fixtures
User Manual for Schuller 748261 Heat Vulcan Floor Heater
Comprehensive user guide for the Schuller 748261 Heat Vulcan Floor Heater. Includes detailed assembly steps, operating instructions for remote and touch controls, safety precautions, and technical specifications.
Quick answers from the manual
Quick answer
- The Schuller 748261 is a 2100W floor heater. It features three heat settings (900W/1200W/2100W), remote control, and touch switch operation. It must be used on a firm, flat surface. p. 1, 3
Key actions
- Assemble the heater by connecting the base, tubes, and head, then threading the power cord. p. 2
- Operate using the remote control or the touch switch on the heater head. p. 3
First start
- Connect to a 220-240V grounded outlet, ensure the unit is in an upright position, and use the remote or touch switch to select heat level. p. 3
Show 4 more answers Show less
Problems and fixes
Heater turns off automatically
Ensure the unit is on a firm, solid, horizontal surface.
p. 1Maintenance and reset
- Unplug and let cool. Clean with a soft, damp cloth. Do not use abrasive cleaners or immerse in water. p. 4
Technical specifications
| Parameter | Value | Meaning | Pages |
|---|---|---|---|
| Voltage | 220-240V, 50Hz | Operating voltage | p. 4 |
| Power | 900W/1200W/2100W | Power consumption settings | p. 4 |
Where to find it in the PDF
- Safety Instructions p. 1
- Assembly Process p. 2
- Operating Instructions p. 3
- Technical Specifications p. 4
Table of contents
Manual images
Click an image to enlargeQuick Guide
The Schuller 748261 Heat Vulcan is a 2100W floor heater designed for outdoor use in dry conditions. It features three heat settings (900W, 1200W, 2100W) and can be operated via a remote control or a touch switch on the unit. Always ensure the unit is placed on a firm, flat, horizontal surface before operation.
Safety Instructions
- Placement: Use only on a firm, solid, horizontal surface. The unit has an auto cut-off switch if tilted or knocked over.
- Clearance: Maintain a minimum distance of 1 meter from flammable objects like curtains or furniture.
- Environment: Do not use in unventilated areas, near flammable goods (gas, petrol, paint), or during rain/wet conditions.
- Operation: The unit becomes very hot during and after use. Do not touch the head while hot. Do not cover the unit.
- Children/Pets: Keep children and animals away. Children aged 3-8 years should only operate the unit under supervision and must not plug in, clean, or maintain the appliance.
- Grounding: The unit must be securely grounded during operation.
Assembly Process
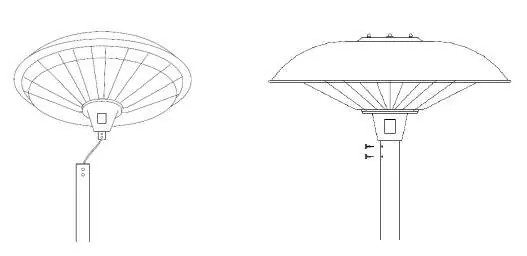
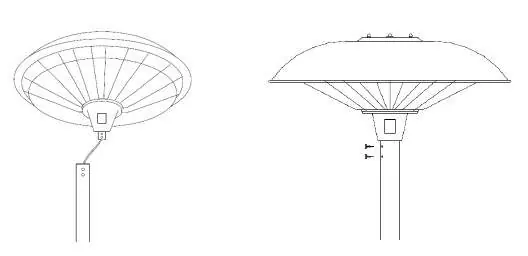
- Connect the bottom tube to the base by screwing them together.
- Screw the middle tube onto the bottom tube.
- Feed the power cord through the base, bottom tube, and middle tube, pulling through approximately 2m of cable.
- Thread the power cord plug through the base, bottom pole, middle pole, and top pole. Connect the plug to the socket in the heater head.
- Push the heater head onto the top hollow tube and secure it using the 2 supplied M4*8 screws.
- Pull the power cord gently out of the base and fix it under the weighted base using the 4 supplied M4 nuts.
- Raise or retract the top telescopic tube to the desired height and tighten by screwing the knob down.
Operating Instructions
Connect the power cable to a 13 amp supply in a safe, dry area. The unit must be in an upright position to operate.

Remote Control
- Low Power (900W): Press the left side button.
- High Power (1200W): Press the right side button.
- Maximum Power (2100W): Press both left and right buttons.
Touch Switch
- 1st Press: Low power (900W).
- 2nd Press: High power (1200W).
- 3rd Press: Maximum power (2100W).
- 4th Press: Shut down.
Maintenance and Storage
Always unplug the unit and let it cool completely before cleaning. Clean the outer shell with a soft, damp cloth and mild detergent if necessary. Do not use alcohol, gasoline, abrasive powders, or rough brushes. Do not immerse the unit in water. For long-term storage, keep in a cool, dry location, preferably in the original packaging.
Technical Specifications
- Voltage: 220-240V, 50Hz
- Power Consumption: 900W / 1200W / 2100W
- Dimensions: 58.5cm (W) x 46cm (D) x 160-205cm (H)
- Weight: 13.7kg
Practical help
Common problems
Heater turns off automatically
The unit has an auto cut-off switch. Ensure it is placed on a firm, solid, horizontal surface.
Dark spots on heating elements
This is normal during the first few minutes of operation and does not affect performance.
Heater not working
Ensure the unit is plugged into a 220-240V grounded outlet and is in an upright position.
Before use
- Ensure the heater is on a firm, flat, horizontal surface.
- Check that the area is well-ventilated.
- Maintain a minimum distance of 1 meter from flammable objects.
- Verify the power supply is 220-240V, 50Hz.
- Ensure the unit is grounded.
Show more Show less
Specs in practice
- Power Consumption
- 900W / 1200W / 2100W
Images and diagrams
- Assembly involves connecting the base, tubes, and heater head.
- Power cord must be threaded through the base and tubes.
- The heater head is secured with M4*8 screws.
Model compatibility
- For outdoor use, but do not use in rain or wet conditions.
- Not for use in unventilated areas.

Manual page author
David Miller
Documentation analyst