Software / Apps Services
Seagate Lyve Cloud and Parsec Labs Integration Guide
A step-by-step integration guide for deploying Parsec Labs with Seagate Lyve Cloud. Learn how to configure buckets, permissions, storage connections, and cloud replication jobs for data protection.
Quick answers from the manual
Quick answer
- This guide provides instructions for integrating Parsec Labs with Seagate Lyve Cloud to enable data replication and protection. It covers creating buckets and permissions in Lyve Cloud, connecting storage systems in Parsec, and setting up cloud replication jobs. p. 1, 3, 8
Key actions
- Create Lyve Cloud Bucket p. 3
- Create Bucket Permissions p. 4
- Add Storage Connection in Parsec p. 6
- Create Cloud Replication Job p. 8
Problems and fixes
Cannot create sub-buckets
Select all buckets in the account with a prefix when creating permissions.
p. 4Show 1 more answers Show less
Where to find it in the PDF
- Task 1: Bucket and Permissions p. 3, 4
- Task 2: Deploy Parsec with Lyve Cloud p. 5, 6, 7
- Task 3: Create Cloud Replication Jobs p. 8, 9, 10, 11
Table of contents
Manual images
Click an image to enlargeQuick Guide: Integrating Parsec Labs with Lyve Cloud
This guide outlines the process for integrating Parsec Labs with Seagate Lyve Cloud to enable efficient data mobility and protection. The integration allows you to satisfy the 3-2-1 backup rule by creating a third copy of your data on a different media type, accessible via the standard S3 protocol.
Deployment Prerequisites
- A configured Lyve Cloud storage account.
- A configured Parsec Labs account.
Task 1: Deploy Lyve Cloud Bucket and Permissions
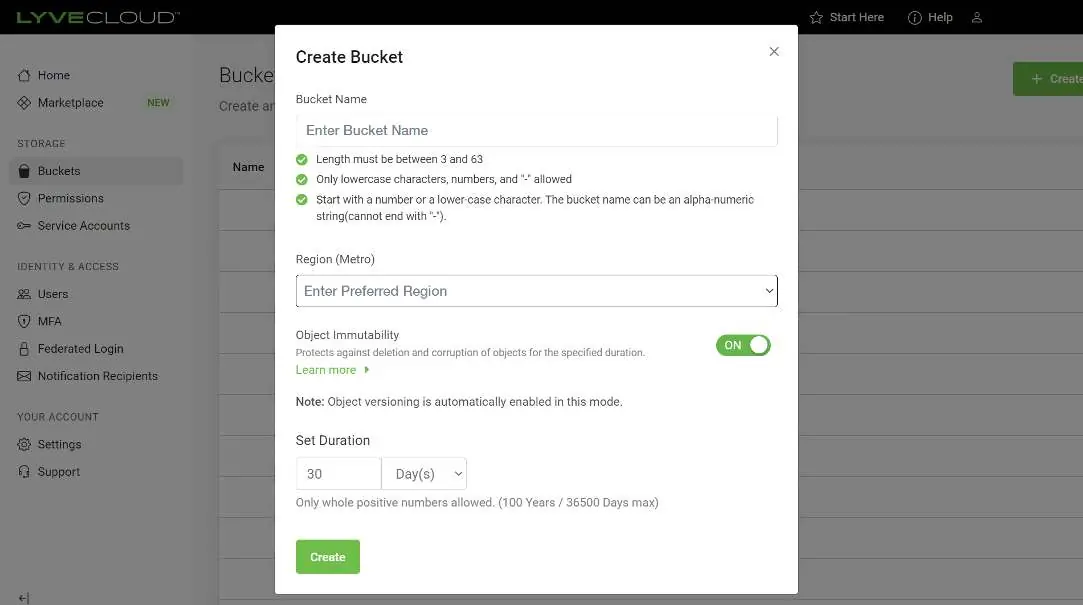
Create Bucket: Navigate to the Bucket section of the Lyve Cloud console and select Create Bucket. Follow the prompts to name your bucket and select the region.
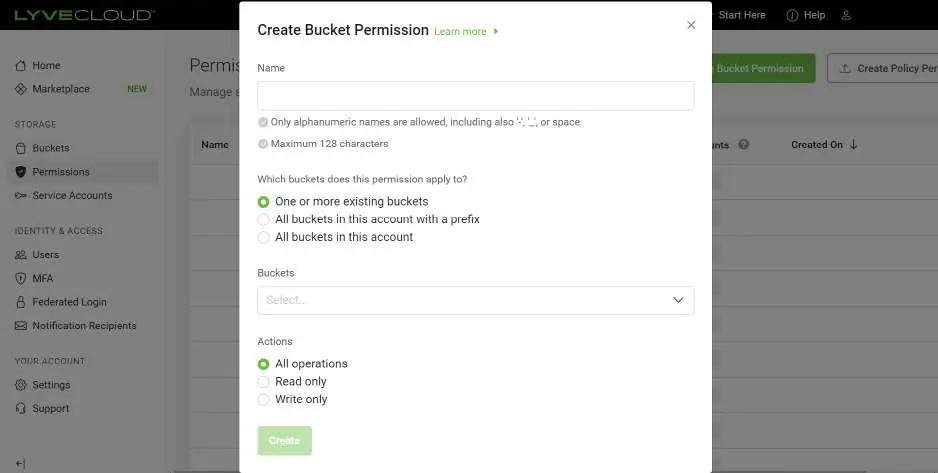
Create Permissions: Go to the Permissions section of the Lyve Cloud console and select Create Bucket Permission. Note: You must select all buckets in this account with a prefix to allow Parsec Labs to create sub-buckets.
Create Service Account: Navigate to the Service Accounts section of the Lyve Cloud console and select Create Service Account. Ensure you copy or download the secret key immediately, as it will not be available once the dialog box is closed.
Task 2: Deploy Parsec with Lyve Cloud
Enter the Parsec Job Console: From the main menu, go to Storage and select an existing array or add a new one. For this exercise, select Local and add a new local NAS filer.
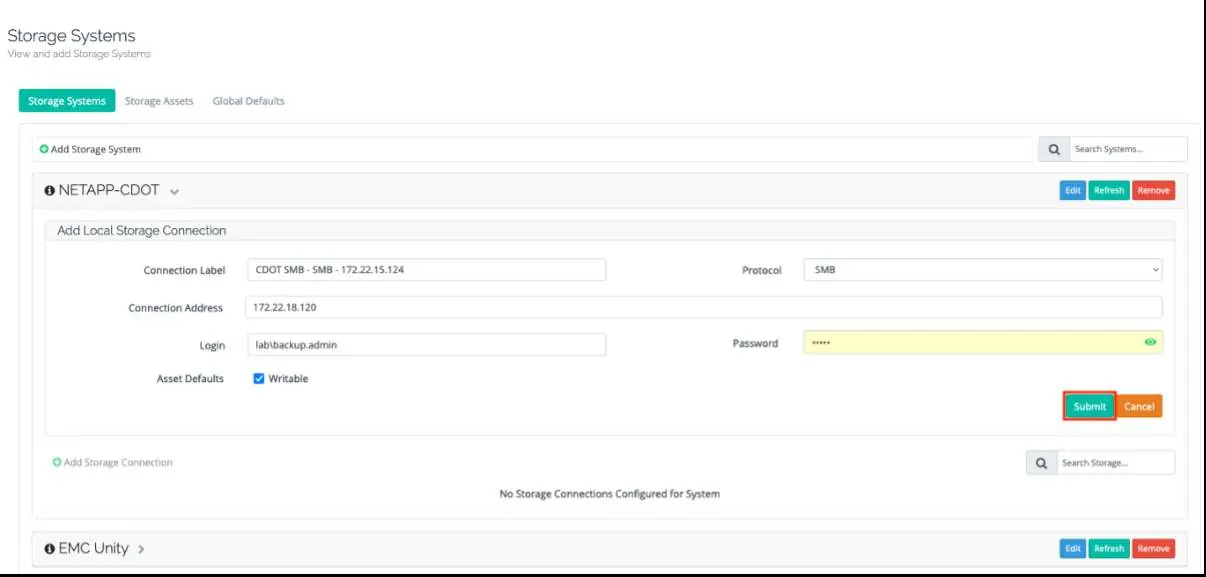
Add Storage Connection: Click Add Storage Connection. Provide a connection label, select the protocol (e.g., SMB), and enter the IP address or fully qualified domain name. For SMB connections, provide credentials for a member of the domain backup operators group. For NFS exports, ensure the Parsec appliance IP is on the export list.
Add Cloud Storage Host: On the main menu, go to Storage and select Cloud. Under Hosts, select Add Cloud Storage Host. Use Advanced Options if you need to adjust long-path aliasing or multipart segment sizes. After adding the host, select Add Account under the host name, provide a label, and enter your access and secret keys. Finally, select Rescan for Buckets.
Task 3: Create Cloud Replication Jobs
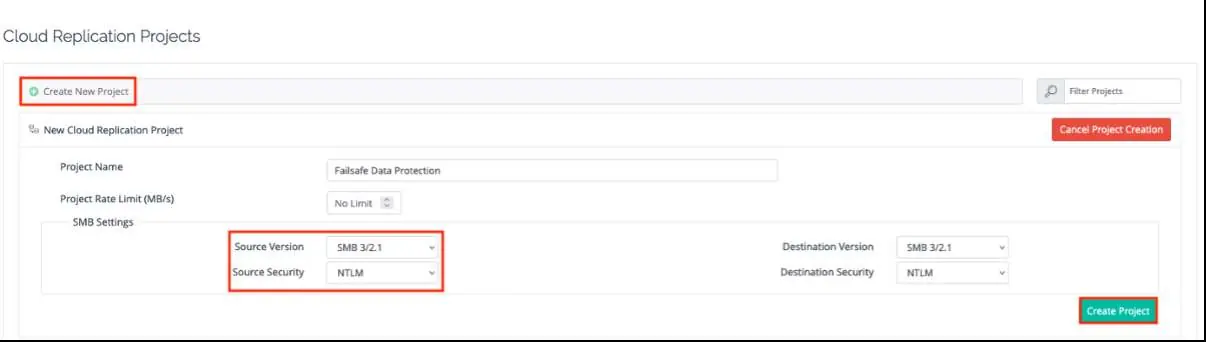
Create a Project: Under Data Protection, select Cloud Replication and click Create New Project. If using an SMB share, select the appropriate SMB version (1, 2, 2.1, or 3) and security style (NTLM or Kerberos).
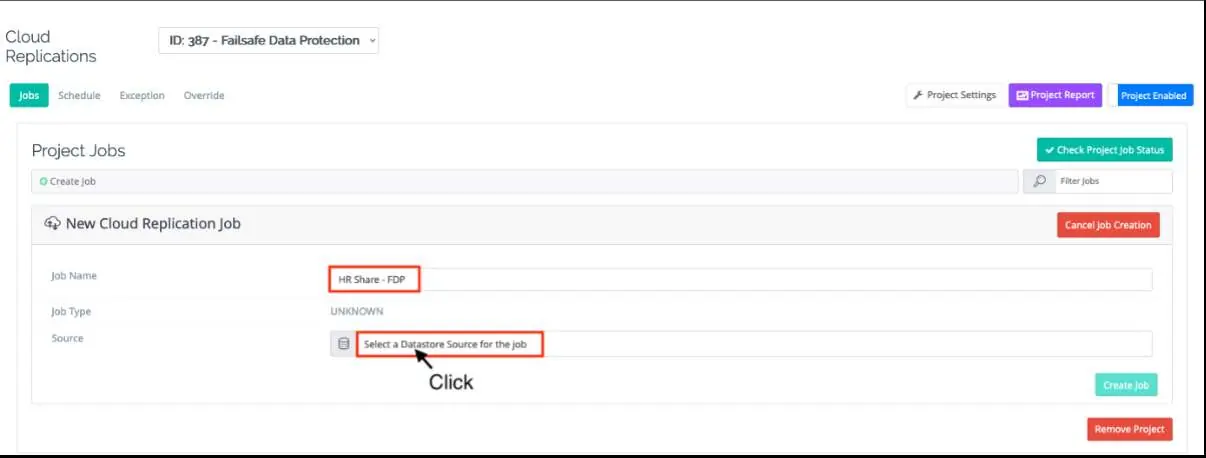
Create a Job: Within your project, select Create Job. Give the job a name and select the source datastore. After selecting the source, the destination dialog will appear. Choose your destination S3 bucket. You may optionally create include or exclude expressions based on metadata criteria. Once configured, the job will appear in the job monitor and can be run manually or scheduled.
Manufacturer information
Seagate Technology LLC
Practical help
Common problems
Cannot create sub-buckets in Lyve Cloud
Ensure that when creating bucket permissions, you select 'All buckets in this account with a prefix'.
Shares not detected during storage connection
For NFS exports, ensure the Parsec appliance IP is included on the export list.
Before use
- Ensure you have a configured Lyve Cloud storage account.
- Ensure you have a configured Parsec Labs account.
- Have your access and secret keys ready for the Lyve Cloud service account.
- Verify network connectivity between the Parsec appliance and your storage systems.
Show more Show less
Images and diagrams
- The manual includes screenshots of the Lyve Cloud console for bucket, permission, and service account creation.
- Screenshots of the Parsec Job Console illustrate the steps for adding storage systems, connections, and cloud hosts.
- Screenshots demonstrate the process of creating cloud replication projects and jobs, including source selection.
Model compatibility
- Supports standard S3 protocol.
- Supports SMB versions 1, 2, 2.1, and 3.
- Supports NTLM or Kerberos security styles for SMB shares.

Manual page author
Emily Carter
User documentation editor