Tools / Tool Storage
User Manual for Sealey APMS21 Heavy-Duty Modular Floor Cabinet
Comprehensive assembly and safety guide for the Sealey APMS21 heavy-duty modular floor cabinet. Includes step-by-step installation instructions, safety warnings, and technical specifications.
Quick answers from the manual
Quick answer
- The APMS21 is a heavy-duty modular floor cabinet. Assembly requires two people, a soft mat for protection, and basic tools to secure the panels, shelves, and door. p. 1, 2, 3
Key actions
- Assemble on level ground p. 1
- Install shelves p. 2
Maintenance and reset
- Leveling the cabinet p. 3
Show 2 more answers Show less
Technical specifications
| Parameter | Value | Meaning | Pages |
|---|---|---|---|
| Dimensions | 610 x 610 x 2108mm | Overall width, depth, and height | p. 1 |
Where to find it in the PDF
- Safety and Contents p. 1
- Assembly Instructions p. 2, 3
Table of contents
Manual images
Click an image to enlargeQuick Guide from the Manual
The Sealey APMS21 is a heavy-duty modular floor cabinet designed for professional garage storage. Before beginning assembly, ensure you have a soft mat to protect the paint finish and a second person to assist with the process. Always assemble the unit on level, solid ground, preferably concrete.
Safety Instructions
- Work Area: Keep the area clean, uncluttered, and well-lit.
- Assembly: Wear protective gloves to handle sharp edges. Assistance from another person is recommended.
- Usage: Do not use the cabinet outdoors, in damp/wet locations, or areas with condensation.
- Operation: Do not step on shelves, overload the system, or move the cabinet while items are stored inside.
- Maintenance: Do not clean with solvents that may damage the protective coating.
Assembly Instructions
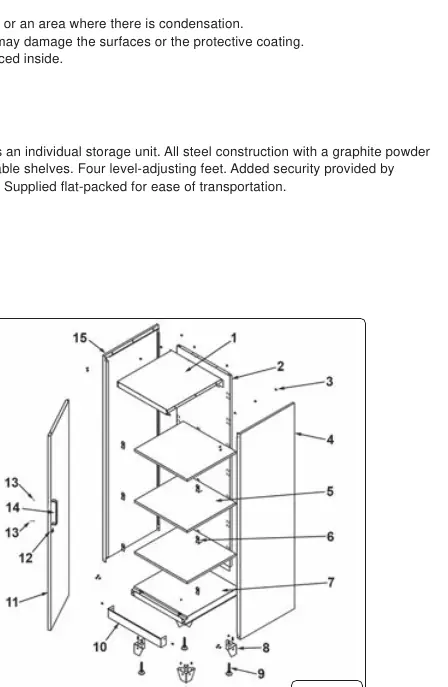
Bottom Panel and Sides
- Secure the metal feet to the bottom panel using M6 x 12 screws.
- Thread the adjustable feet into the bottom panel.
- Lay a soft mat on the floor. Attach the right side panel to the back panel by sliding the edge into the groove. Repeat for the left side panel.
- Align the bottom panel assembly with the side panels and secure with M6 x 12 screws.
Top Panel and Final Fixings
- Align the top panel with the side panels and secure with M6 x 12 screws.
- With assistance, rotate the cabinet onto its side to secure the remaining fixings for the bottom and top panels.
Shelves and Door
- Stand the cabinet upright.
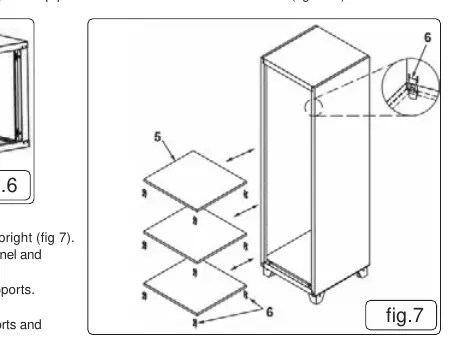
- Insert shelf supports into the slots on the back and front panels at the desired height.
- Press the shelves firmly onto the supports until locked.
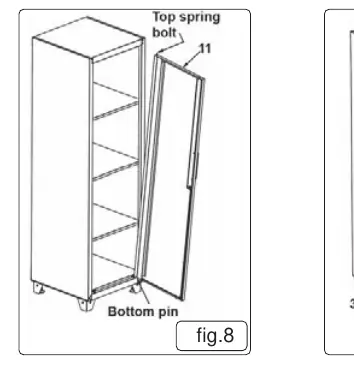
- To attach the door, locate the bottom pin into the base unit hole, pull the top spring pin down, align with the top panel rail hole, and release.
- Secure the door handle using M4 x 8 screws.
Skirting Board
Level the cabinet by rotating the adjustable feet before attaching the skirting board with M6 x 12 screws.
Environment Protection
Recycle unwanted materials instead of disposing of them as waste. Sort all tools, accessories, and packaging. If the product becomes unserviceable, drain any fluids into approved containers and dispose of according to local regulations.
Manufacturer information
Sealey Group
Practical help
Common problems
Cabinet is unstable or wobbling
Rotate the adjustable feet to level the cabinet on the floor.
Difficulty aligning panels during assembly
Ensure you are working on a level surface and have a second person to assist with holding panels in place.
Before use
- Ensure the floor is level and solid (preferably concrete).
- Wear protective gloves to avoid sharp edges.
- Have a second person available to assist with assembly.
- Check all parts against the contents list.
- Use a soft mat to protect the paint finish during assembly.
Show more Show less
Specs in practice
- Overall Size
- 610 x 610 x 2108mm (W x D x H)
Images and diagrams
- Figure 1: Exploded view of all components.
- Figure 8: Detail of the door pin and spring bolt mechanism.
- Figure 9: Final assembly of the door handle and skirting board.
Model compatibility
- Designed for use as part of a complete professional garage storage system or as an individual unit.

Manual page author
Emily Carter
User documentation editor