Tools / Tool Storage
Sealey 10pc Garage Storage System Assembly Guide
Assembly and installation guide for the Sealey 10pc Garage Storage System. Includes step-by-step instructions for wall cabinets, base cabinets, and stacking units, along with safety and maintenance procedures.
Table of contents
Manual images
Click an image to enlargeQuick Guide
The Sealey 10pc Garage Storage System is a modular, flat-pack solution designed for workshop environments. It can be free-standing or fixed to a wall. Assembly requires basic tools and should be performed on level, solid ground. Always wear protective gloves during assembly.
Safety Instructions
- Ensure the work area is clean, uncluttered, and well-lit.
- Use the storage system on level, solid ground, preferably concrete.
- Do not use the system outdoors or in damp/wet locations.
- Do not move the system when items are stored inside.
- Do not step on the shelves or overload the system.
- Keep children and unauthorized persons away from the work area.
Assembly Instructions
The system consists of various modular units. Follow the specific steps for your unit type:

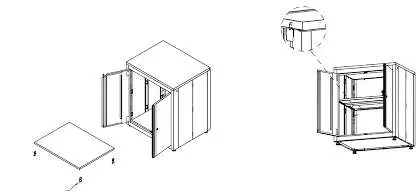

1 Door Wall Cabinet
- Separate the front and back panels to allow the side panels to unfold completely.
- Attach the top panel using 8x M6x16mm screws.
- Turn the cabinet over and attach the bottom panel using 11x M6x16mm screws.
- Insert 4 shelf supports at the desired height and place the shelf.
2 Door Base Cabinet
- Unfold the panels.
- Attach the bottom panel using 11x M6x16mm screws.
- Screw the 4 adjustable feet into the cabinet bottom.
- Attach the worktop to the cabinet using 4x M6x16mm screws.
- Insert 4 shelf supports and place the shelf. Note: The cabinet will only lock when the shelf is placed in the center position.
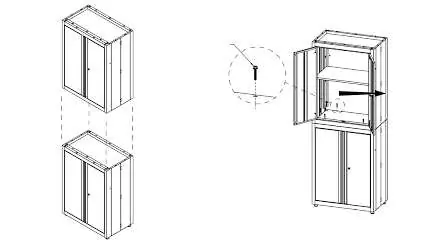
2 Door Stacking Cabinet
- Unfold the panels.
- Attach the top panel using 8x M6x16mm hex socket head screws.
- Place the top panel on the bottom cabinet (do not attach yet).
- Turn the top cabinet over and attach the bottom panel using 7x M6x16mm screws.
- Connect the top and bottom cabinets using M6x35mm hex flange bolts.
Maintenance and Adjustments
Drawer Removal: Pull the drawer out until it is almost fully extended. Push up the right-hand black release lever while pulling down the left-hand black release lever, then pull the drawer out until it is released from the slides.
Drawer Replacement: Extend the drawer slides. Insert the brackets on each side of the drawer into the slots in the cabinet slides, ensuring they are properly positioned. Once inserted, close the drawer completely to set the slides.
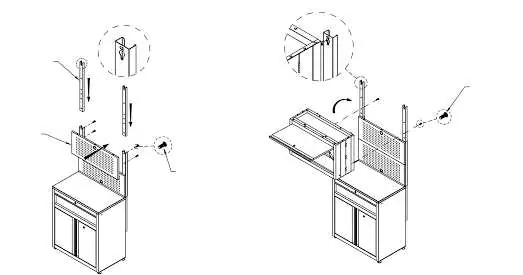
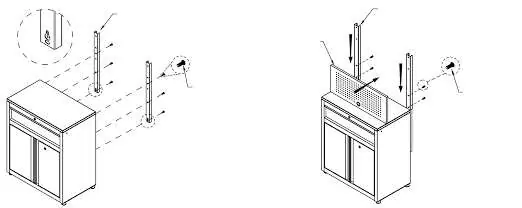
Wall Mounting
Attach the modular storage kit to the wall using twelve M6x65mm tapping screws and washers inserted through wall studs. Insert the 6 end cups on the side panels of the cabinets.
Contact Information
Sealey Group, Kempson Way, Suffolk Business Park, Bury St Edmunds, Suffolk. IP32 7AR. Phone: 01284 757500. Email: [email protected]. Website: www.sealey.co.uk.
Official resources from the manual
Manufacturer information
Sealey Group
Practical help
Common problems
Cabinet will not lock
Ensure the shelf is placed in the center position.
Drawer removal
Pull drawer out, push up right-hand release lever, pull down left-hand release lever, then pull out.
Before use
- Ensure the work area is clean and well-lit.
- Verify the floor is level and solid (preferably concrete).
- Wear protective gloves during assembly.
- Check that all parts are present from the pallet.
- Ensure wall studs are available if wall mounting.
Specs in practice
- Overall size
- 3100 x 460 x 2080mm
- Inner drawer dimensions
- 670 x 398 x 122mm
Images and diagrams
- Assembly diagrams illustrate the unfolding of flat-pack panels and screw locations.
- Wall mounting diagram shows the use of tapping screws into wall studs.
Model compatibility
- Can be free-standing or fixed to the wall.
- Extra units are available to extend the storage system.

Manual page author
Emily Carter
User documentation editor
Prepares concise manual descriptions and highlights the most useful setup, operation, and maintenance information for readers.