Tools / Welding Equipment
Sealey TIG/MMA Inverter Welder TIG130 and TIG160
Quick guide for Sealey TIG130 and TIG160 TIG/MMA Inverter Welders. Includes setup instructions for TIG and ARC welding, safety precautions, maintenance tips, and troubleshooting.
Table of contents
Manual images
Click an image to enlargeQuick guide from the manual
This manual provides essential safety and operational instructions for the Sealey TIG130 and TIG160 Inverter Welders. Before use, ensure you have read the safety section, inspected all cables for damage, and verified that your power supply matches the machine requirements. Always wear appropriate PPE, including a welding mask, gauntlets, and safety footwear.
Safety
Electrical Safety: Ensure the power supply is protected by an RCD. Do not use damaged cables or plugs. If using a generator, it must be stable in frequency, voltage, and waveform.
Operator Safety: Keep unauthorized persons away. Do not weld near flammable materials or in unventilated spaces. Be aware that magnetic fields may affect pacemakers. Always allow the workpiece and electrode holder to cool before touching.
Operation
TIG Welding Set Up:
- Select TIG mode on the machine.
- Plug the earth cable into the POSITIVE (+) terminal.
- Plug the TIG torch cable into the TIG torch terminal.
- Connect the gas pipe to the gas outlet and the gas bottle to the gas inlet on the back of the machine.
ARC (MMA) Welding Set Up:
- Select MMA mode on the machine.
- Connect the Electrode Holder to the POSITIVE (+) terminal.
- Connect the Work Clamp cable to the NEGATIVE (-) terminal.
- Attach the work clamp to the workpiece or a metallic workbench as close to the weld as possible.
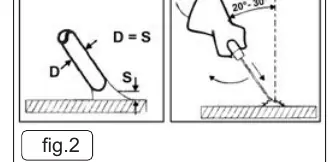
Welding Technique: Strike the electrode like a match. Maintain a distance from the workpiece equal to the diameter of the electrode. Keep the electrode angle between 20 and 30 degrees during the weld.
Maintenance
Routine Care:
- Switch off and disconnect from the mains before maintenance.
- Periodically remove the casing and use low-pressure air (max 1 bar) to remove dust. Do not direct air onto electronic circuit boards; use a soft brush instead.
- Ensure all electrical connections are tight.
- If the unit is not to be used for a long time, store it in the original packaging in a dry location.
- Warning: If the case is opened, wait 10-15 seconds after switching off for the capacitor to discharge.
Troubleshooting
- Power lamp not on: Check mains supply.
- Overheat indicator on: Thermal cut-out activated. Wait for the machine to cool down before restarting.
- Poor weld quality: Check if the welding current is suitable for the electrode diameter. Ensure the work clamp is correctly attached to the workpiece and the surface is free of grease or paint.
Manufacturer information
Sealey Group
Practical help
Common problems
Power lamp does not light up
Check the mains power supply and connections.
Overheat indicator is lit
The thermal cut-out has activated. Wait for the machine to cool down before attempting to restart.
Poor weld quality or difficulty striking arc
Ensure the work clamp is securely attached to the workpiece, the surface is clean (no paint/grease), and the current is set correctly for the electrode diameter.
Before use
- Inspect power cables, plugs, and connectors for wear or damage.
- Ensure the voltage matches your power supply.
- Verify the work area is well-ventilated and free of flammable materials.
- Ensure the work clamp is attached to a clean, conductive surface.
- Wear appropriate PPE: welding mask, gauntlets, and non-slip safety footwear.
Specs in practice
- Absorbed Power
- The power consumption of the unit (4.25kW for TIG130, 5.1kW for TIG160).
Images and diagrams
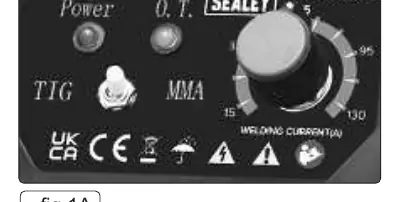
- Fig 1: Control panel layout showing the power switch, overheat indicator, potentiometer for current adjustment, and terminal connections.
- Fig 2: Welding technique diagram illustrating the correct electrode angle (20-30 degrees) and arc distance (D=S).
Model compatibility
- Suitable for welding steel, stainless steel, copper, nickel, titanium, and their alloys.
- Maximum power may require a 16A supply.
- Do not use welding cables longer than 10m.

Manual page author
David Miller
Documentation analyst
Organizes user manual content into clear summaries, with attention to model details, product context, and everyday usability.