Tools / Air Compressors & Pneumatics
User Manual for Sealey SUPERMIG100 100A No-Gas MIG Welder
Quick guide for the Sealey SUPERMIG100 100A No-Gas MIG Welder. Includes setup, wire installation, maintenance, troubleshooting, and safety instructions.
Table of contents
Manual images
Click an image to enlargeQuick guide from the manual
The Sealey SUPERMIG100 is a compact no-gas MIG welder designed for flux-cored wire. Before use, ensure you have read the safety instructions, particularly regarding electrical safety and the use of an RCD. The welder requires a 230V power supply and is suitable for gasless operation only.
Safety precautions
- Electrical Safety: Inspect power leads, plugs, and connections for wear before use. Use an RCD (Residual Current Device) with the power supply.
- Personal Protective Equipment: Always wear a welding mask and protective gloves to protect against arc rays and sparks.
- Environment: Ensure the work area is well-ventilated, clean, and free from flammable materials. Do not use in damp or wet conditions.
- Generator Use: If using a generator, it must be self-regulating and stable regarding voltage, waveform, and frequency.
Assembly and setup
Fitting the handle and cover spring
Slide the handle onto the top cover and secure it with the provided screw. Fix the cover locking spring to the top of the front panel using the supplied screw, washer, and spring washer.
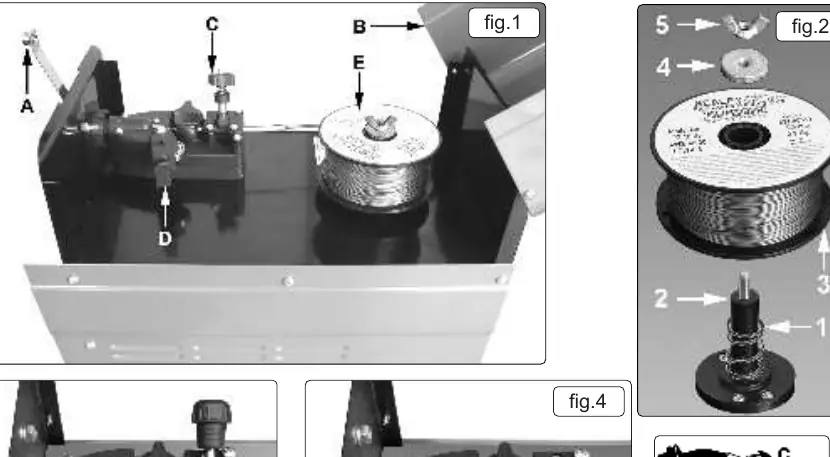
Fitting a reel of wire
- Depress the silver button on the handle to open the top compartment.
- Rotate the butterfly nut anti-clockwise and remove it along with the pressure disc, leaving the spring on the spindle.
- Place the wire reel over the spindle, ensuring the wire withdraws from the front.
- Replace the pressure disc and butterfly nut. Do not overtighten; the reel should have a mild braking effect.
- Straighten 40-50mm of wire, push it through the flexible guide and feed roller groove, and into the torch liner.
- Move the pressure roller moulding back into place and lock it.
Feeding wire to the torch
- Remove the gas cup and contact tip from the torch.
- Switch the welder on, set the voltage to MIN, and wire speed to 5 or 6.
- Press the torch switch to feed the wire through the torch cable.
- Once the wire protrudes, switch off the welder, replace the contact tip and gas cup.
Maintenance
Wire feed unit
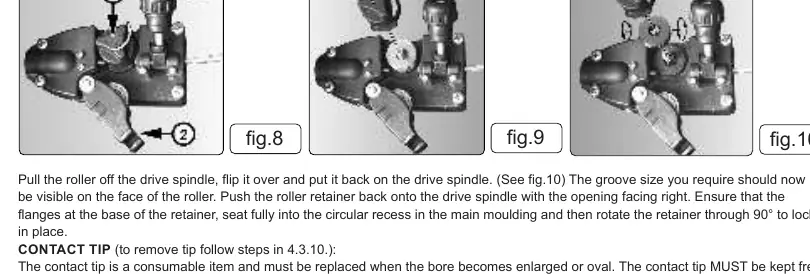
Regularly check the wire feed unit. Clean the rollers weekly, especially the feed roller groove, to remove dust. Ensure the correct groove (0.6mm or 0.9mm) is facing outward to suit the wire size.
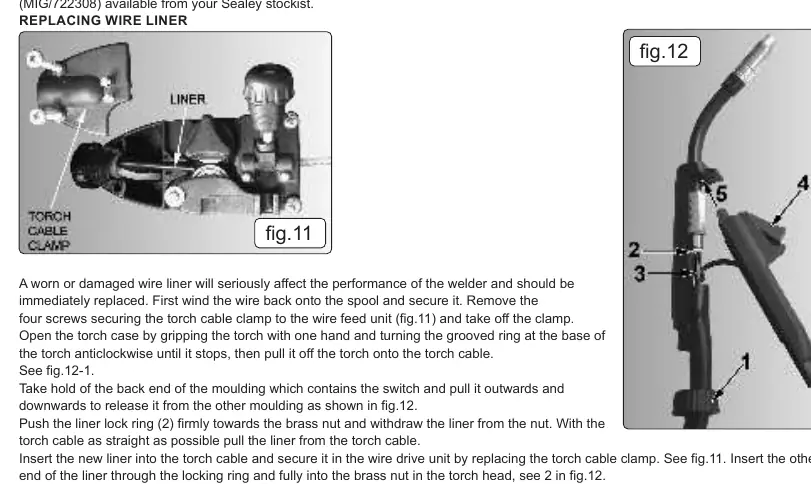
Torch and liner
Protect the torch cable from mechanical wear. If the wire feed is inconsistent, clean the liner using compressed air. If the liner is blocked or damaged, it must be replaced.
Troubleshooting
If you encounter issues, refer to the following:
- Weld current interrupted: Overheating protection may be active. Wait 15 minutes for the transformer to cool.
- No weld current: Check for a blown rectifier, bad connection between clamp and workpiece, or broken leads.
- Wire does not feed: Check if the pressure roller is properly adjusted, the liner is clean, or the gas cup/tip is defective.
- Unstable arc: Check settings, clean the workpiece, or replace the gas cup.
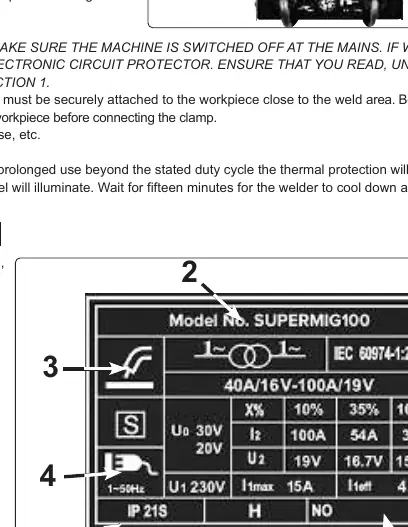
Specifications
- Welding Current: 40 - 100A
- Duty Cycle: 100% @ 32A, 35% @ 54A, 10% @ 100A
- Supply: 230V
- Absorbed Power: 3.3kW
- Wire Capacity: 1kg Gasless only
For technical support, contact Sealey at [email protected] or 01284 757505.
Manufacturer information
Sealey Group
Practical help
Common problems
Weld current interrupted
Overheating protection activated; wait approximately 15 minutes for the transformer to cool.
No weld current
Check for a blown rectifier, bad connection between clamp and workpiece, or broken earth/torch leads.
Wire does not feed
Adjust pressure roller tension, clean the torch liner with compressed air, or replace the gas cup/tip.
Unstable arc
Check settings, clean/grind the workpiece, or replace a worn gas cup.
Before use
- Inspect power supply leads, plugs, and connections for wear or damage.
- Ensure the area has adequate ventilation.
- Wear a welding mask and protective gloves.
- Ensure the workpiece is correctly secured.
- Check that the voltage marked on the product matches the power supply.
- Ensure the correct fuse rating (13A) is used.
Specs in practice
- Welding Current
- The output range of the welder (40 - 100A).
- Absorbed Power
- 3.3kW power consumption.
Images and diagrams
- Fig 1 & 2: Wire reel installation and pressure disc setup.
- Fig 3, 4, 5: Torch assembly and wire feeding procedure.
- Fig 7: Ratings plate explanation.
- Fig 8, 9, 10: Wire feed roller orientation and replacement.
- Fig 11, 12: Wire liner replacement procedure.
Model compatibility
- Suitable for gasless operation only.
- For use with flux cored wire only.
- Requires 13A fuse; 16A supply recommended for full capacity.

Manual page author
Emily Carter
User documentation editor
Prepares concise manual descriptions and highlights the most useful setup, operation, and maintenance information for readers.