Home Appliances / Cleaning Robots
User Manual for Sencor SRV 2230TI Robotic Vacuum Cleaner
Comprehensive user guide for the Sencor SRV 2230TI robotic vacuum cleaner. Includes setup, cleaning modes, maintenance, troubleshooting, and technical specifications.
Quick answers from the manual
Quick answer
- The Sencor SRV 2230TI is a robotic vacuum cleaner for hard floors and low-pile carpets. It features multiple cleaning modes, a mop function, and automatic charging. p. 8, 9
Key actions
- Charging the battery p. 8, 10
- Selecting cleaning modes p. 9
- Cleaning the dust container p. 11
First start
- Charge for at least 7 hours before first use. p. 8
Show 3 more answers Show less
Problems and fixes
Red 4x flash
Dust container is incorrectly inserted or missing.
p. 10
2x red, 1x blue flash
Anti-collision sensor error; clean the bumper bar.
p. 10
1x red, 3x blue flash
Fan motor error; clean the dust container and central brush.
p. 10Technical specifications
| Parameter | Value | Meaning | Pages |
|---|---|---|---|
| Dimensions | 320 x 80 mm | Diameter x height | p. 11 |
| Weight | 2.2 kg | Total weight | p. 11 |
| Operating time | up to 90 min | Per single charge | p. 11 |
Where to find it in the PDF
- Parts Diagram p. 4
- Charging Station p. 5
- Mop Installation p. 6
- Remote Control p. 7
Table of contents
Manual images
Click an image to enlargeQuick guide from the manual
The Sencor SRV 2230TI is a robotic vacuum cleaner designed for hard floors and low-pile carpets. Before first use, ensure the battery is fully charged for at least 7 hours. Always clear the floor of small items, cords, and lift curtains before starting. The device features multiple cleaning modes (Automatic, Spiral, Random, Along-the-walls, Zig-zag, and Max Power) and a mop function for wet/dry wiping.
Description of the appliance
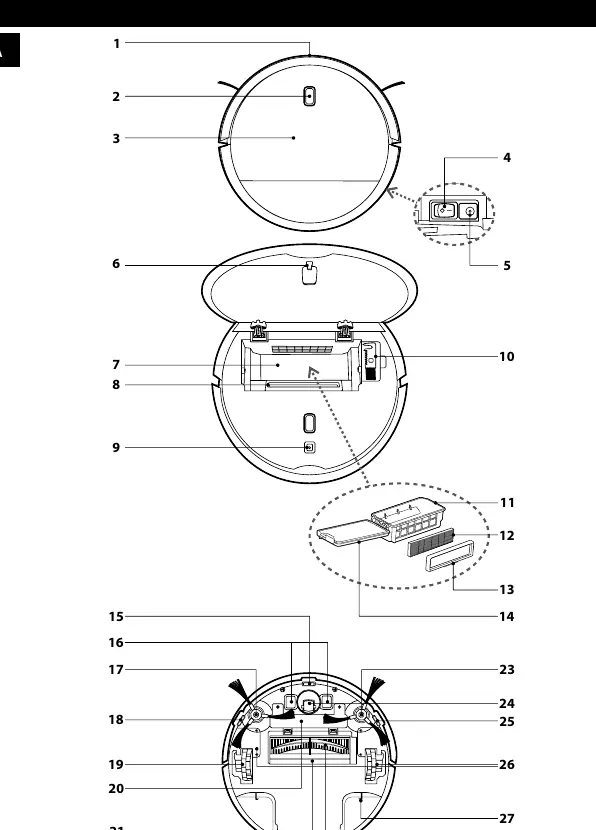
The vacuum cleaner consists of a main unit with a bumper, dust container, HEPA filter, and rotary brushes. It is controlled via the main switch, the button on the top cover, or the included remote control. The charging station is used for automatic recharging.
Preparation and installation
- Rotary brushes: Push the brushes onto the pins, ensuring the L and R markings match the vacuum cleaner. Remove them when cleaning carpets.
- Battery: Insert the battery into the compartment and connect the battery connector to the vacuum cleaner connector.
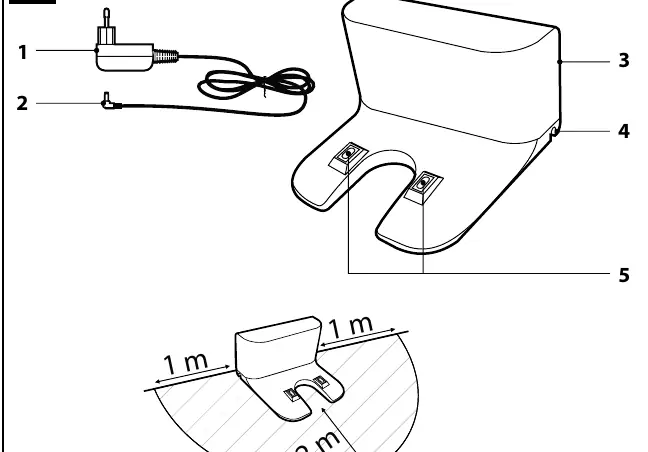
- Charging station: Place against a wall on a hard, even surface. Ensure 1m of clearance on the left/right and 2m in front.
Operating the vacuum cleaner
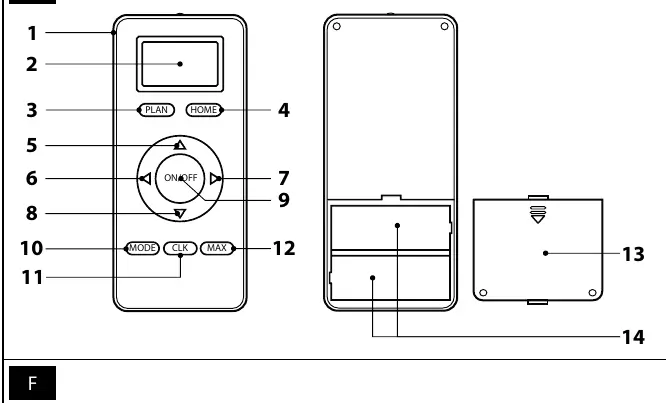
Turn on the main switch (position I) and press the start button to enter stand-by mode. Use the remote control to select cleaning modes:
- Automatic: Combines various movement patterns.
- Spiral: High power, lower speed, focused cleaning.
- Random: Moves in random directions.
- Along-the-walls: Cleans perimeters and corners.
- Zig-zag: Suitable for large areas without furniture.
- Max Power: Increases motor and brush power.
Mop function
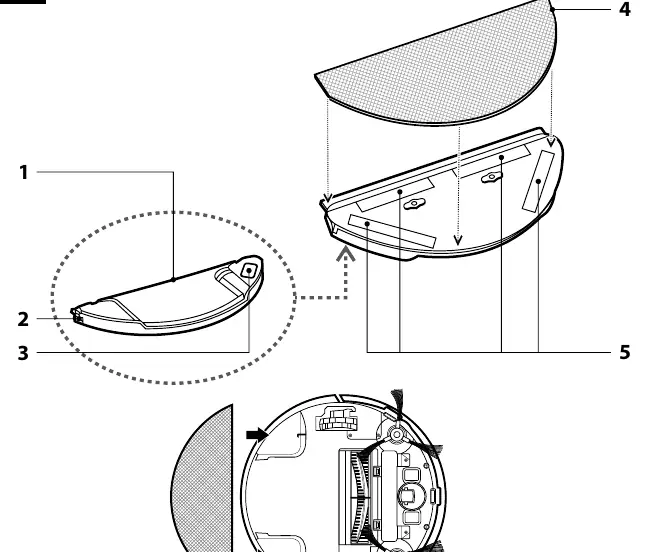
The mop is an auxiliary function for smooth hard floors. Attach the duster to the water tank using the velcro strips. For wet wiping, fill the tank with water (do not add detergent). Slide the tank into the tabs on the vacuum cleaner.
Cleaning and maintenance
- Dust container: Empty after every use. Wash the container under running water (not the filter).
- Filters: Tap out or clean the HEPA filter with a soft brush. Replace if damaged.
- Brushes: Remove hair and dirt regularly. If bristles are deformed, dip in warm water to restore shape.
- Sensors: Wipe the bottom sensors and wheels weekly with a soft dry cloth.
Troubleshooting
The vacuum cleaner indicates errors via audio signals and flashing lights on the top button. If the vacuum cleaner stops, check the dust container, sensors, and wheels for obstructions. If the vacuum cleaner travels backwards, move it to a lighter-colored floor.
Manufacturer information
Sencor
Practical help
Common problems
Vacuum cleaner cannot be turned on
Check if the battery is inserted correctly and fully charged.
Not vacuuming dust and dirt
Empty the dust container and ensure the HEPA filter is properly installed.
Travels only backwards
Move the vacuum cleaner to a lighter-colored floor; clean the anti-fall sensors.
Rotary brushes not sweeping
Clean brushes of hair/dirt; if deformed, dip in warm water to restore shape or replace.
Before use
- Remove small items (toys, cords) from the floor.
- Close entry doors.
- Lift curtains and drapes.
- Ensure dust container and HEPA filter are installed.
- Charge the battery for at least 7 hours before first use.
- Turn on the main switch.
Show more Show less
Specs in practice
- Operating time
- Up to 90 minutes per charge
- Dust container capacity
- 500 ml
- Charging time
- 4-7 hours
Images and diagrams
- A: Main unit parts and sensors.
- B: Charging station placement and connection.
- C: Battery and brush installation.
- D: Mop attachment.
- E: Remote control layout.
Model compatibility
- Intended for hard floors (wood, laminate, tiles, vinyl) and low-pile carpets.
- Do not use in industrial surroundings or outdoors.
- Not intended for vacuuming water or wet areas.

Manual page author
Emily Carter
User documentation editor