Home Appliances / Cleaning Robots
User Manual for Sencor SRV 2010TI Robotic Vacuum Cleaner
Comprehensive user guide for the Sencor SRV 2010TI robotic vacuum cleaner. Includes setup instructions, operating modes, maintenance procedures, troubleshooting, and technical specifications.
Quick answers from the manual
Quick answer
- The Sencor SRV 2010TI is a robotic vacuum cleaner for hard floors and low-pile carpets. It features automatic, along-the-walls, and spiral cleaning modes, and automatically returns to the charging station when the battery is low. p. 9, 10
Key actions
- Charging the battery p. 10
- Cleaning the dust container p. 12
First start
- Install the battery and charge fully before first use. p. 10
Problems and fixes
Error codes C01-C23
Refer to the error message table on page 12 for specific causes and solutions.
p. 12Error codes
| Code | Meaning | Action | Pages |
|---|---|---|---|
| C01 | Wheels not in contact with floor | Place vacuum on floor | p. 12 |
Technical specifications
| Parameter | Value | Meaning | Pages |
|---|---|---|---|
| Power input | 40 W | Power consumption | p. 12 |
| Battery | Li-Ion / 14.4 V / 2850 mAh | Battery type and capacity | p. 12 |
Where to find it in the PDF
- Parts and Accessories p. 5, 6
- Remote Control p. 7, 9, 10
- Maintenance p. 12
Table of contents
Manual images
Click an image to enlargeQuick guide from the manual
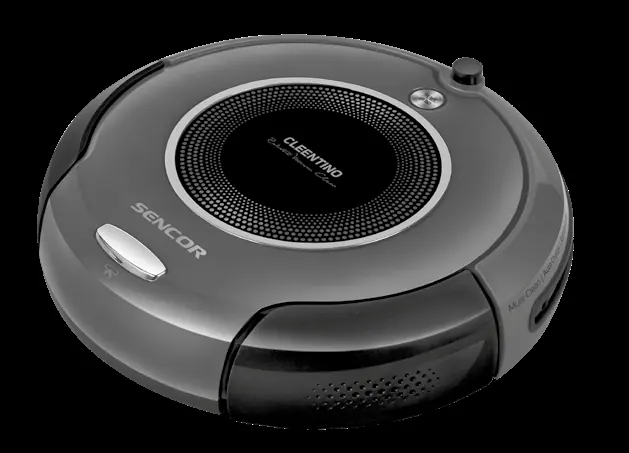
The Sencor SRV 2010TI is a robotic vacuum cleaner designed for hard floors and low-pile carpets. Before first use, ensure the battery is installed and fully charged. The device features automatic, along-the-walls, and spiral cleaning modes. It automatically returns to the charging station when the battery is low. Always clear the floor of cables, toys, and fragile items before starting a cleaning cycle.
Description of the robotic vacuum cleaner
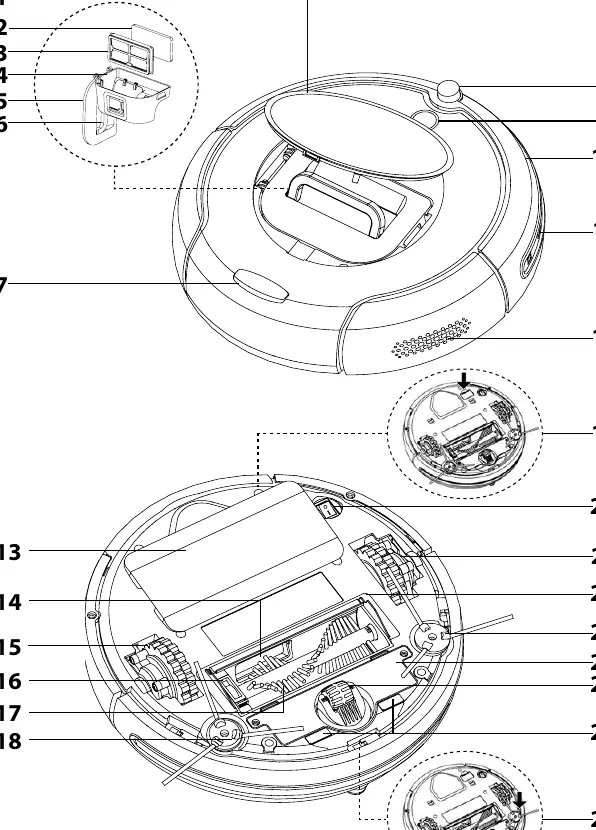
The vacuum cleaner consists of a main unit with a dust container, inflow filters, bumper with sensors, and motorized wheels. Accessories include a charging station, power adapter, remote control, side rotary brushes, and a mop head with a textile sleeve.
Installation and first use
- Battery Installation: Turn the vacuum upside down, remove the battery compartment cover, connect the battery, and secure the cover.
- Charging Station: Place against a wall on a hard, dry surface with 1.5m of clearance. Connect to a power socket.
- Side Brushes: Attach the side rotary brushes using the provided screws and hex key.
- Mop Attachment: Attach the textile sleeve to the mop head using Velcro and secure it to the vacuum.
Operating modes
- Automatic Cleaning: Combines various routes to clean the entire floor area.
- Along-the-Walls Cleaning: Travels along the perimeter to clean corners and edges.
- Spiral Cleaning: Moves in a spiral pattern to clean concentrated areas of dirt.
- Return to Charging Station: Automatically seeks the charging station when the battery is low.
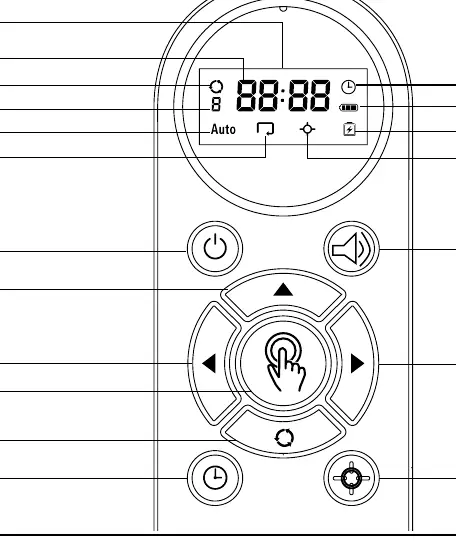
Remote control
The remote control allows you to set the operating mode, schedule cleaning times, adjust the number of cleaning cycles, and locate the vacuum cleaner via an acoustic signal. The signal range is approximately 6 meters.
Maintenance and cleaning
- Dust Container: Empty after each use.
- Filters: Clean inflow filters weekly and replace every three months.
- Brushes and Wheels: Regularly remove hair and debris from the central brush, side brushes, and wheels.
- Sensors: Wipe the bumper and bottom sensors with a soft, dry cloth.
Troubleshooting
The vacuum cleaner reports errors via acoustic signals and error codes on the remote control display. Common issues include wheels not touching the floor (C01), soiled sensors (C03-C05), or foreign objects blocking brushes (C07-C08). Always turn the power switch to 0 (off) before performing maintenance or clearing blockages.
Technical specifications
The device has a power input of 40W and uses a 14.4V Li-Ion battery. Charging takes 3-5 hours, providing up to 80 minutes of operation. The dust container capacity is 230 ml.
Manufacturer information
Sencor
Practical help
Common problems
Wheels not in contact with floor (C01)
Place the vacuum cleaner on the floor so both wheels are in contact.
Sensors soiled (C03, C04, C05)
Turn off the device and clean the respective sensor with a dry cloth.
Foreign items blocking brushes (C07, C08)
Turn off the device and remove items blocking the side rotary brushes.
Battery temperature too high (C12)
Turn off the device and allow the battery to cool down.
Low battery (C13)
Manually place the vacuum cleaner into the charging station.
Before use
- Install the Li-Ion battery into the compartment.
- Charge the battery fully (3-5 hours) before first use.
- Clear the floor of cables, toys, and fragile items.
- Close doors to rooms you do not want cleaned.
- Ensure the inflow filter is correctly installed.
- Attach side rotary brushes.
Specs in practice
- Charging time
- 3–5 hours
- Operating time
- Up to 80 minutes
- Dust container capacity
- 230 ml
Images and diagrams
- A: Main unit components and sensors.
- B: Accessories including charging station, remote, and brushes.
- C: Charging station details.
- D: Remote control buttons and display indicators.
- E: Cleaning mode patterns.
Model compatibility
- Suitable for hard floors (wood, laminate, tile, vinyl).
- Suitable for low-pile carpets.
- Not suitable for high-pile carpets.
- Do not use in rooms with high humidity or outdoors.

Manual page author
Michael Turner
Technical manual editor
Reviews PDF manuals for structure, safety notes, and practical product details so readers can find the right information quickly.