Electronics / Emergency Radios
User Manual for Sencor SRV 1000SL Robotic Vacuum Cleaner
Quick guide for the Sencor SRV 1000SL robotic vacuum cleaner. Learn how to install brushes, charge the battery, use the mop function, clean the dust container, and troubleshoot common issues.
Table of contents
Manual images
Click an image to enlargeQuick Start Guide
To begin using your Sencor SRV 1000SL, ensure the battery is installed and fully charged. Before the first use, charge the battery for at least 8 hours. Clear the floor of small objects, cords, and toys, and close doors to areas you do not want the vacuum to enter. Ensure the dust container and filter are properly installed before starting.
Safety Information
- Do not use the vacuum in rooms with high humidity (bathrooms, laundries) or outdoors.
- Do not vacuum water, liquids, smouldering cigarettes, ash, or sharp items.
- Keep the power adapter and cord dry; do not use if damaged.
- Children should not play with the appliance.
- Always disconnect from power before cleaning or maintenance.
Product Overview
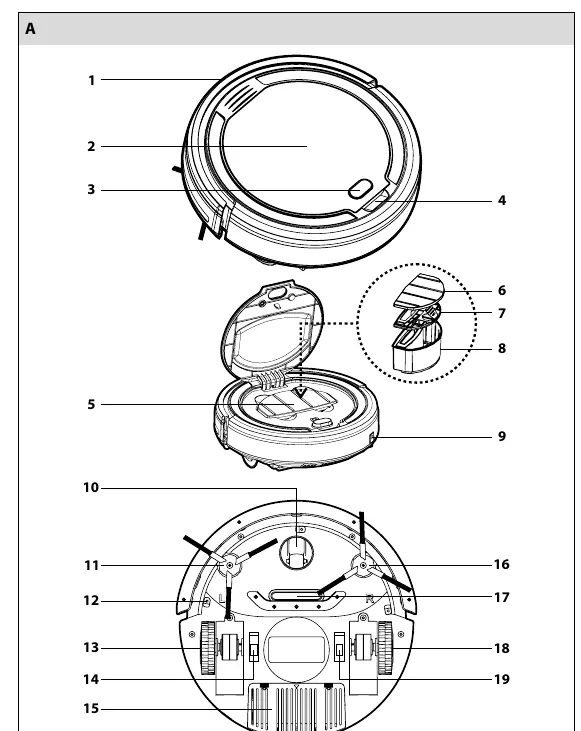
The vacuum features a bumper bar, dust container, side rotary brushes, anti-fall sensors, and motorized rubber wheels. It is designed for hard floors and low-pile carpets. The power button indicator shows status: red (weak battery/error/full dust container), flashing blue (charging), and lit blue (fully charged).
Preparation and Setup
Rotary Brushes: Turn the vacuum upside down. Push the brushes onto the pins, ensuring the 'L' and 'R' marks on the brushes match the vacuum. Remove them when cleaning carpets.
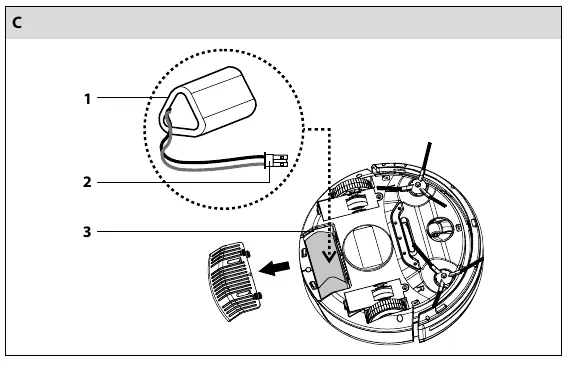
Battery Installation: Open the battery cover on the underside. Connect the battery connector (C2) to the vacuum connector (C3) and insert the battery into the compartment.
Charging: Plug the adapter into the vacuum socket and then into a power outlet. The indicator will flash blue while charging and stay lit blue when fully charged.
Operation
Press the power button to start vacuuming. To stop, press the power button again. If the vacuum encounters an error (e.g., jammed wheel) or the dust container is full, the indicator will turn red and an acoustic signal will sound.
Mop Function
The mop is an auxiliary function for dry or wet cleaning of smooth hard floors. Attach the anti-static duster to the holder using the Velcro tape. Click the assembled mop into the holes on the underside of the vacuum. After use, remove the duster, wash it by hand, and allow it to dry.
Cleaning and Maintenance
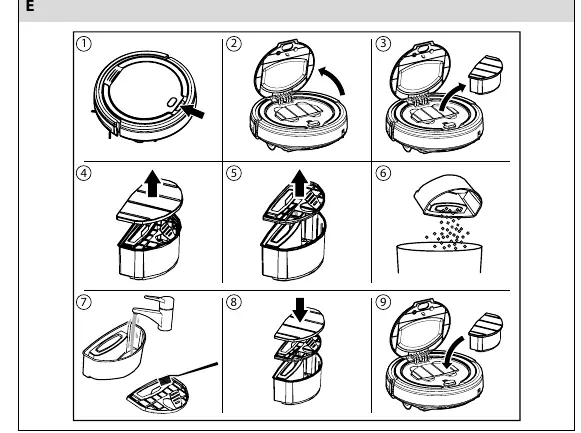
Dust Container: Open the top lid, remove the container, empty the bin, and clean the filter with a soft brush. Wash the container under running water if necessary, but dry it thoroughly before re-installing.
Wheels and Sensors: Regularly clean the front swivel wheel, motorized wheels, and bottom anti-fall sensors to ensure optimal performance.
Troubleshooting
If the vacuum does not turn on, check the battery connection and charge level. If it is not picking up dirt, check if the dust container is full or the filter is improperly installed. If it travels only backwards, clean the anti-fall sensors or move it to a lighter-colored floor.
Technical Specifications
- Suction power: 10 W
- Operating time: up to 80 minutes
- Dust container capacity: 200 ml
- Charging time: 2 - 2.5 hours (standard)
- Battery: 1,500 mAh Li-Ion
Manufacturer information
Sencor
Practical help
Common problems
Vacuum cleaner cannot be turned on
Check if the battery is inserted correctly or if the battery is flat and needs charging.
Vacuum is on but not picking up dirt
Empty the dust container and ensure the dust filter is properly installed.
Vacuum travels only backwards
The floor may be too dark, or the anti-fall sensors are dirty. Clean the sensors or move to a lighter floor.
Indicator stays blue after 3 hours of charging
There was likely a power outage during charging. The vacuum is functional and can be used.
Before use
- Remove small items like toys, paper, and cords from the floor.
- Close doors to rooms you do not want cleaned.
- Lift curtains that reach the floor.
- Ensure the dust container and filter are installed.
- Charge the battery for at least 8 hours before the first use.
Specs in practice
- Suction power
- 10 W, sufficient for dust and hair on hard floors.
- Operating time
- Up to 80 minutes on a single charge.
- Dust container capacity
- 200 ml, requires regular emptying.
- Charging time
- 2 - 2.5 hours for a standard charge.
Images and diagrams
- Diagram A: Shows the location of the bumper, dust container, sensors, and wheels.
- Diagram E: Illustrates the step-by-step process for removing, emptying, and cleaning the dust container.
Model compatibility
- Suitable for hard floors (wood, laminate, tiles, vinyl) and low-pile carpets.
- Not suitable for outdoor use or high-humidity environments like bathrooms.
- Do not use on wet surfaces or to vacuum liquids.

Manual page author
Michael Turner
Technical manual editor
Reviews PDF manuals for structure, safety notes, and practical product details so readers can find the right information quickly.