Tools / Welding Equipment
Operation Manual for SFDC LW Series Laser Welding Machine
Comprehensive operation manual for the SFDC LW Series laser welding machine. Includes installation steps, safety guidelines, controller settings, maintenance procedures, and troubleshooting.
Table of contents
Manual images
Click an image to enlargeQuick guide from the manual
This manual provides essential instructions for the safe and efficient operation of the SFDC LW Series laser welding machine. Before operating the equipment, ensure the following safety conditions are met:
- Safety: This is a Class IV radiation laser. Always wear protective goggles.
- Environment: Do not use in areas with flammable or explosive materials. Ensure good ventilation with at least 60cm of clearance around the machine.
- Grounding: The equipment must be reliably grounded.
- Protective Gas: Ensure protective gas pressure is at least 0.15MPa.
- Cable Handling: The minimum bending radius of the integrated cable must be more than 200mm.
- First Use: If the red light does not emerge from the copper nozzle, do not emit the laser.
Product Description
The LW Series (LW-1000, LW-1500, LW-2000) is designed for welding carbon steel, stainless steel, aluminum, and copper. Key technical parameters include:
- Laser Power: 1000W, 1500W, or 2000W depending on the model.
- Operating Mode: Continuous or modulated.
- Cooling: Water cooling (distilled, deionized, or pure water).
- Input Voltage: AC220V ±10%.
Installation and use instructions
Follow these steps to install the machine:

- Connect the laser welding machine host power cord.
- Connect the protective gas supply.
- Connect the control cable between the host and the wire feeder.
- Connect the wire guiding tube.
- Install the welding wire: Place the reel on the shaft, align with the positioning pin, open the pressure adjustment knob, insert the wire through the pressing wheels and guiding tube, and ensure it exits the welding head nozzle. Adjust the pressure knob to ensure proper feeding force.
Operation Process
Start-up: Check the water level in the chiller, connect power, turn on the main power, turn off the emergency stop, and turn on the laser switch. Adjust protective gas pressure to ≥ 0.15MPa.
Focusing: For first-time use, loosen the fixing screws on the telescopic tubes of the welding head. Insert the tubes fully. Set laser power to 30%. Trigger the laser against a test plate to find the point of largest energy (focus). Pull the telescopic tube out by about 4mm and lock it.
Welding: Clamp the safety clip to the workpiece or welding table. Set parameters on the controller, touch the welding head to the workpiece, and press the switch button to start.
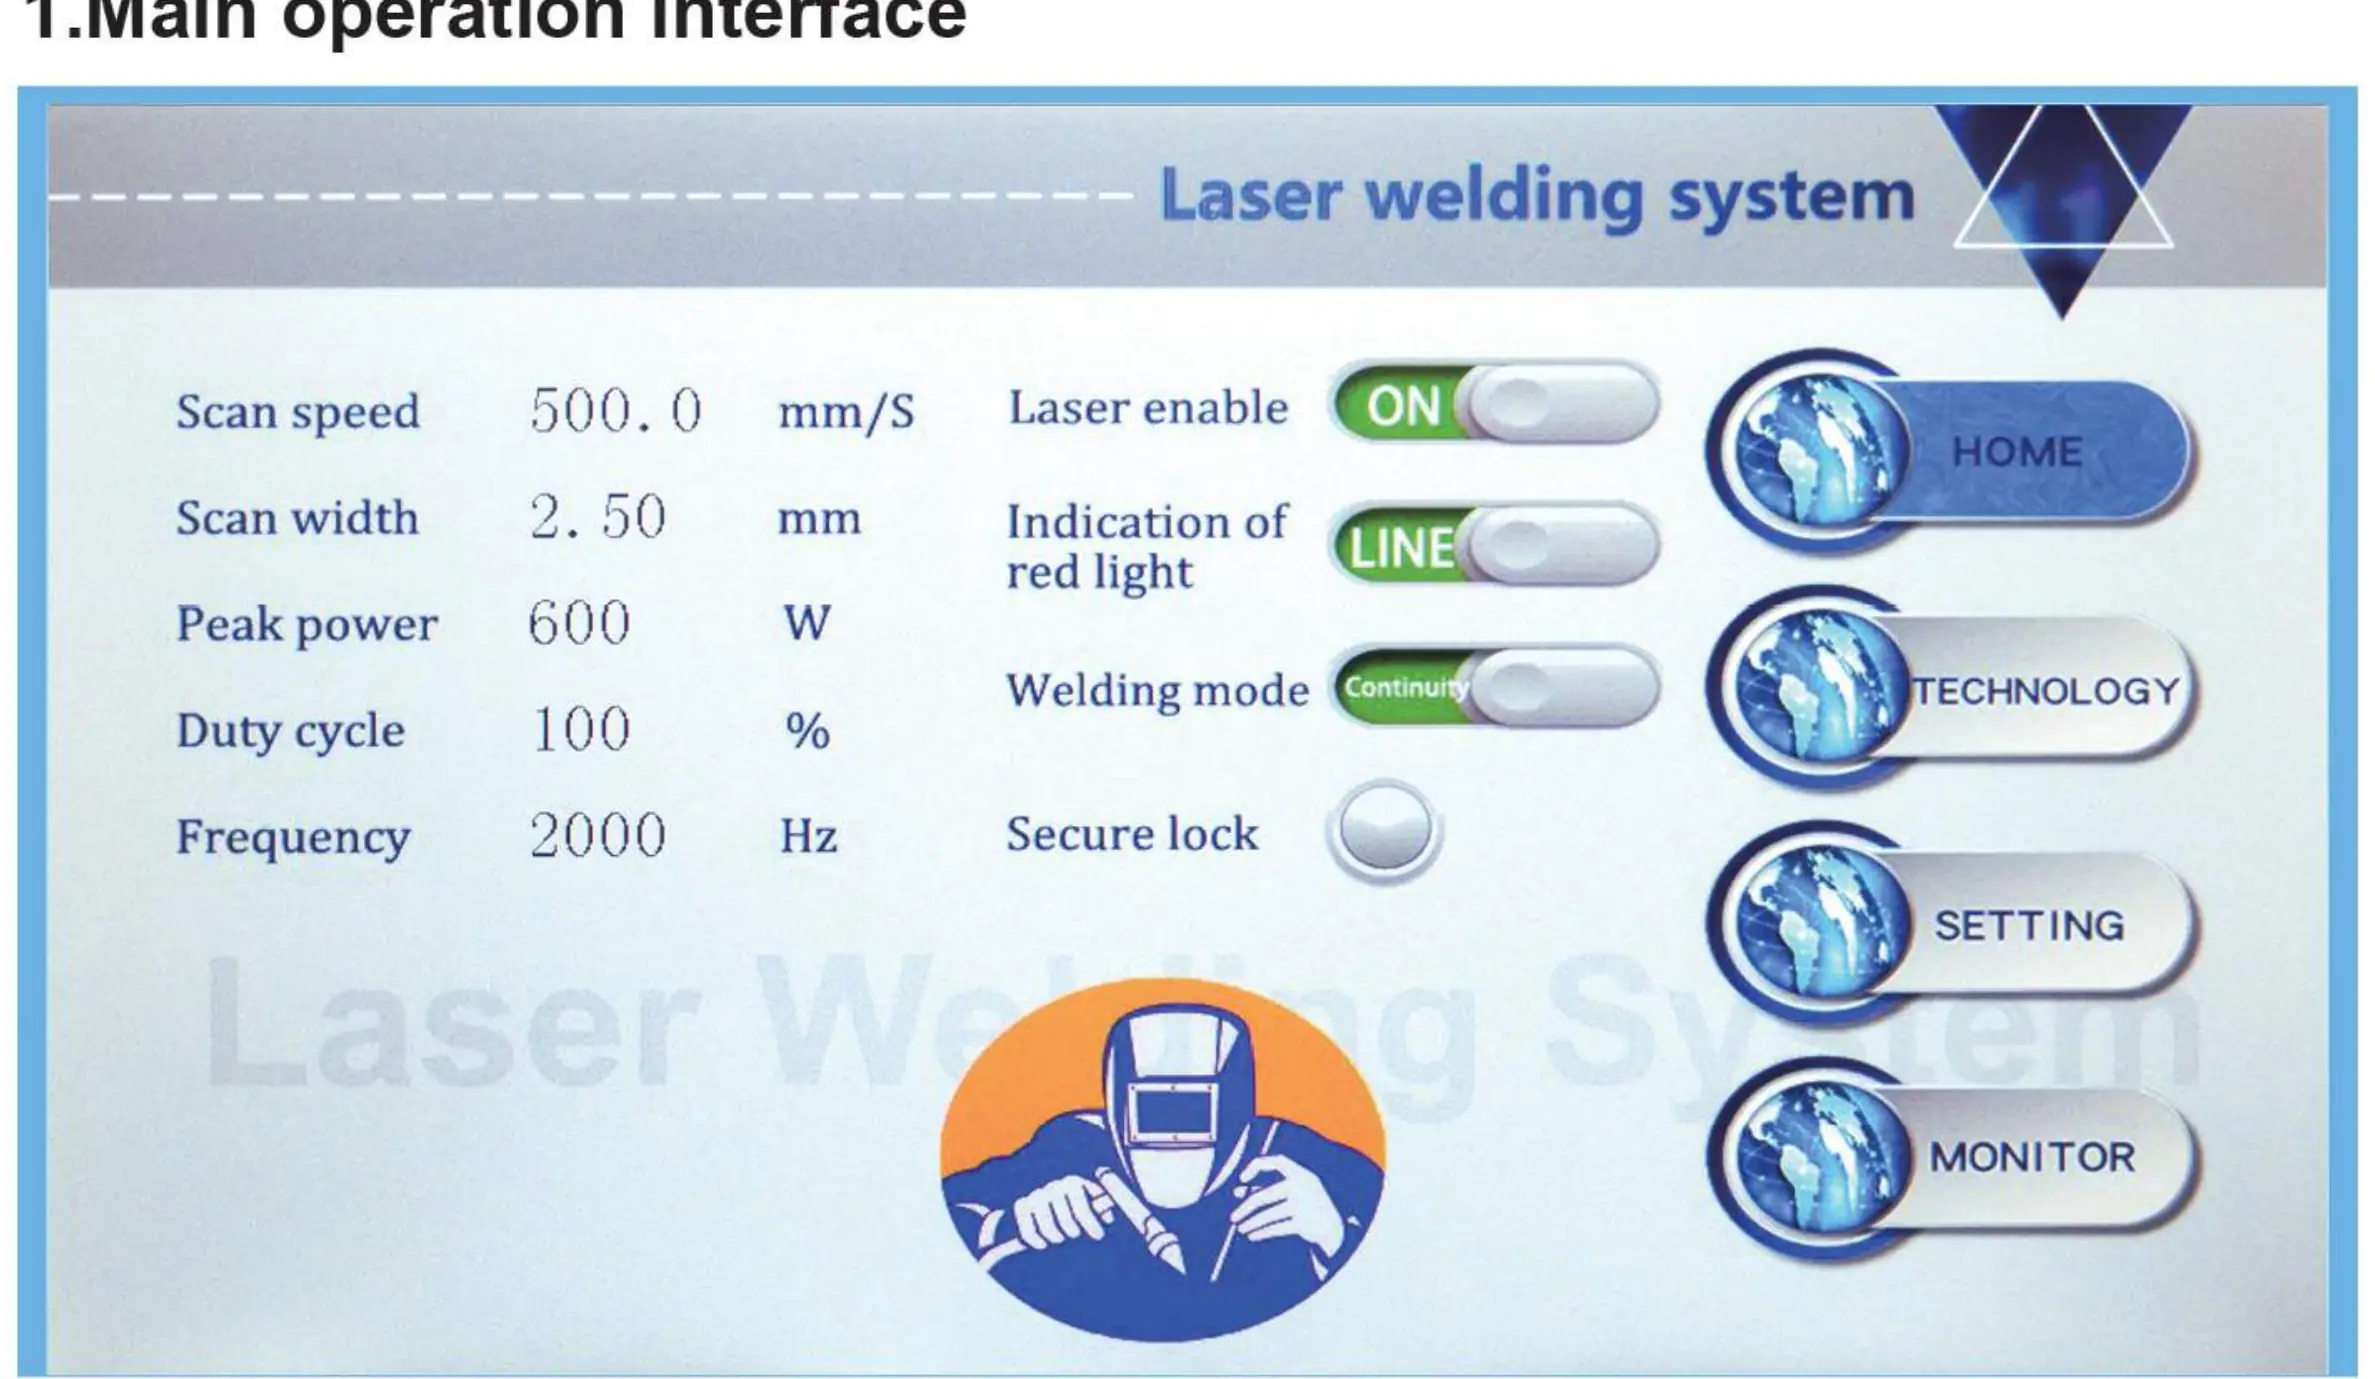
Laser Welding Controller Setting
The main interface allows you to monitor and adjust parameters like scan speed, scan width, peak power, duty cycle, and frequency. The Technology interface allows you to save and import process parameters for different materials. The Setting interface provides advanced configuration, including gas delay times, laser power ramping, and alarm thresholds. The default password is 123456.
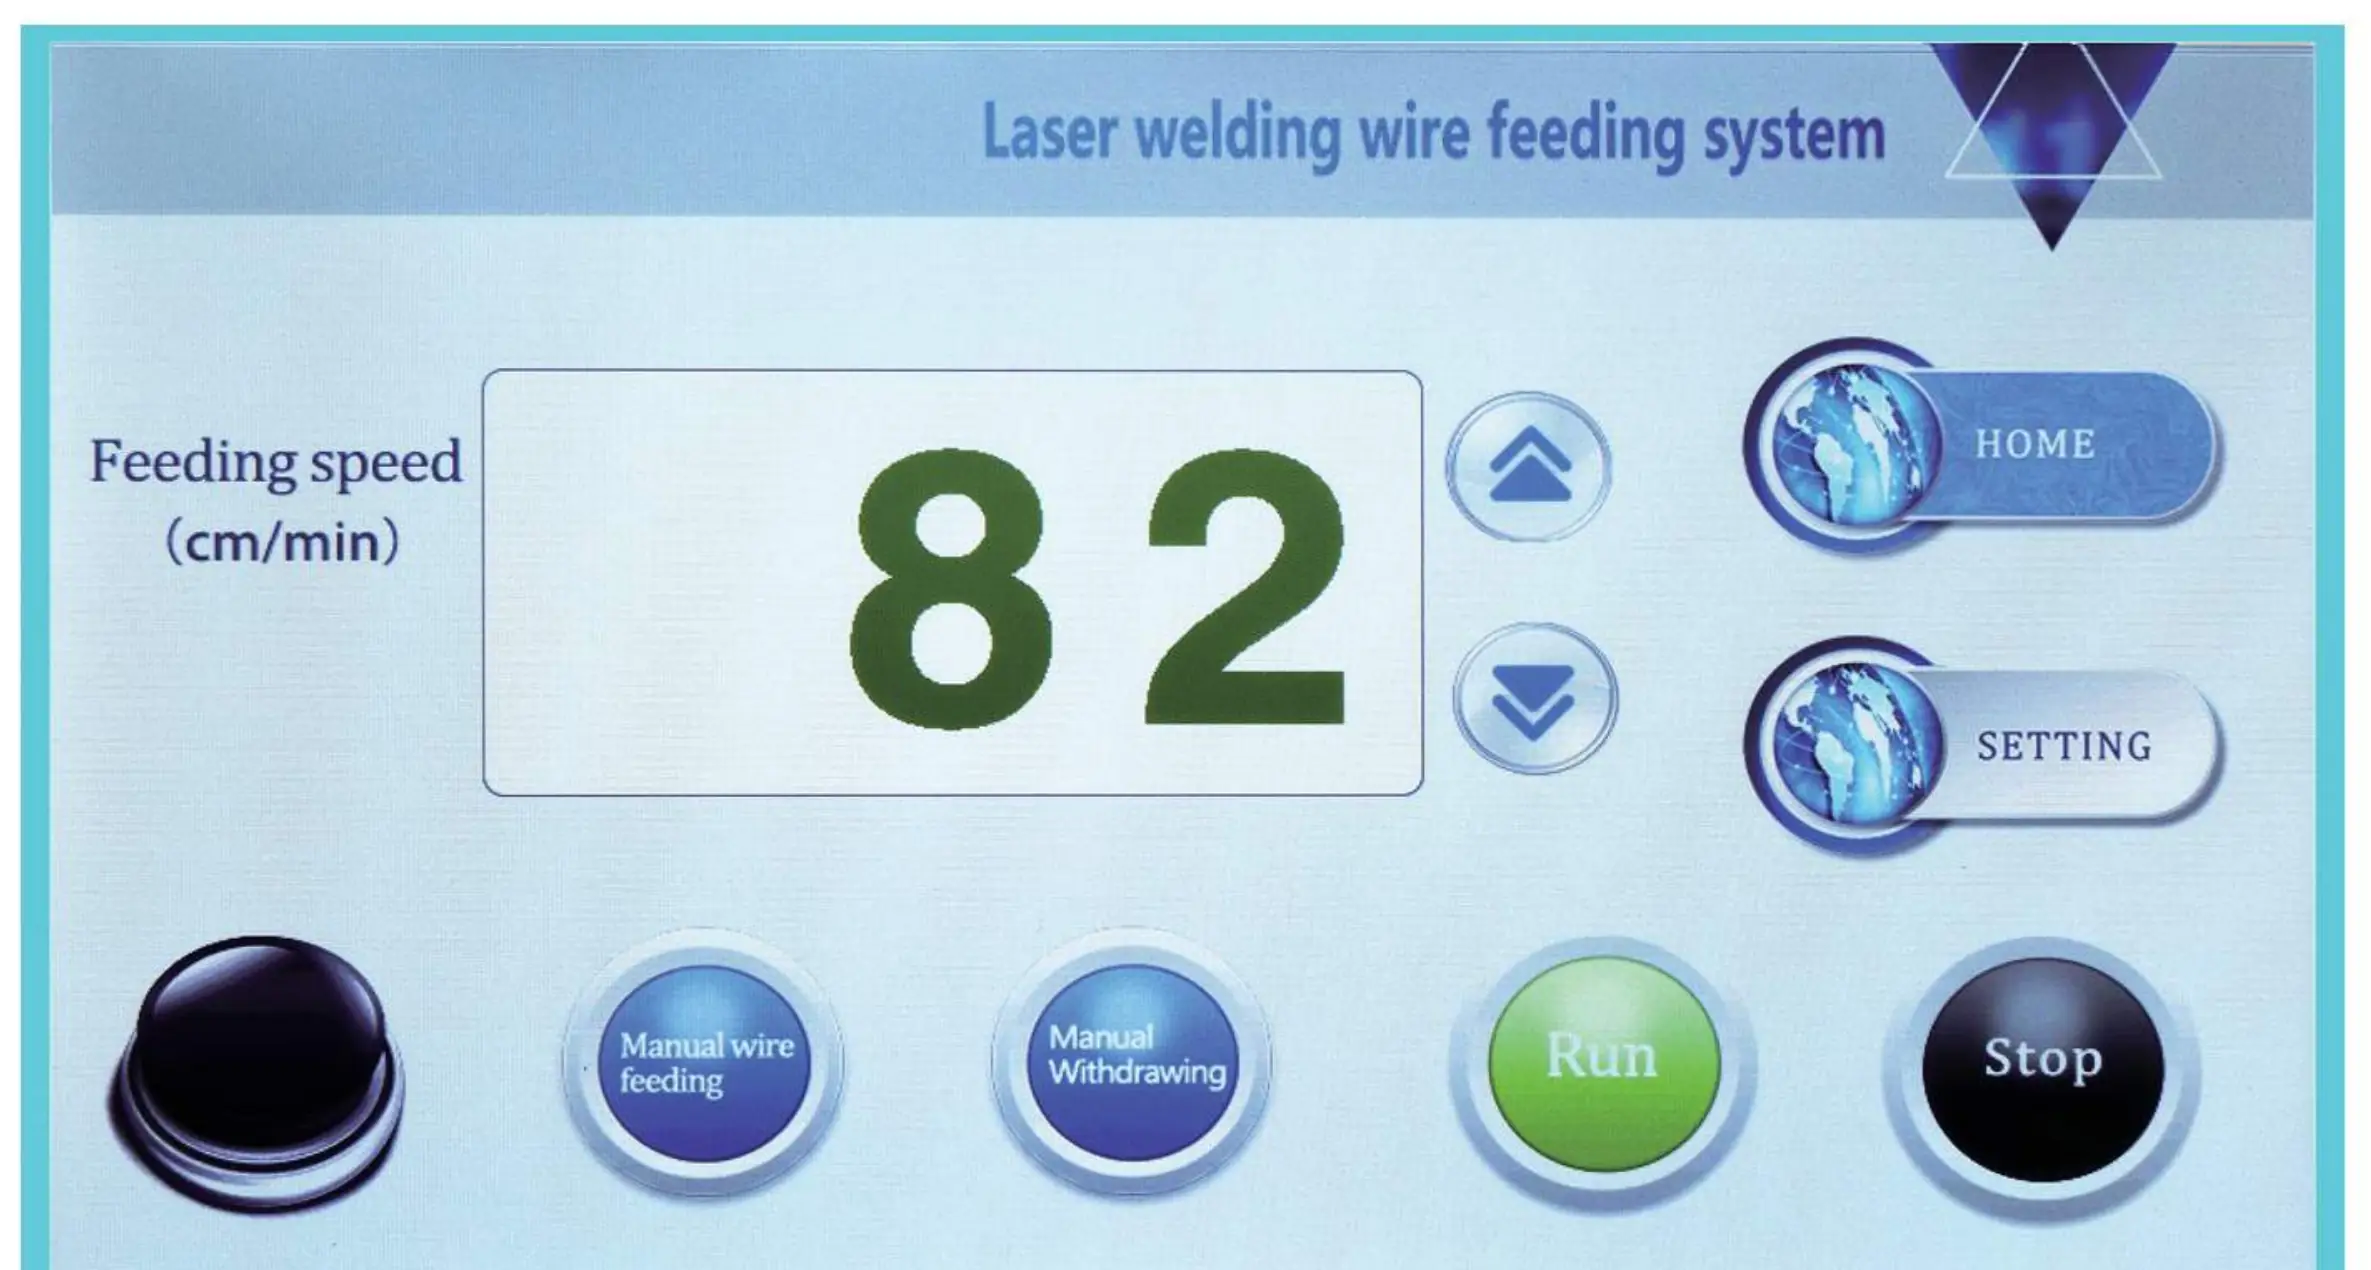
Wire Feeder Setting
The wire feeder has its own control screen. You can adjust the feeding speed, manual wire feeding, and manual withdrawing. The setting interface allows configuration of start-up delay, withdrawal length, and supplement length, which is useful for managing broken wires.
Maintenance
Maintenance must be performed by professionals:
- Welding Head: Daily inspection of the protective lens. Clean with a special dust-free cotton swab dipped in industrial alcohol. Replace if damaged.
- Water Chiller: Regularly clean the condenser and dust filter. Drain the coolant if the machine is transported or stored for a long time. Replace coolant after 3 months of use or after long-term non-use.
Troubleshooting
If issues arise, consult the following:
- Spot does not swing: Check for loose two-core wire connectors or damage to the motor/control card.
- Sudden loss of energy: Inspect the protective lens for dirt or damage; check the laser source.
- Welding head is hot: Check for dirty/damaged optical lens or optical path deflection.
- Sudden stop of light emission: Check if temperature alarm is triggered or if the safety lock has poor contact.
Practical help
Common problems
The spot does not swing
Tighten loose two-core wire connectors on the welding head or contact after-sales service if the motor/control card is damaged.
Sudden loss of energy during welding
Clean or replace the protective lens. If the issue persists, contact after-sales service as the laser source may be faulty.
Welding head is hot
Clean or replace the optical lens. Check for optical path deflection and ensure the connection between the optical fiber and welding head is secure.
Sudden stop of light emission
Check if the temperature alarm threshold is exceeded or if the safety lock has poor contact on the monitoring interface.
Before use
- Ensure the equipment is reliably grounded.
- Check the water level in the chiller to ensure it is within the standard area.
- Verify protective gas pressure is ≥ 0.15MPa.
- Clean the protective lens with a cotton swab dipped in special cleaning solution.
- Ensure the bending radius of the integrated cable is more than 200mm.
- Wear safety goggles as this is a Class IV laser.
Specs in practice
- Protective Gas Pressure
- Must be maintained at ≥ 0.15MPa for proper operation.
- Cooling Method
- Requires water cooling using distilled, deionized, or pure water.
- Input Voltage
- AC220V ±10%.
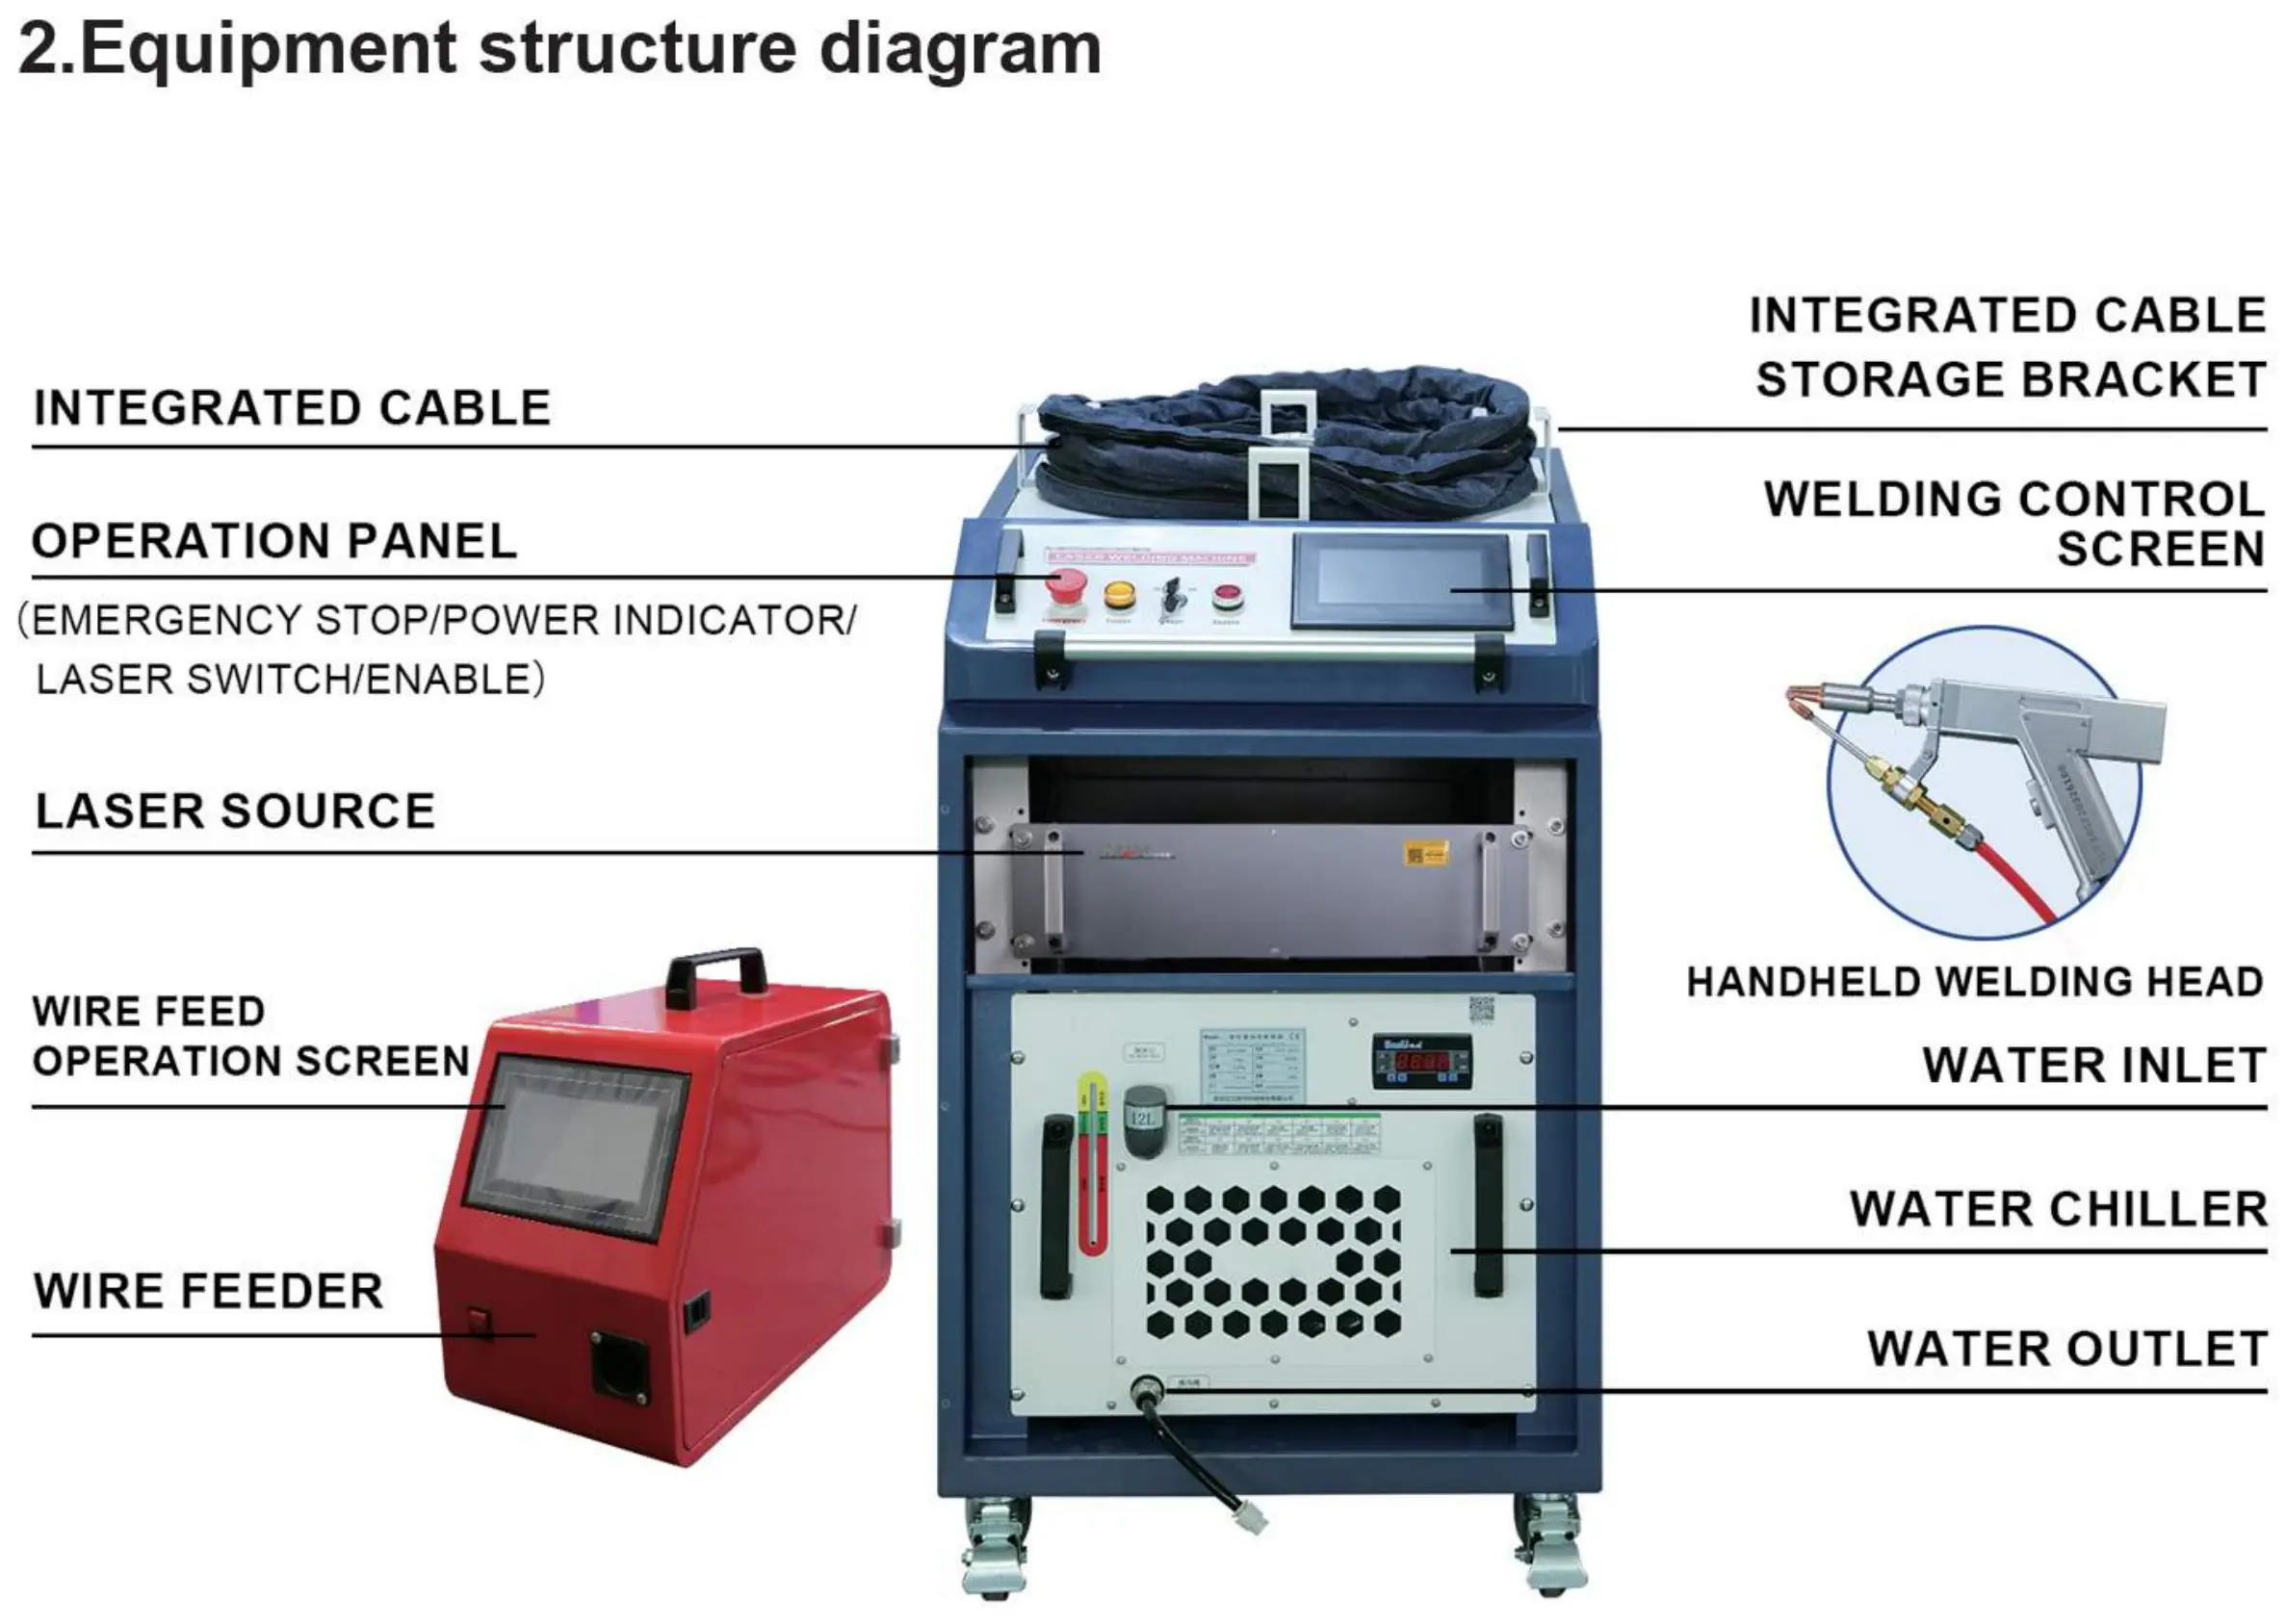
Images and diagrams
- Equipment structure diagram: Identifies the location of the laser source, wire feeder, welding head, control screen, and water chiller connections.
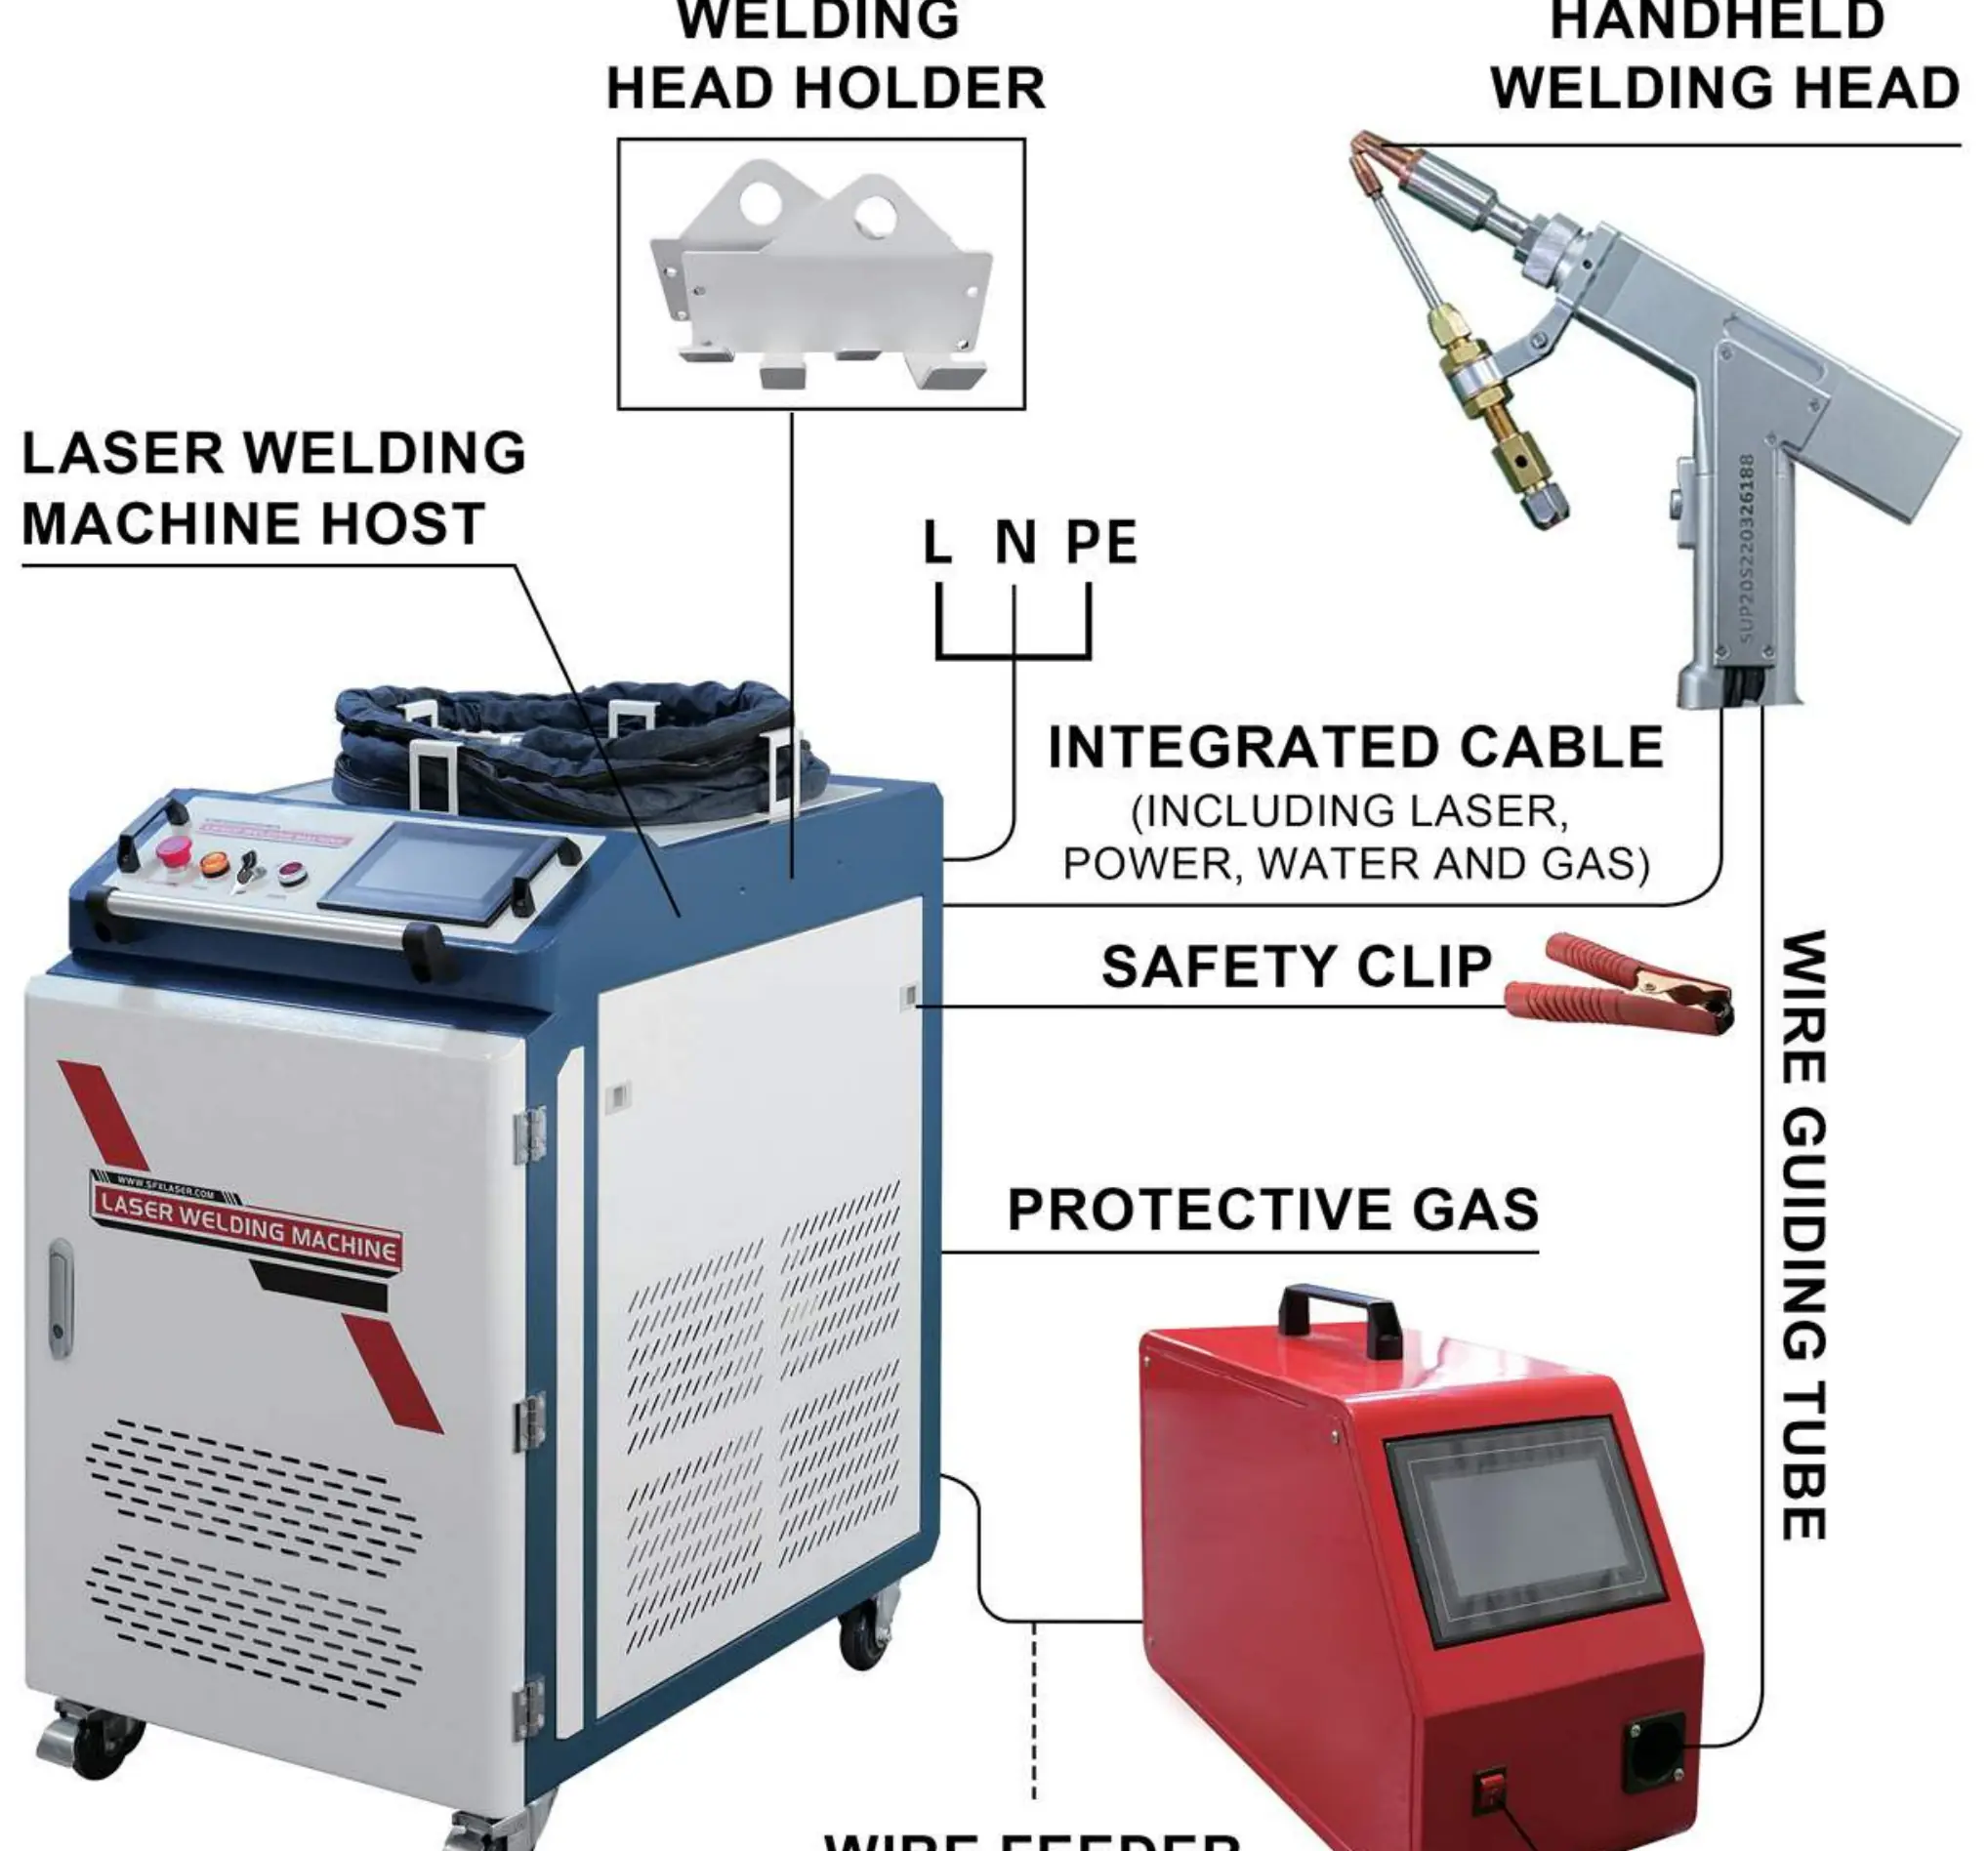
- Installation steps diagram: Shows the connection points for the welding head, safety clip, protective gas, and wire feeder control cable.
- Wire feeder diagram: Details the pressure adjustment button, wire feed wheel, and reel shaft for proper wire installation.
Model compatibility
- Compatible materials: Carbon steel, stainless steel, aluminum, copper.
- Environment: Temperature 0°C ~ 35°C, Humidity 40%-80%.

Manual page author
Emily Carter
User documentation editor
Prepares concise manual descriptions and highlights the most useful setup, operation, and maintenance information for readers.