Wearables / Vr Headsets
User Manual for Telwin PTE 28 LCD / PCP 28 LCD Pedal Spot Welder
Comprehensive user guide for the Telwin PTE 28 LCD and PCP 28 LCD pedal spot welders. Includes installation, safety, operation modes, maintenance, and troubleshooting.
Table of contents
Manual images
Click an image to enlargeQuick guide from the manual
This spot welder is designed for industrial and professional use, specifically for spot welding steel plates with low carbon content. The system generates electromagnetic fields (EMF) during operation; operators must maintain a minimum distance of 40cm from the welding circuit and avoid winding cables around their body. Residual Risk: There is a risk of crushing upper limbs. Never place hands near moving parts. Always use suitable protective glasses, gloves, and clothing.
Device Description and Control Panel
The spot welder features a digital microprocessor control. The control panel (FIG. D1) includes:
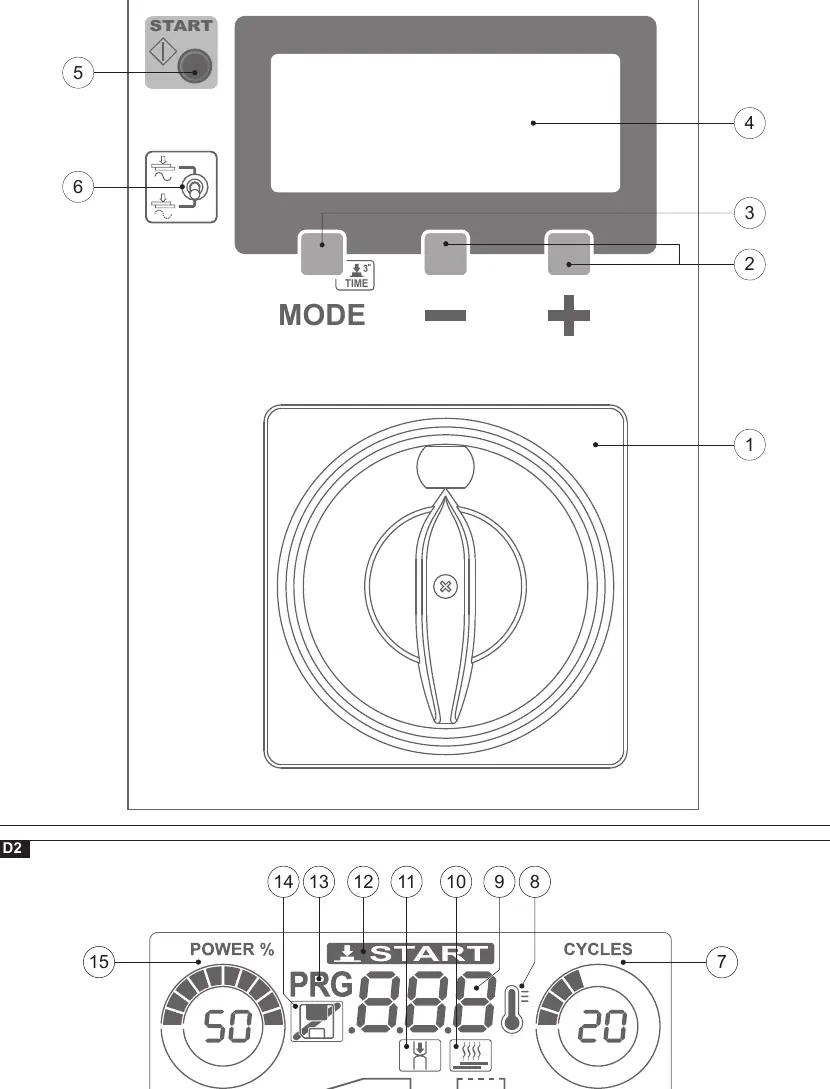
- Main Switch: Used to power the unit and lock it in the 'O' position for safety.
- LCD Display: Shows parameters and controls.
- Mode Button: Selects between 'REDUCED' (Easy) and 'EXTENDED' (Expert) modes.
- Start Button: Used to enable the machine after power-up or safety trips.
- Welding/No Welding Switch: Allows testing arm movement without current.
The display icons (FIG. D2) indicate parameters such as Power (%), Approach time, Ramp time, Welding time, Pause time, and Pulse number.
Installation and Connections
Installation must be performed by authorized, skilled personnel.
- Positioning: Place on a flat, stable surface. Secure to the floor using the four M10 holes on the base.
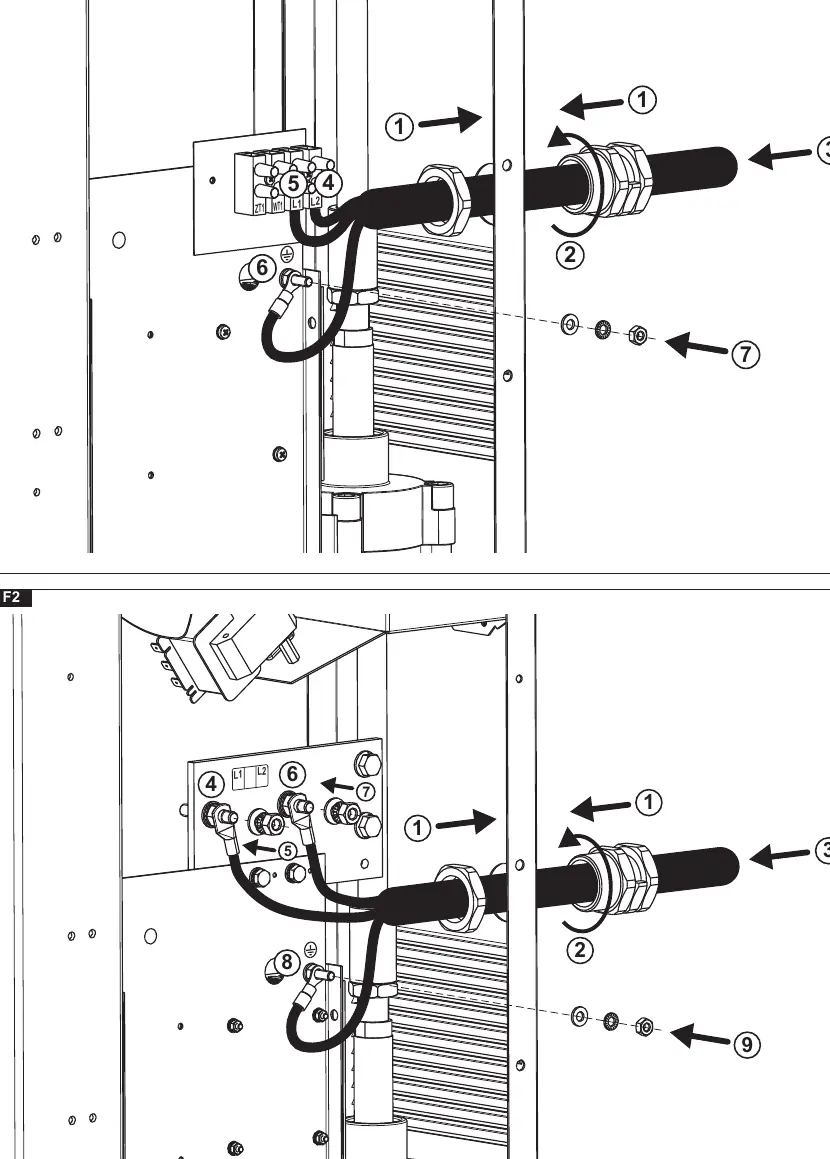
- Power Supply: Connect to a power supply with the neutral conductor connected to earth. Use the appropriate differential switch (Type A for single-phase, Type B for three-phase).
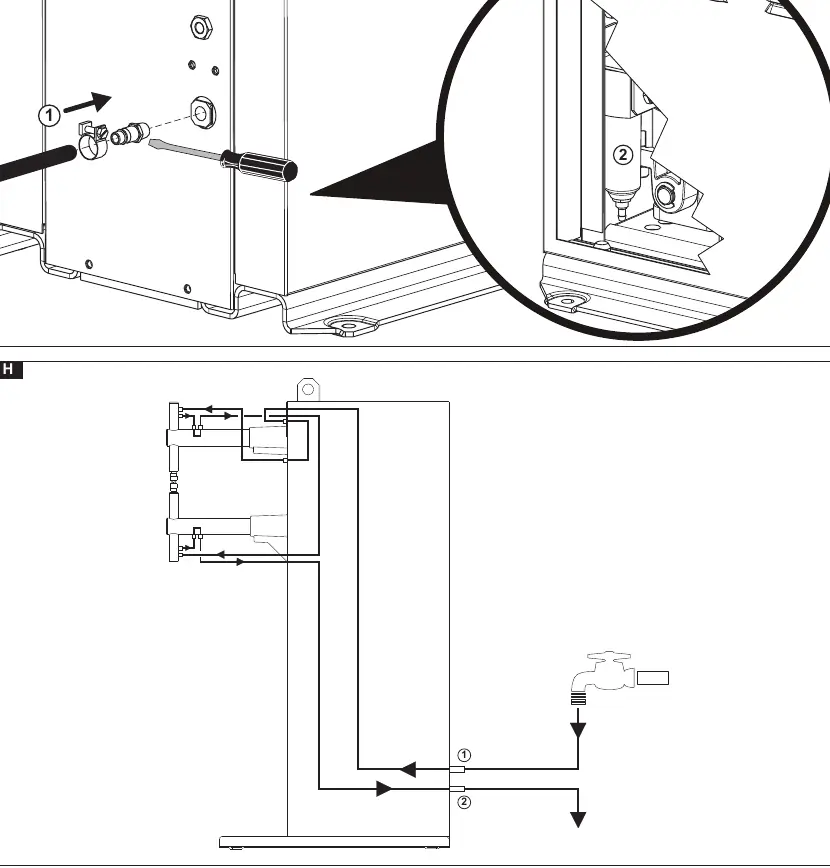
- Pneumatic Connection (PCP models only): Requires a compressed air supply line with at least 6 bar pressure. Connect the gas pipe fitting to the 1/8 coupling.
- Cooling Circuit: Connect water delivery and return pipes. Ensure water temperature does not exceed 30°C. Welding without sufficient water flow can cause overheating and breakdown.
Operation and Welding Modes
Before welding, perform checks with the machine switched off and disconnected. Adjust the electrode diameter based on sheet thickness (d = 4 ÷ 6 · √s).
- REDUCED Mode: Allows quick selection of 'POWER' and 'welding time'. No program saving.
- EXTENDED Mode: Allows selection of all parameters and saving of customized programs.
- Welding Procedure: Position the sheet metal, press the pedal (PTE) or pedal valve (PCP) to close the electrodes, and initiate the welding current. Release the pedal a few seconds after the welding icon switches off to ensure proper mechanical properties.
Maintenance
Routine Maintenance: Can be performed by the operator and includes:
- Adjustment/reset of electrode tip diameter and profile.
- Electrode alignment checks.
- Checking spring load (electrode force).
- Exhausting condensation from the compressed air filter (PCP models).
- Checking cooling water level and absence of leaks.
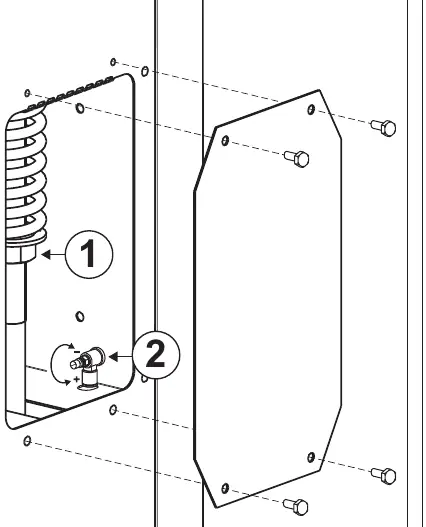
Extraordinary Maintenance: Must be performed by expert electrical-mechanical technicians. This includes cleaning the transformer and internal components with dry compressed air (max 5 bar) and checking wiring insulation.
Troubleshooting
If the machine does not run properly, check the following before contacting service:
- Display OFF: Check power line, plug, socket, and fuses.
- Alarms: Wait for the 'START' icon to light up. Check cooling water circulation and compressed air pressure.
- Welding issues: Ensure the pedal/cylinder is enabled and the electronic card is receiving consent. Check for loose or rusted screws on the secondary circuit.
Manufacturer information
Telwin SpA
Practical help
Common problems
Display is not ON
Check the power line, cables, plug, socket, and fuses. Ensure there is no excessive voltage drop.
Alarms triggered
Wait for the 'START' icon to light up. Check that cooling water is circulating correctly and compressed air pressure (PCP models) is sufficient.
Spot welder does not weld
Check if the cycle selector is in 'pressure only' mode. Ensure the start-up button was pressed after the general switch was closed.
Poor welding quality
Verify that electrode force, diameter, welding time, and current are suited to the job. Check for loose or rusted screws on the secondary circuit.
Before use
- Ensure power supply matches the rating plate.
- Check that cooling water is circulating (max 30°C).
- Adjust electrode diameter based on sheet thickness.
- Verify electrode alignment and arm parallelism.
- Check compressed air pressure (6 bar for PCP models).
- Ensure the main switch is in the 'I' position and the machine is enabled.
Specs in practice
- Approach (cycles)
- Stand-by time before delivering current after electrode contact.
- Welding time (cycles)
- Duration the current remains at the set value.
- Pause time (cycles)
- Time between pulses in pulse mode.
Images and diagrams
- FIG. D1/D2: Control panel layout and icon descriptions for parameter setting.
- FIG. F1/F2: Power cable connection terminals (L1, L2, Earth).
- FIG. G/H: Pneumatic and cooling circuit connection points.
- FIG. I: Safety distance (d=40cm) to minimize EMF exposure.
Model compatibility
- PTE models: Mechanical pedal operation.
- PCP models: Pneumatic cylinder operation.
- Requires industrial power supply with neutral conductor connected to earth.

Manual page author
Michael Turner
Technical manual editor
Reviews PDF manuals for structure, safety notes, and practical product details so readers can find the right information quickly.