Home Appliances / Cleaning Robots
User Manual for Shenzhen B6 Drone
Quick guide for the Shenzhen B6 drone. Learn how to calibrate, fly, use headless mode, recharge the battery, and troubleshoot common issues.
Quick answers from the manual
Quick answer
- The Shenzhen B6 is a C0-level toy drone. To start, unfold the drone, power it on, align the frequency with the remote, calibrate the gyroscope, and unlock the motors using the left joystick. p. 1, 2
Key actions
- Calibrate the drone p. 1
- Take-off p. 2
First start
- Unfold, power on, align frequency, calibrate, and unlock motors. p. 1, 2
Where to find it in the PDF
- Controller and Drone Overview p. 1
- Flight Instructions p. 2
- Advanced Modes and Fine-Tuning p. 3
Table of contents
Manual images
Click an image to enlargeQuick Start Guide
The Shenzhen B6 is a C0-level toy drone designed for entertainment. Before flying, ensure the drone is unfolded and placed on a level surface. The remote control requires 3 AA batteries (not included). Always operate in a safe environment, away from crowds and obstacles, and ensure the pilot is at least 14 years old.
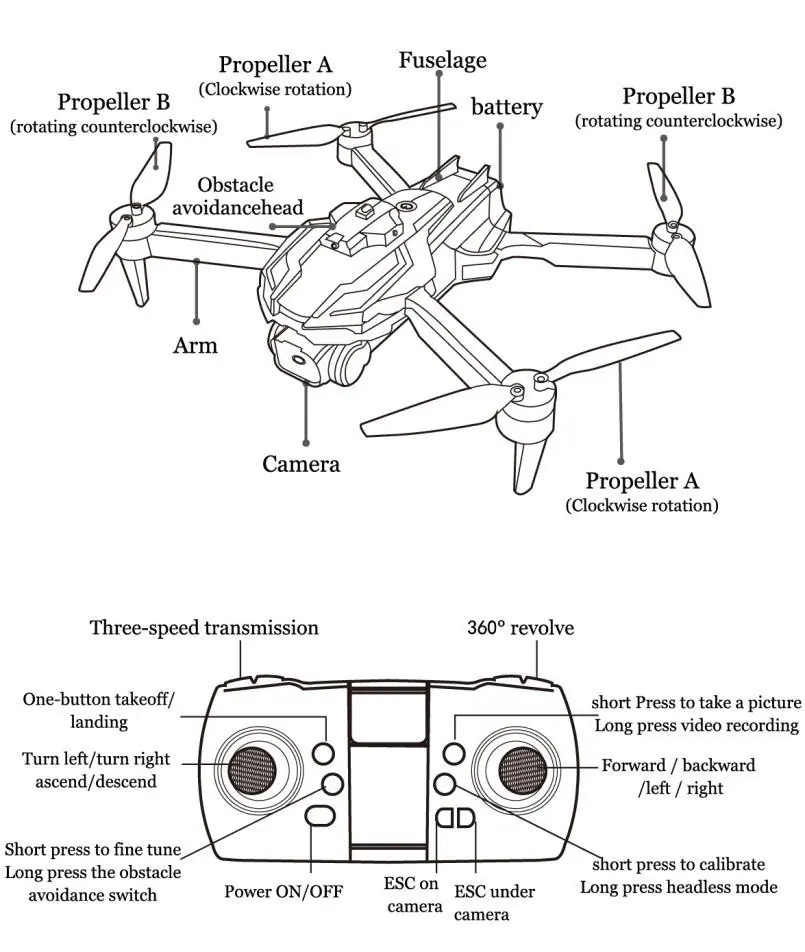
Device Overview
The drone features a foldable design with a camera and obstacle avoidance sensors. The remote controller includes joysticks for flight control, trim buttons for fine-tuning, and dedicated buttons for take-off, landing, headless mode, and speed transmission.

Flight Operations
Pre-Flight Preparation: Unfold the drone and turn on the power switch. Turn on the remote control to align the frequency (indicated by a beeping sound and solid lights). Perform a gyro calibration by pressing the calibration button; the lights will flash and then turn solid.
Take-off and Landing: To unlock the motors, push the left joystick up and then release. You can use the one-key take-off button to automatically rise and hover. Use the one-key landing button to descend slowly.
Flight Controls: The left joystick controls altitude (up/down) and rotation (left/right). The right joystick controls forward, backward, and lateral movement (left/right).
Advanced Features
- Headless Mode: Long press the headless mode button to enter this mode. The drone's forward direction will no longer depend on the orientation of its head, making it easier for novices to control.
- Three-Speed Transmission: Press the speed button to cycle between low, medium, and high speeds. The remote will beep to indicate the current speed level.
- 360° Revolve: Press the 3D revolve button to enter tumble mode, then push the right joystick to perform a roll.
- Obstacle Avoidance: If equipped, long press the obstacle avoidance switch. The drone will stop and beep when it detects an obstacle within approximately 1 meter.
Maintenance and Charging
Battery Charging: Connect the battery to the provided USB charging cable and a power adapter. Charging takes approximately 3-4 hours. The red light on the battery pack remains on during charging and turns off when complete.
Blade Replacement: If the drone shakes or fails to fly, check the blades for distortion and replace them if necessary. Ensure you distinguish between A and B blades.
Troubleshooting
If the drone is unresponsive, ensure it is successfully linked to the remote and the battery is charged. If the drone drifts, use the fine-tuning buttons to adjust. If the drone loses control after a crash, leave it for 5-10 seconds and perform the calibration procedure again.
Technical Specifications
- Weight: 162 grams
- Max Altitude: 50 meters
- Max Speed: 3 m/s
- Age Requirement: 14+
Practical help
Common problems
Quadcopter flashing and no reaction
Ensure the quadcopter and remote are successfully linked (frequency alignment) or recharge the battery.
Blades rotate but drone cannot fly
Recharge the battery or replace the blades.
Quadcopter shakes during flight
Replace the distorted blades.
Drone out of control after crash
Leave the aircraft for 5-10 seconds, then press the calibration button before taking off again.
Before use
- Unfold the quadcopter
- Place on a horizontal surface
- Insert 3 AA batteries into the remote control
- Ensure the drone battery is fully charged (3-4 hours)
- Perform frequency alignment
- Calibrate the gyroscope
Specs in practice
- Max Altitude
- The maximum height the drone can reach above the take-off point is 50 meters.
- Charging Time
- Approximately 3-4 hours for a full charge.
Images and diagrams
- The controller diagram identifies the joysticks, trim buttons, and function buttons for take-off, landing, and speed.
- The drone diagram shows the location of propellers (A/B), battery, and camera.
Model compatibility
- Suitable for users over 14 years of age.
- Not recommended for use in strong winds or bad weather.
- Avoid flying near airports, highways, or densely populated areas.

Manual page author
Emily Carter
User documentation editor
Prepares concise manual descriptions and highlights the most useful setup, operation, and maintenance information for readers.