Baby / Sleep Aids
User Manual for Shenzhen 1026-R8-XLDPro Portable Car Stereo
Quick guide for the Shenzhen 1026-R8-XLDPro portable car stereo. Learn how to install, connect CarPlay/Android Auto, configure ADAS, and manage video recordings.
Table of contents
Manual images
Click an image to enlargeQuick Guide
The Shenzhen 1026-R8-XLDPro is a portable car stereo featuring a dash cam, CarPlay, Android Auto, and ADAS support. To get started, ensure you use a high-capacity U3 class 10 SD card. The device supports wireless connectivity for CarPlay and Android Auto, as well as screen mirroring via AirPlay and Miracast. For advanced features like time-lapse monitoring and parking monitoring, a buck line connection is required. GPS functionality is necessary for path tracking and speed-based warning broadcasts.

Device Features
Power Key: A short press turns the device on. When powered on, a long press turns it off, while a short press puts the screen to sleep. Touch the screen or press the power button to wake it.
Reset Key: Located next to the power key, use this to forcibly restart the device if it crashes or malfunctions.
Interface and Settings
Start Window: The main interface allows access to CarPlay, Android Auto, Files, Settings, FM, and the Dash Cam preview.
Preview Interface: Displays the live recording. Icons indicate sound recording status, photo capture, recording status (red dot), and video locking. Large vibrations will automatically lock the current video file.
Set Up Interface:
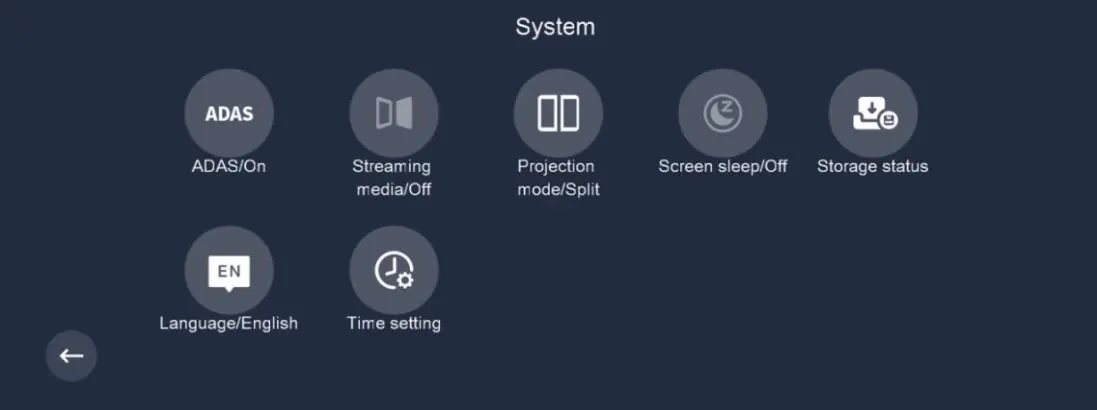
- System: Configure ADAS, streaming media, projection mode, screen sleep, storage status, language, and time settings.
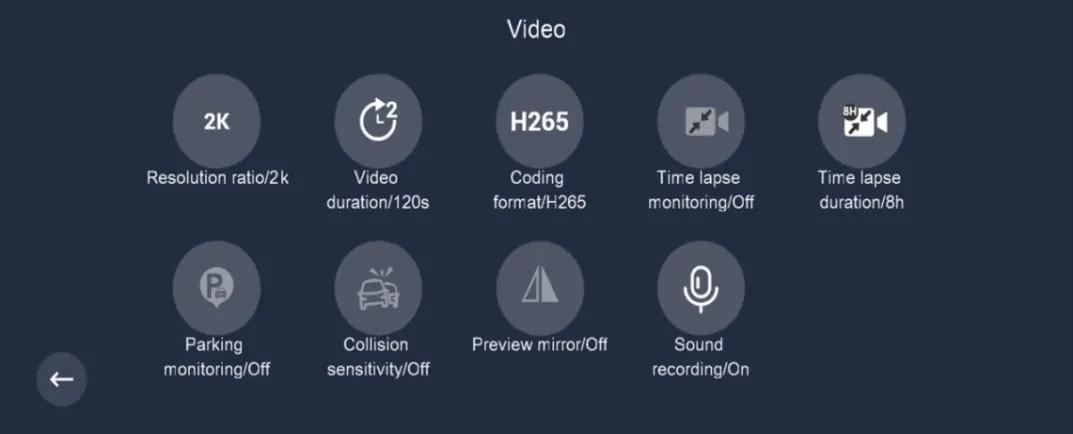
- Video: Adjust resolution (4K, 2K, 1080P), video duration, encoding format (H264/H265), time-lapse monitoring, parking monitoring, and collision sensitivity.
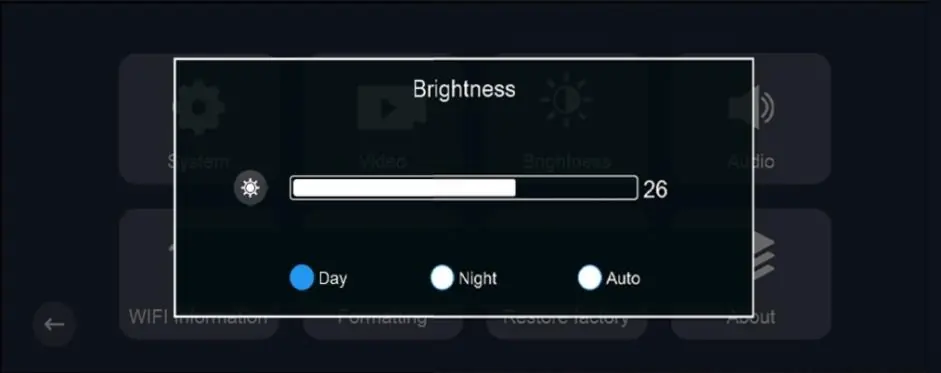
- Brightness Control: Choose between Day, Night, or Auto modes.
- Voice Control: Adjust system volume, key sounds, and power-on/off sounds.
- WiFi Information: Displays SSID and password for the Roadcam app connection.
- Maintenance: Options to format the TF card and restore factory settings.
Connectivity
CarPlay/Android Auto: Enable Bluetooth on your phone, select the CarPlay/Android Auto icon on the device, and follow the on-screen prompts to pair. If connection fails, forget the Bluetooth device and restart both the phone and the car stereo.
Screen Mirroring: Supports AirPlay (Apple) and Miracast (Android). Ensure the "Screen mirroring" toggle is set to "On" in the Phone Link settings. Select the desired mode on the main interface.
WiFi Direct: Use the "Roadcam" app to view live streams and manage files. Scan the QR code found in the device's WiFi information menu to download the app.
ADAS and Playback
ADAS Calibration: The ADAS function requires the GPS module to be inserted. Manual calibration can be performed by pressing and holding the ADAS icon in the preview interface to align lane lines. Automatic calibration occurs while driving on a clear road.
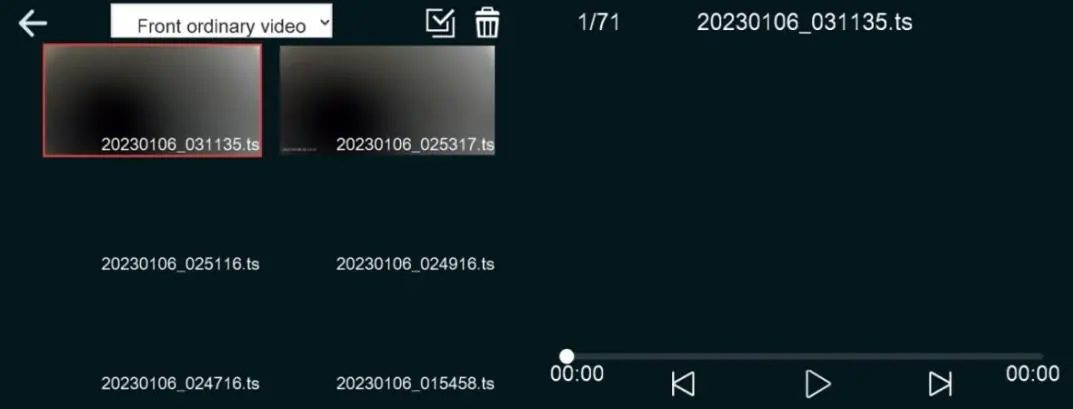
Playback: Access the playback interface to view front/rear recordings and photos. Emergency recordings (parking, locked, time-lapse) are saved with specific suffixes (_URG, _VIO, _IMP). Use GXPlayer on a computer to view trajectory data if a GPS module is used.
Installation Guide
- Turn off the car engine.
- Insert a U3 class 10 SD card into the slot.
- Fix the DVR onto the original rearview mirror.
- Insert the car charger into the cigarette lighter socket.
- Connect the USB-C port of the dash cam to the car charger using the extension cable.
- Install the rear camera at the back of the vehicle and plug it into the dash cam.
- Adjust the lens position to be level with the ground.
- Start the engine and verify the system working indicator light is on.
Troubleshooting
If you encounter issues, check the following:
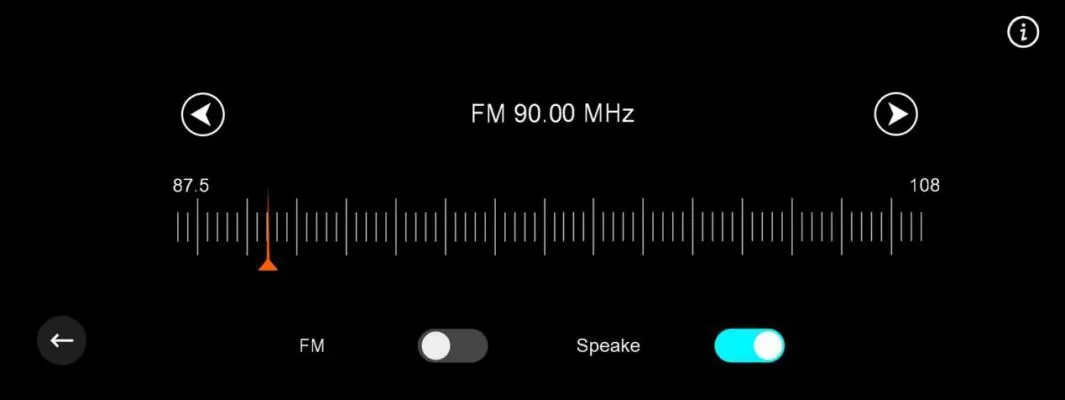
- No sound: Ensure FM is turned off and system volume is not muted.
- Connection issues: Restart the device and phone; ensure Bluetooth is correctly paired.
- Video duration mismatch: Try using a Windows 10 operating system when viewing files on a computer.
- Trajectory missing: Ensure the GPS module is plugged in during recording.
Practical help
Common problems
No sound from the machine
Check if FM is turned on (turn it off), check if system volume is muted, or check if the speaker is damaged.
Unable to connect to CarPlay/Android Auto
Forget the Bluetooth connection, restart both the phone and the device, and try reconnecting.
Video trajectory not visible in GXPlayer
Ensure the GPS module was plugged in during recording and check the map settings in the player.
Video duration on computer differs from actual length
Try viewing the files using the Windows 10 operating system.
Before use
- Use a high-capacity U3 class 10 SD memory card.
- Ensure the GPS module is connected for path tracking and speed-based warnings.
- Turn off the car engine before starting installation.
- Ensure the rear camera is installed in the correct direction.
- Adjust the lens angle to be level with the ground.
Specs in practice
- Parking Monitoring
- Automatically records a 20-second video when the car vibrates while parked.
Images and diagrams
- Start Window: Main menu for accessing CarPlay, Android Auto, Files, Settings, FM, and Dash Cam.
- Preview Interface: Shows recording status, photo/video icons, and locking status.
- Playback Interface: Divided into levels for accessing ordinary and emergency video/photo files.
Model compatibility
- Requires U3 standard TF card.
- GPS module required for path tracking and speed-based warnings.
- Buck line required for time-lapse and parking monitoring features.

Manual page author
Michael Turner
Technical manual editor
Reviews PDF manuals for structure, safety notes, and practical product details so readers can find the right information quickly.