Lighting / Fixtures
Signature Hardware 1.8GPM Wall Mounted Pot Filler Faucet
Quick installation and maintenance guide for the Signature Hardware 1.8GPM wall-mounted pot filler faucet. Includes step-by-step mounting instructions, flushing procedures, and troubleshooting tips for valve cartridge replacement.
Table of contents
Manual images
Click an image to enlargeImportant Information
This pot filler faucet is designed for cold water connection only. It is intended for installation above sinks or stoves to provide a convenient water source for pots and pans. Before beginning installation, ensure that plasterboard walls have appropriate reinforcement to support the weight of the faucet. The recommended hole size for installation is 1 inch, and the unit uses 1/2 inch IPS inlets.
Installation Steps
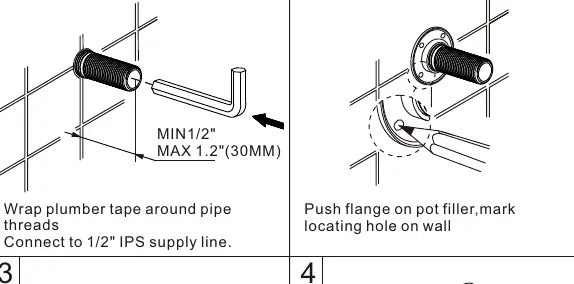
- Prepare Supply: Wrap plumber tape around pipe threads and connect to the 1/2 inch IPS supply line.
- Marking: Push the flange onto the pot filler and mark the locating hole on the wall.
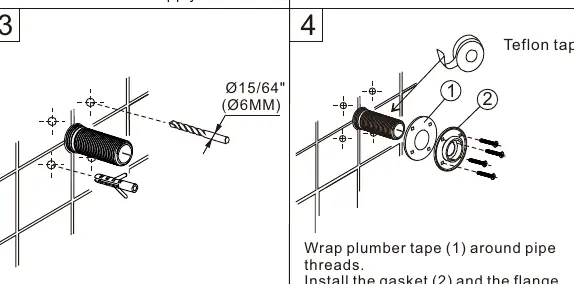
- Drilling: Drill holes (15/64 inch or 6mm) and insert plugs.
- Mounting: Wrap plumber tape around pipe threads. Install the gasket and the flange using the 4 provided screws.
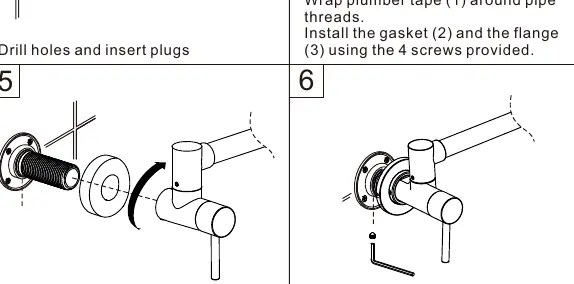
- Final Assembly: Place the flange trim onto the faucet. Thread the faucet onto the pipe and tighten securely, but do not overtighten.
- Securing: Screw the pot filler into place and use a 1.5mm allen wrench to fasten the pot filler to the flange.
Flushing and Maintenance
Flushing: Before regular use, remove the aerator and turn the faucet handles to the full open position. Turn on the cold water supply and flush the water lines for one minute to remove debris that could damage internal parts. Check all connections for leaks and re-tighten if necessary.

Cleaning: The finish is durable but can be damaged by harsh abrasives or polish. Clean the faucet by wiping gently with a damp cloth and blotting dry with a soft towel.
Troubleshooting
If the faucet leaks from the spout or handle, the valve cartridge may need replacement:
- Remove the handle cap, stick, and screw.
- Unscrew and replace the valve cartridge using a 1.5mm hex key.
- Assemble in reverse order, ensuring handles are lined up with valves in the closed position before pushing them into place.
If water flow is unsatisfactory due to low water pressure, replace the aerator to improve flow.
Manufacturer information
Signature Hardware
Practical help
Common problems
Faucet leaks from spout or handle
Replace the valve cartridge. Remove the handle cap, stick, and screw, then unscrew the old cartridge using a 1.5mm hex key.
Unsatisfactory water flow
Replace the aerator to improve water flow in the faucet.
Water damage risk
Shut off both handle cartridges when not in use or left unattended.
Before use
- Ensure cold water supply only.
- Flush pipes thoroughly before final use.
- Verify plasterboard walls have appropriate reinforcement.
- Ensure 1 inch hole size for installation.
- Check for leaks at all connections after flushing.
Specs in practice
- 1/2 inch IPS
- Standard pipe connection size for the water supply.
Images and diagrams
- The diagram illustrates the articulated spout range and dimensions for positioning above stoves or sinks.
- Installation steps show the use of plumber tape, flange mounting, and securing the faucet with an allen wrench.
Model compatibility
- Cold water connection only.
- Compliant with California water efficiency regulations and Federal Safe Drinking Water Act.

Manual page author
David Miller
Documentation analyst
Organizes user manual content into clear summaries, with attention to model details, product context, and everyday usability.