General / Other Manuals
SIIG 04-1419A Desk Mount Dual Monitor Arm User Guide
Quick setup and adjustment guide for the SIIG 04-1419A dual monitor arm. Includes installation steps, VESA mounting, cable management, and tension adjustment instructions.
Table of contents
Manual images
Jump to the sectionQuick guide from the manual
This guide provides instructions for the assembly and adjustment of the SIIG 04-1419A dual monitor arm. Ensure your desk surface is compatible with the clamp mount thickness requirements (18-57mm) and that your monitors fall within the weight capacity of 4.4 lbs to 19.8 lbs (2 kg to 9 kg) per arm.
Parts list
- Clamp mount pole assembly
- Two monitor arms
- Two VESA plates
- Two arm connectors
- Cable management clip
- M5x25 screws (x2)
- M4x12 screws (x8)
- Hex keys (#3, #4, #5)
Installation
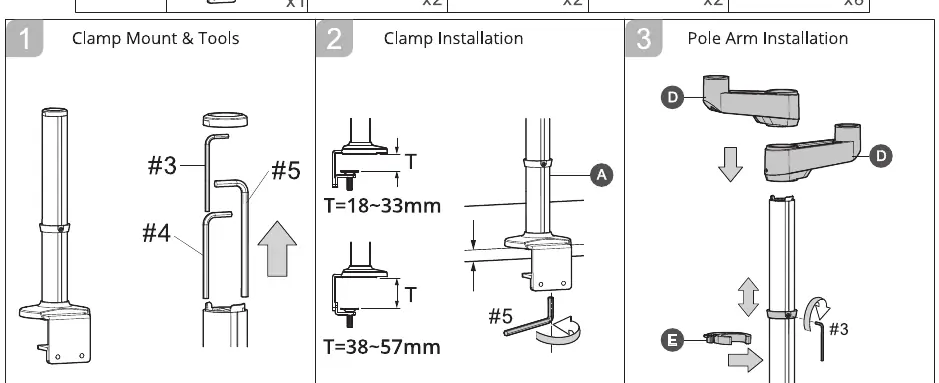
- Clamp Installation: Attach the clamp mount to the desk edge. Adjust the clamp base to fit your desk thickness (18-33mm or 38-57mm) using the provided hex key.
- Pole Arm Installation: Slide the arm connectors onto the pole and secure them at the desired height. Attach the cable management clip to the pole.
- Arm Installation: Attach the monitor arms to the connectors using the M5x25 screws and the #4 hex key.
- VESA Plate Installation: Attach the VESA plates to the back of your monitors using the M4x12 screws. Ensure the arrow on the plate points downward.
- Screen Installation: Slide the monitors onto the arm heads until they click into place.
Adjustments
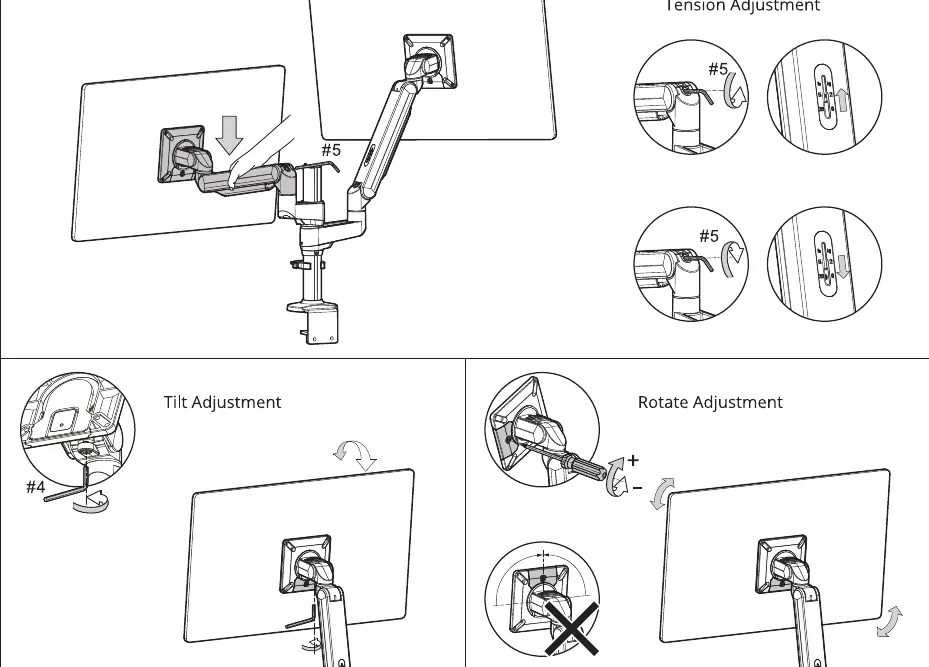
- Tension Adjustment: Use the #5 hex key to adjust the arm tension based on the weight of your monitor. Turn toward the plus sign to increase tension for heavier monitors or toward the minus sign for lighter ones.
- Tilt Adjustment: Use the #4 hex key to adjust the tilt angle of the monitor.
- Rotate Adjustment: Use the provided tool to adjust the rotation. Do not fully loosen the screw at the top to prevent the monitor from falling.
Cable Management
Route cables through the arm channels and secure them using the provided clips to ensure a clean setup and prevent cable strain during arm movement.
Support
For further technical support, visit http://www.siig.com/support.
Official resources from the manual
Manufacturer information
SIIG, Inc.
Practical help
Common problems
Monitor arm does not hold the monitor in position
Adjust the tension using the #5 hex key. Turn toward the '+' sign if the monitor sinks, or toward the '-' sign if it rises too easily.
Monitor feels loose or unstable
Ensure the VESA plate is securely attached and the arm head is fully clicked into the locked position.
Risk of monitor falling during rotation adjustment
Do not fully loosen the screw at the top of the rotation joint.
Before use
- Verify desk thickness is between 18mm and 57mm.
- Ensure monitor weight is between 4.4 lbs and 19.8 lbs (2-9 kg).
- Check that monitor VESA pattern is 75x75mm or 100x100mm.
- Ensure you have all hex keys (#3, #4, #5) ready.
Specs in practice
- Weight Capacity
- 2 kg to 9 kg (4.4 lbs to 19.8 lbs) per monitor.
- VESA Compatibility
- Supports 75x75mm and 100x100mm mounting patterns.
- Desk Thickness
- Compatible with surfaces 18mm to 57mm thick.
Images and diagrams
- The VESA plate must be installed with the arrow pointing downward.
- The clamp mount has two depth settings depending on desk thickness.
- Cable management clips should be attached to the pole and arm segments to prevent cable tangling.
Model compatibility
- Designed for flat screen monitors up to 32 inches.

Manual page author
Emily Carter
User documentation editor
Prepares concise manual descriptions and highlights the most useful setup, operation, and maintenance information for readers.