Lighting / Controllers & Dimmers
User Manual for Skydance SC+R9 RF 2.4G LED SPI Controller Set
Quick guide for the Skydance SC+R9 LED SPI Controller. Learn how to wire, configure pixel length, set chip types, match the remote, and troubleshoot common issues.
Table of contents
Manual images
Click an image to enlargeQuick Guide
The Skydance SC+R9 is an RF 2.4G LED controller designed for SPI-based digital LED strips. It supports 49 different IC types and allows for dynamic lighting effects, speed, and brightness control via the included remote. Key operations include matching the remote to the receiver and configuring the controller for specific LED strip types and lengths.
Installation and Wiring
The controller requires a 5-24VDC power supply. Ensure the power supply capacity is at least 1.2 times the load of the LED strip to prevent flickering.
- Single-wire control: Connect DATA and CLK signal lines together; one controller can drive two LED strips.
- High load (>8A): If the load exceeds 8A, use additional power supplies for the LED strips. Connect only the DATA/CLK and GND cables between the controller and the LED strip.
- Matching the Remote: Short press the match key on the receiver, then within 5 seconds, press the on/off key on the remote.
- Deleting Remote: Long press the match key on the receiver for 5 seconds to delete all matched remotes.
Remote Control Functions
The remote allows for extensive customization of the lighting effects:
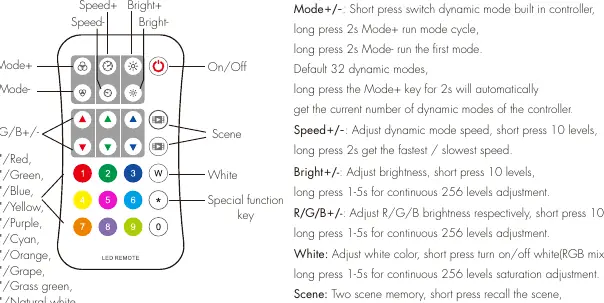
- Mode+/-: Switch dynamic modes. Long press Mode+ for 2s to cycle modes; long press Mode- for 2s to run the first mode.
- Speed+/-: Adjust dynamic mode speed (10 levels).
- Bright+/-: Adjust brightness (10 levels).
- R/G/B+/-: Adjust individual color brightness.
- Scene: Two scene memory slots. Short press to recall, long press for 2s to save current color.
Configuration
You can configure the controller settings directly using the remote:
- Set Pixel Length: Enter * + 3 digits + * (e.g., *032* for 32 pixels). Range: 8-1024.
- Set Chip Type: Enter * + 2 digits + * (e.g., *11* for TM1803).
- Set RGB Order: Enter * + 1 digit + * (e.g., *1* for RGB).
- Set RGBW Order: Use *7* for W after RGB or *9* for W before RGB.
Safety Information
- For indoor and dry location use only.
- Ensure correct battery polarity (+/-) when installing the CR2032 battery.
- Remove the battery if the remote will not be used for an extended period.
- Do not disassemble, heat above 55°C, or incinerate batteries.
- If the remote distance decreases or becomes insensitive, replace the battery.
Manufacturer information
Guangzhou Skydance Co., Ltd.
Practical help
Common problems
Remote not responding
Re-match the remote to the receiver by pressing the match key on the receiver, then the on/off key on the remote within 5 seconds.
LEDs flickering or shaking
Ensure the power supply output power is at least 1.2 times the load of the LED strip.
Remote distance is short or insensitive
Replace the CR2032 battery or raise the battery shrapnel inside the remote with a screwdriver.
Before use
- Remove the protective film from the battery before first use.
- Verify the LED strip IC type is compatible with the controller.
- Ensure the power supply voltage matches the LED strip requirements (5-24VDC).
- Check that the power supply capacity is sufficient for the load (at least 1.2x load).
- Ensure correct polarity for all wiring connections.
Specs in practice
- Input Voltage
- 5-24VDC; must match the LED strip voltage.
- Input Current
- 8A maximum; if the load exceeds this, use additional power supplies.
- Remote Distance
- Up to 30 meters in open space.
Images and diagrams
- Wiring Diagram: Shows connections for single-wire SPI spots, single pixel strips, and multiple strips with external power.
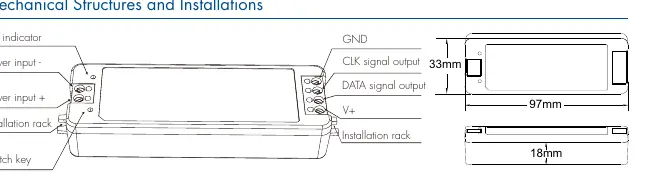
- Mechanical Structure: Details the physical dimensions and port locations (Power input, DATA/CLK output, Match key).
Model compatibility
- Compatible with 49 IC types including TM1803, WS2811, WS2812, SK6812, and others listed in the manual.
- Supports RGB and RGBW LED strips.

Manual page author
David Miller
Documentation analyst
Organizes user manual content into clear summaries, with attention to model details, product context, and everyday usability.