Lighting / Outdoor Lighting
Installation Manual for SOLTECH Cosmo Flood Lights 20W/50W
Quick guide for installing and operating the SOLTECH Cosmo 20W and 50W solar flood lights. Includes activation steps, charging requirements, remote control modes, and technical specifications.
Quick answers from the manual
Quick answer
- To activate the SOLTECH Cosmo, press and hold the button on the light. You must connect the light to the solar panel and charge it in bright sunlight for at least 48 hours before the first use. p. 2, 3
Key actions
- Activate the light p. 2
- Install the unit p. 3
First start
- Charge for 48 hours in bright sunlight before first use. p. 2, 3
Problems and fixes
Light does not turn on
Connect the light to the solar panel and charge for 48 hours.
p. 2
Red light flashes
The fixture is in low voltage protection status; charge the battery.
p. 3Maintenance and reset
- Charge the battery if the red light flashes (low voltage protection). p. 3
Technical specifications
| Parameter | Value | Meaning | Pages |
|---|---|---|---|
| 20W Model Lumen Output | 3,000 | Lumen output at 4,000K | p. 2 |
| 50W Model Lumen Output | 6,000 | Lumen output at 4,000K | p. 2 |
Where to find it in the PDF
- Introduction and Activation p. 2
- Specifications p. 2
- Installation p. 3
- Warranty p. 4
Table of contents
Quick Guide and Activation
The SOLTECH Cosmo flood light is a solar-powered lighting solution. Before using the device for the first time, it is critical to charge the solar panel in bright sunlight for at least 48 hours. To activate the light, press and hold the button located on the light fixture. The battery indicator will show the current charge level: Green (>70%), Orange (30%–70%), or Red (10%–30%).
Installation
The installation process involves mounting the solar panel and the light fixture to a wall. Follow these steps:
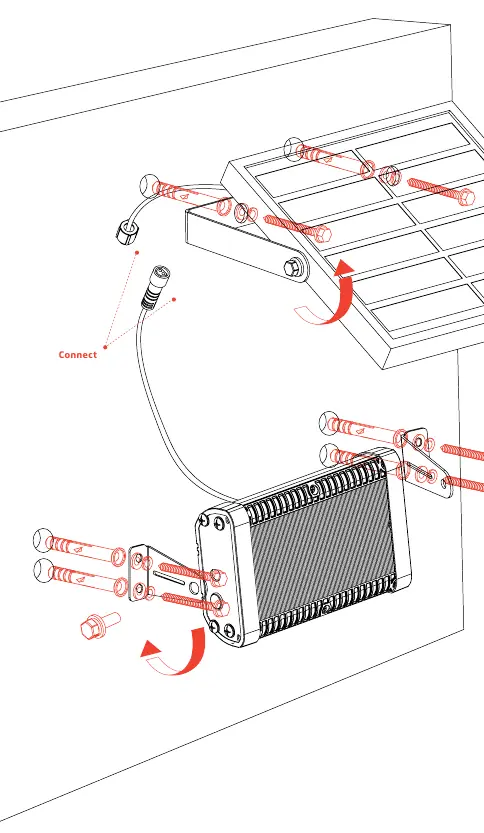
- Attach the bracket to the wall, then secure the solar panel onto the bracket.
- Screw the bracket onto the fixture housing and mount it onto the wall.
- Connect the light and solar panel cables securely.
Ensure the solar panel is installed in a location that receives optimal sunlight without obstructions.
Operating Modes
The light is controlled via a remote control. There are three main modes (M1, M2, M3) and a timer function (T). The remote allows for adjusting brightness and setting the timer. The lighting mode indicator on the remote will flash green when the timer button is pressed.
Specifications
The Cosmo series is available in 20W and 50W models. Both models feature an IP65 waterproof rating and operate between -4°F and 140°F. The 20W model provides 3,000 lumens, while the 50W model provides 6,000 lumens. Both models utilize a 3.7V Lithium Ion battery.
Maintenance and Safety
Keep the device away from fire and oil to prevent explosions. Avoid severe shock to the solar-powered light. Do not disassemble the light without expert assistance. If the red light on the battery indicator flashes, the fixture is in low voltage protection status and requires charging.
Practical help
Common problems
Light will not turn on
Ensure the light is connected to the solar panel and has been charged for at least 48 hours in bright sunlight.
Red light flashing on battery indicator
The fixture is in low voltage protection status; the battery needs to be charged.
Before use
- Charge the solar panel in full sunlight for 8-9 hours (initial).
- Charge for at least 48 hours in bright sunlight before first-time usage.
- Connect the light to the solar panel before usage.
- Ensure the solar panel is placed where it receives optimal sunlight without obstructions.
Specs in practice
- Charging Time
- 7.5 hours (at 1000W/m²) under standard radiation.
- Waterproof Rate
- IP65, indicating the device is dust-tight and protected against water jets.
Images and diagrams
- The installation diagram illustrates the bracket attachment to the wall, the mounting of the solar panel, and the cable connection between the light and the solar panel.
Model compatibility
- Operating temperature: -4°F to 140°F.
- Charging temperature: 32°F to 113°F.
- Extreme temperatures (above 131°F or below 32°F) may cause the battery and solar panel to function less optimally.

Manual page author
Emily Carter
User documentation editor
Prepares concise manual descriptions and highlights the most useful setup, operation, and maintenance information for readers.