Lighting / Outdoor Lighting
User Manual for Soltech SunLike 8W/20W/30W Solar Light
Comprehensive user guide for Soltech SunLike 8W, 20W, and 30W solar lighting systems. Includes installation instructions, wiring diagrams, remote control operation, battery maintenance, and technical specifications.
Quick answers from the manual
Quick answer
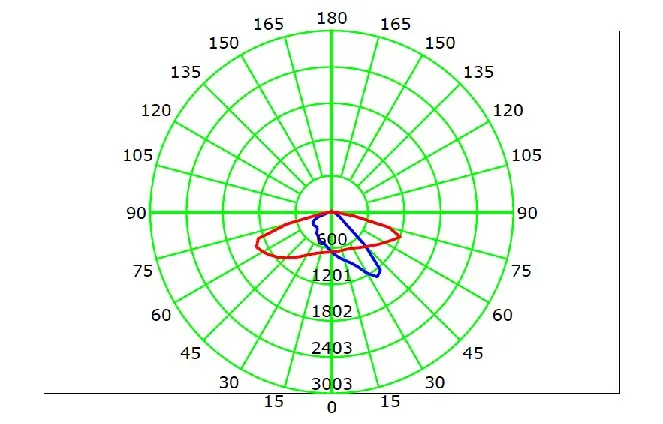
- The Soltech SunLike is an outdoor solar lighting system available in 8W, 20W, and 30W models. It features remote control operation, multiple mounting options, and an intelligent adaptive program for battery management. p. 1, 3
Key actions
- Charge the battery fully before installation. p. 3, 5
- Orient the solar panel towards the equator. p. 5, 7
First start
- Remove the plastic tab from the remote control. p. 8
Problems and fixes
Quick red flashing indicator
This indicates a charge fault.
p. 4Maintenance and reset
- Recharge the battery every 4 months during storage. p. 3, 4
Technical specifications
| Parameter | Value | Meaning | Pages |
|---|---|---|---|
| Waterproof Rate | IP65 | Protection against dust and water jets. | p. 3 |
| Charging Temperature | 32°F to 149°F | Safe temperature range for charging the battery. | p. 3 |
Where to find it in the PDF
- Specifications p. 3
- Installation p. 6
- Remote Control Guide p. 8, 9
Table of contents
Manual images
Click an image to enlargeQuick Guide
The Soltech SunLike is an outdoor solar lighting system. To ensure optimal performance, please note the following:
- Battery Maintenance: To avoid deep discharge during storage, fully recharge the battery every 4 months.
- Installation: Ensure the installation area receives a minimum of 3.5 hours of sunshine per day. Avoid areas with shadows.
- Orientation: Always orient the solar panel facing the equator (e.g., south in the northern hemisphere) with a tilt angle of at least 15 degrees.
- Remote Control: Remove the plastic tab at the bottom of the remote before first use.
Installation and Wiring
Installation must comply with State and National Electrical Codes. Before installation, ensure the light pole and foundation are solid. Press the ON/OFF key on the remote to verify the light is functional before mounting.
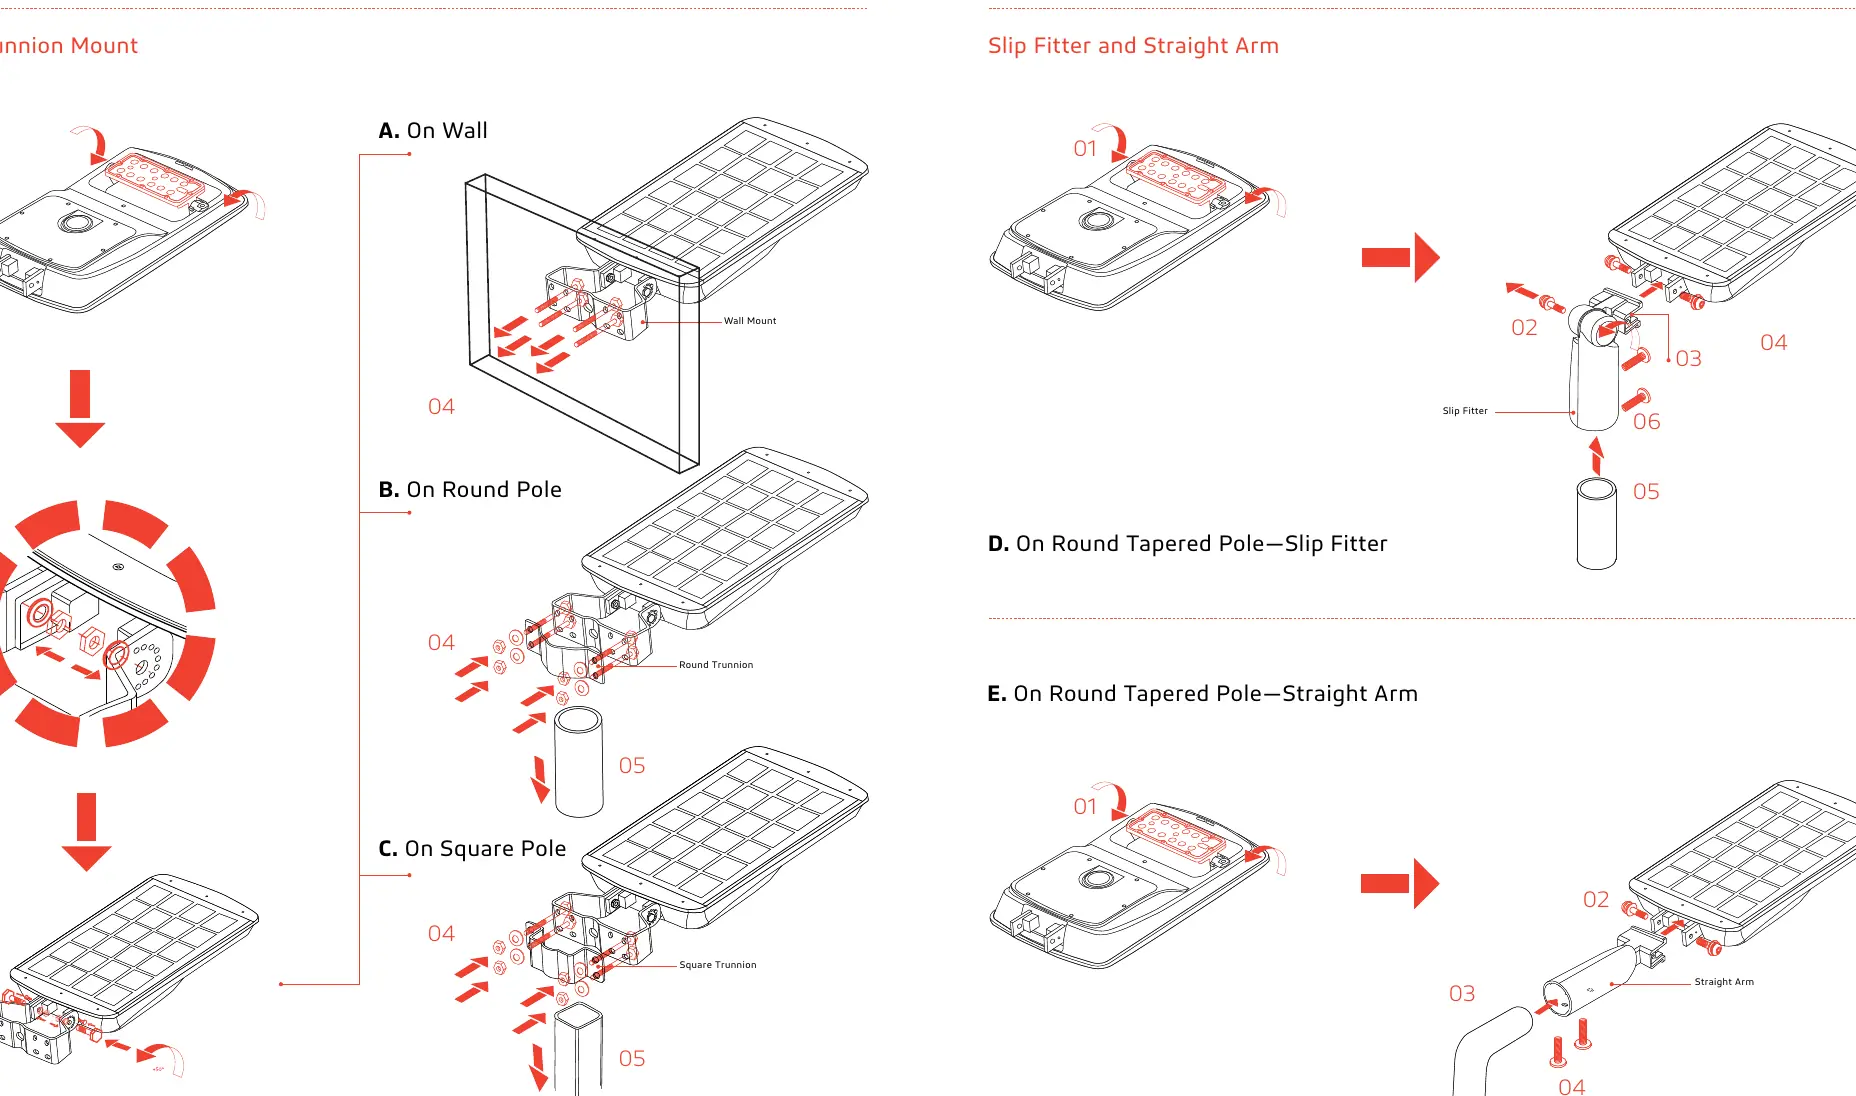
Mounting Options
The system supports various mounting configurations:
- Trunnion Mount: Available for Wall, Round Pole, and Square Pole installations.
- Slip Fitter & Straight Arm: Suitable for round tapered poles.
Always release the safety rope after disconnecting wire connectors during installation.
Battery Maintenance
The system uses a LiFePO4 battery. The status is indicated by the red/green indicator on the fixture:
- Slow red flashing: Charging.
- Solid red: Fully charged.
- Quick red flashing: Charge fault.
- Solid green: More than 40% battery remaining.
- Slow green flashing: Battery below 10%.
- Quick green flashing: Battery below 0% (Protect mode).
If the battery needs replacement, loosen the screws of the battery pack, disconnect the wire connectors, replace the pack, and reconnect.
Remote Control Operation
The remote control allows you to select different lighting modes:
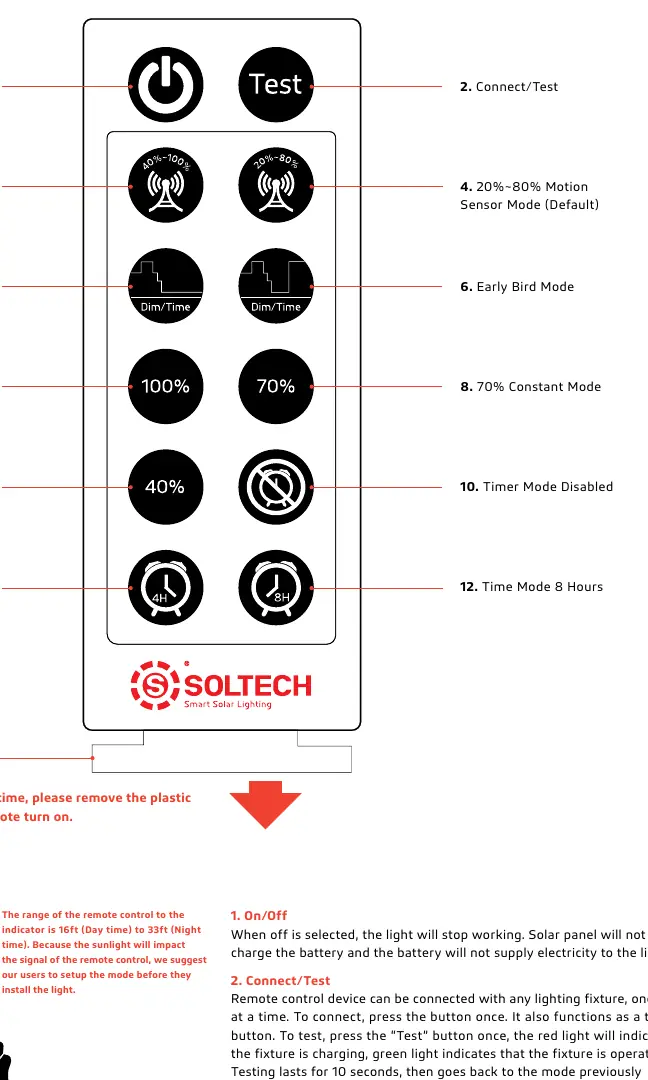
- Motion Sensor Modes: Adjusts brightness based on motion detection (e.g., 40% constant/100% motion or 20% constant/80% motion).
- Constant Modes: Sets the light to a fixed brightness (100%, 70%, or 40%) from dusk to dawn.
- Timer Modes: Allows setting the light to turn off after 4 or 8 hours.
- Night Owl/Early Bird Modes: Adjusts brightness dynamically based on natural light levels.
Practical help
Common problems
Light does not turn on
Ensure the plastic tab is removed from the remote. Check if the battery is charged. Verify the installation area is not shaded.
Battery not charging
Ensure the solar panel is not covered. Check if the ambient temperature is within the charging range (32°F to 149°F).
Remote control not responding
Ensure you are within the operating range (16ft to 33ft). Check if the light is in a mode that allows remote input.
Before use
- Fully charge the battery before installation.
- Test the light using the remote control.
- Ensure the installation site has >3.5 hours of direct sunlight.
- Orient the solar panel towards the equator.
- Set the desired operating mode before mounting.
Specs in practice
- Charging Time
- Time required to fully charge the battery (6-12 hours).
Images and diagrams
- The battery status indicator uses red/green lights to show charging status and battery health.
- Mounting diagrams show the correct assembly for Trunnion (Wall/Round/Square) and Slip Fitter/Straight Arm options.
Model compatibility
- Sunlike 8W, 20W, and 30W models have different installation height requirements (6-13ft, 9-16ft, 9-20ft respectively).

Manual page author
Michael Turner
Technical manual editor
Reviews PDF manuals for structure, safety notes, and practical product details so readers can find the right information quickly.