Lighting / Outdoor Lighting
SOLTECH SOLPORT 15W Wall Pack Light Installation Manual
Comprehensive installation and operation guide for the SOLTECH SOLPORT 15W solar wall pack light. Includes mounting instructions, remote control operation, lighting modes, and solar panel angle optimization.
Table of contents
Manual images
Click an image to enlargeQuick Guide
Before installing your SOLTECH SOLPORT 15W light, please note the following essential requirements:
- Initial Charge: The solar panel must be charged in full sunlight for 8 to 9 hours before the first use to ensure optimal results.
- Activation: Press any button on the lamp first to activate the lamp and the remote control.
- Installation: The unit is designed for wall mounting. Ensure the solar panel is positioned to receive maximum sunlight.
- Maintenance: The internal battery is replaceable. If the battery is removed or replaced, allow the solar panel to receive maximum sunshine to reactivate the lamp.
Installation
Follow these steps to mount the SOLPORT wall pack light:
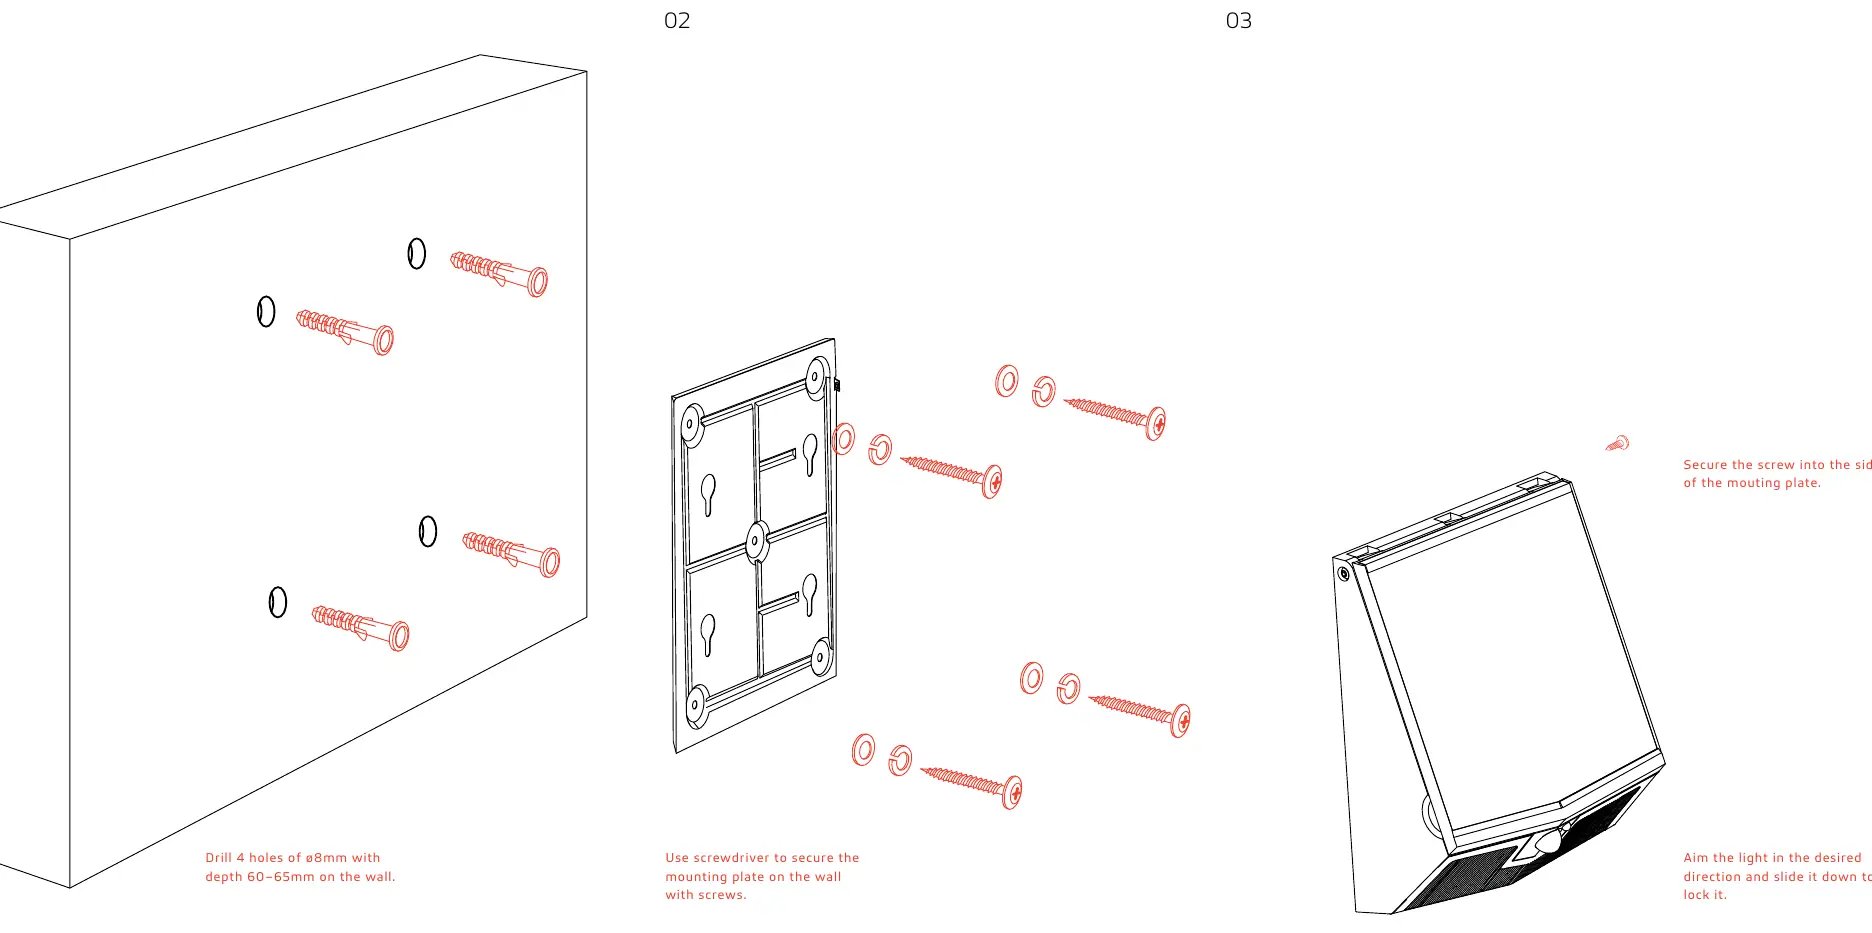
- Prepare the Wall: Drill 4 holes with a diameter of 8mm and a depth of 60–65mm on the wall.
- Mounting Plate: Use a screwdriver to secure the mounting plate onto the wall using the provided screws.
- Attach Light: Aim the light in the desired direction and slide it down onto the mounting plate to lock it into position.
- Secure: Secure the screw into the side of the mounting plate to prevent theft or accidental removal.
Remote Control and Operating Modes
The light features 3 programmable operating modes, which can be controlled via the remote or the buttons on the fixture. The remote control distance is up to 12 meters.
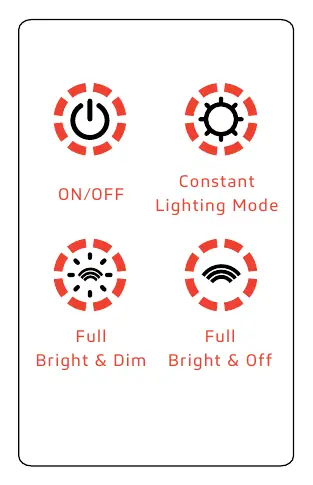

- Mode 1 (Constant Lighting Mode): The light turns on automatically at dusk and remains at 50% brightness. After 5 hours or when the battery capacity drops below 30%, it switches to Mode 3.
- Mode 2 (Full Bright & Dim): The light turns on to full brightness when motion is detected within 24 ft. It turns off after 20 seconds of no motion. The bottom portion of the light turns on automatically when the upper light turns off and turns off once motion is detected.
- Mode 3 (Full Bright & Off): The light turns on to full brightness when motion is detected within 24 ft. Once no motion is detected for 20 seconds, the light turns off completely. The bottom portion does not turn on in this mode.
Note: When switching to a different operating mode, the lamp will flash once to indicate the change was successful.
Solar Panel Angle Optimization
To maximize the efficiency of your solar lighting system, adjust the solar panel tilt based on your area's latitude:
- Winter/Summer Adjustment: You can increase the tilt by 15° in the winter or decrease it by 15° in the summer to capture maximum sunlight.
- Orientation: Southern-facing panels are best. West and East-facing panels will collect a good amount of sunlight, while North-facing panels will take longer to charge.
Specifications
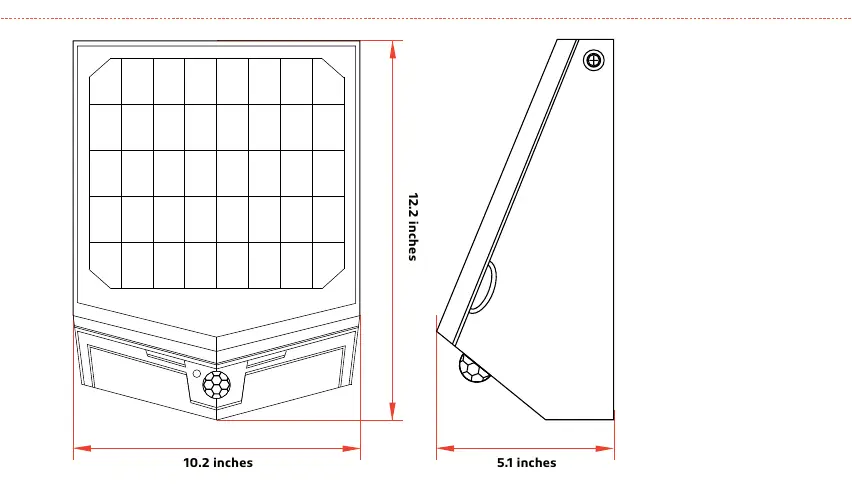
- LED Nominal Power: 15W
- Solar Panel: Mono-Crystalline 10V 7.3W
- Battery: 40WH 7.4V 5.4AH Lithium Ion
- Lumen Output: 1,500
- Operating Temperature: -5°F to 113°F
- Charging Temperature: 32°F to 149°F
- Waterproof Rate: IP65
Practical help
Common problems
Lamp does not light up
Ensure the solar panel has received enough sunlight. If the battery was recently replaced or removed, allow the panel to receive maximum sunshine to reactivate the lamp.
Short run time
Run time depends on sunshine duration and weather. During continuous rainy or cloudy days, the battery may not fully charge. Ensure the panel is angled correctly for your latitude.
Before use
- Charge the solar panel in full sunlight for 8 to 9 hours.
- Ensure the installation location receives adequate sunshine.
- Press any button on the lamp to activate the unit and remote control.
- Verify the mounting surface can accommodate 8mm drill holes.
Specs in practice
- Charging Time
- 7 hours under standard radiation (1000W/m²) at 77°F.
Images and diagrams
- Installation: Drill 4 holes, secure mounting plate, slide light down to lock.
- Remote: Use the remote to toggle between 3 modes and ON/OFF.
Model compatibility
- The solar panel angle should be adjusted based on the latitude of the installation site.
- North-facing installations will result in less optimal solar charging.

Manual page author
David Miller
Documentation analyst
Organizes user manual content into clear summaries, with attention to model details, product context, and everyday usability.