Electronics / Monitor Accessories
Privacy Filter Installation Guide for StarTech.com 142MG-PRIVACY-SCREEN
A comprehensive installation guide for the StarTech.com 142MG-PRIVACY-SCREEN privacy filter. Includes step-by-step instructions for adhesive strip, mounting tab, and flip-up/flip-over installation methods, along with maintenance tips.
Table of contents
Manual images
Click an image to enlargeQuick Guide from the Manual
This document provides installation instructions for StarTech.com Privacy Filters. Before starting, identify the best installation method for your display:
- Adhesive Strips: Recommended for bezel-less displays or when permanent/semi-permanent installation is desired.
- Mounting Tabs: Recommended for displays with raised bezels or when frequent removal of the filter is required.
- Flip-Up/Flip-Over: Allows the filter to be lifted or flipped over the lid without removing it.
Preparation
Before beginning any installation method, ensure the following:
- Clean the screen and bezels thoroughly using the provided wiping cloth.
- Remove all protective films from the privacy filter.
- If the filter is reversible, choose the side that best fits your application.
Method 1: Adhesive Strips
- Clean the screen.
- Place the filter on a clean, flat surface with the outward-facing side down.
- Remove adhesive strips from the transparent lining and apply them along the top, bottom, left, and right edges of the filter. Apply firm pressure.
- Remove the protective backing from the strips.
- Attach the filter to the screen, starting from the bottom and working towards the top.
- Apply gentle pressure to the locations where the strips were installed.
Method 2: Mounting Tabs
- Clean the screen and bezels.
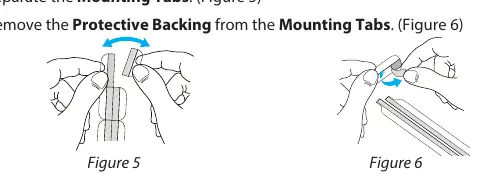
- Separate the mounting tabs and remove the protective backing.
- Install one short and one long mounting tab on the left bezel, and repeat for the right bezel.
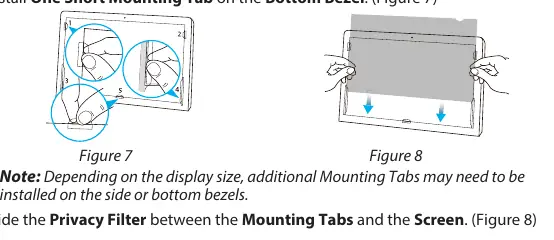
- Install one short mounting tab on the bottom bezel. Note: Additional tabs may be needed depending on display size.
- Slide the privacy filter between the mounting tabs and the screen.
Method 3: Flip-Up and Flip-Over
- Clean the screen and bezels.
- Remove the protective backing from the short-side of the adhesive flip-up or flip-over tabs.
- Align and space the tabs around the corners of the top edge of the filter. Apply firm pressure to the screen side of the filter.
- Remove the protective backing from the long-side of the tabs.
- Center the filter against the screen/display.
- For flip-up installation, align tabs along the top bezel and apply firm pressure.
- For flip-over installation, fold the tabs over the top edge and apply firm pressure to the lid.
- Optionally, attach a lifting tab to the bottom edge for easier handling.
Maintenance
To maintain clarity and privacy performance, clean any fingerprints or smudges from the privacy filter using the provided wiping cloth.
Official resources from the manual
Practical help
Common problems
Filter is skewed or misaligned
Ensure adhesive tabs are perfectly aligned with each other during installation.
Filter does not stay in place
If using mounting tabs, you may need to install additional tabs on the side or bottom bezels depending on the display size.
Fingerprints on the filter
Clean the filter surface using the provided wiping cloth.
Before use
- Clean the screen and bezels thoroughly.
- Remove all protective films from the privacy filter.
- Determine if your display is bezel-less (use adhesive strips) or has raised bezels (use mounting tabs).
- Check if the filter is reversible and select the desired side.
- Ensure you have the correct installation method for your specific display type.
Specs in practice
- Adhesive Strips
- Best for permanent or semi-permanent installation; ideal for bezel-less screens.
- Mounting Tabs
- Best for frequent removal; ideal for screens with raised bezels.
- Flip-Up/Flip-Over Tabs
- Allows the filter to remain attached while being lifted or flipped over the lid.
Images and diagrams
- Figures 1-4 illustrate the application of adhesive strips to the filter and screen.
- Figures 5-8 demonstrate the placement of mounting tabs on the display bezels.
- Figures 9-15 show the installation process for flip-up and flip-over tabs.
Model compatibility
- Not all installation methods are available for all privacy filters.
- Additional mounting tabs may be required depending on the display size.

Manual page author
Emily Carter
User documentation editor
Prepares concise manual descriptions and highlights the most useful setup, operation, and maintenance information for readers.