Electronics / Monitor Accessories
Privacy Screen User Guide for StarTech.com 135S
Quick-start guide for the StarTech.com 135S privacy screen. Includes installation steps, component identification, and maintenance tips for your 13.5" Surface Laptop privacy filter.
Table of contents
Manual images
Click an image to enlargeQuick guide from the manual
This document provides instructions for installing the StarTech.com 135S privacy screen on 13.5" Surface Laptops. The privacy filter is designed to limit the viewing angle to 60 degrees total (30 degrees off-center from the left or right), protecting your screen content from prying eyes.
Package Contents
- Privacy Screen x 1
- Set of Adhesive Strips x 1
- Sleeve x 1
- Wiping Cloth x 1
- Quick-Start Guide x 1
Components
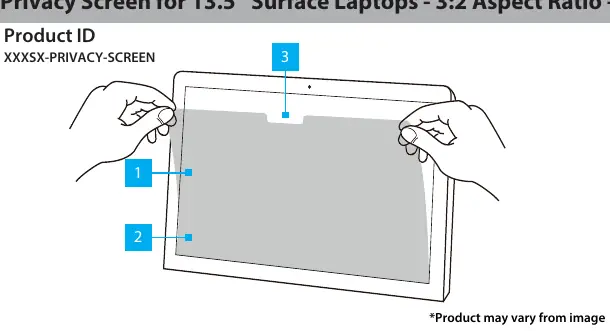
- Privacy Filter: Provides the privacy effect.
- Adhesive Strips: Used to secure the filter to the screen surface.
- Camera Notch: Ensures the built-in camera remains unobstructed.
Installation Instructions
- Clean the laptop screen and bezels thoroughly using the provided Wiping Cloth.
- Select the side of the Privacy Filter you wish to use (high matte or low matte). Place the filter on a clean, flat surface with the chosen side facing down.
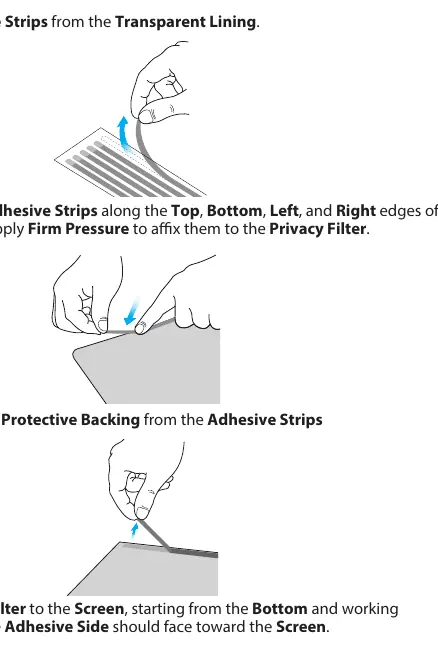
- Remove all Adhesive Strips from the transparent lining.
- Align the Adhesive Strips along the top, bottom, left, and right edges of the Privacy Filter. Apply firm pressure to ensure they adhere correctly.
- Remove the protective backing from the Adhesive Strips.
- Attach the Privacy Filter to the screen, starting from the bottom and working towards the top. Ensure the adhesive side faces the screen.
- Apply gentle pressure on the locations where the adhesive strips were installed to secure the filter.
- Clean any fingerprints from the Privacy Filter using the Wiping Cloth.
Maintenance and Usage Notes
Note that the adhesive strips become less effective with frequent removal and reapplication. If the screen requires cleaning, use the provided Wiping Cloth to remove fingerprints or dust.
Official resources from the manual
Practical help
Common problems
Adhesive strips losing stickiness
Avoid frequent removal and reapplication of the privacy filter, as this degrades the adhesive quality.
Camera is obscured
Ensure the filter is oriented correctly so that the camera notch aligns with the laptop's built-in camera.
Before use
- Clean the laptop screen and bezels thoroughly with the provided cloth.
- Identify the desired finish (high matte or low matte) before installation.
- Ensure you have a clean, flat surface to prepare the filter.
- Verify the alignment of the camera notch before final attachment.
Specs in practice
- Field of View
- The filter provides a privacy effect at angles greater than 30 degrees off-center, with a total field of view of 60 degrees.
Images and diagrams
- The installation diagram illustrates the correct placement of adhesive strips along the edges of the filter.
- The diagram highlights the camera notch position to ensure proper orientation.
Model compatibility
- Designed specifically for 13.5" Surface Laptops with a 3:2 aspect ratio.

Manual page author
Emily Carter
User documentation editor
Prepares concise manual descriptions and highlights the most useful setup, operation, and maintenance information for readers.