Electronics / USB Hubs & Docking
User Manual for StarTech.com USB-C Dual-Monitor Dock 201N-USBC-DOCK
Quick-start guide for the StarTech.com USB-C Dual-Monitor Dock (201N-USBC-DOCK, 201UE-USBC-DOCK). Includes installation steps, port layout, and system requirements.
Quick answers from the manual
Quick answer
- This guide provides installation instructions and port identification for the StarTech.com USB-C Dual-Monitor Dock (201N-USBC-DOCK / 201UE-USBC-DOCK). p. 1, 2
Key actions
- Connect the power adapter to the dock and an AC outlet. p. 2
- Connect the host cable from the dock to the laptop. p. 2
First start
- Connect all peripherals and displays, then connect the host cable to the laptop and press the power button. p. 2
Show 2 more answers Show less
Technical specifications
| Parameter | Value | Meaning | Pages |
|---|---|---|---|
| Power Delivery | Up to 100W | Laptop charging capacity | p. 1 |
Where to find it in the PDF
- Port Layout and Requirements p. 1
- Installation Steps p. 2
Table of contents
Manual images
Click an image to enlargeQuick guide from the manual
This document provides setup instructions for the StarTech.com USB-C Dual-Monitor Dock. To ensure full functionality, the host computer's USB-C port must support Power Delivery and DisplayPort Alt Mode. Video performance depends on the host computer's video card and port capabilities.
Device Overview
The docking station features the following ports and controls:
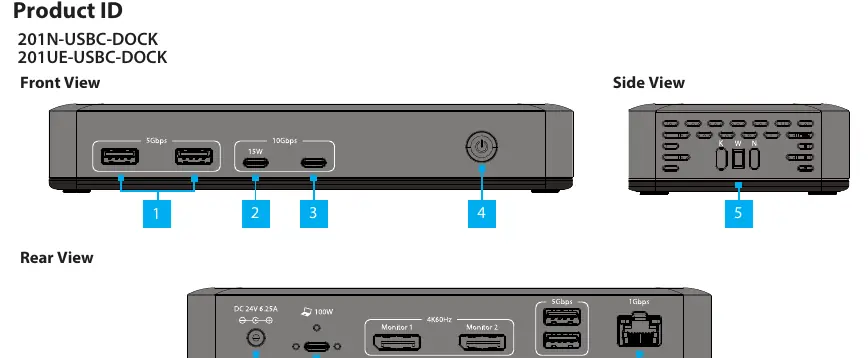
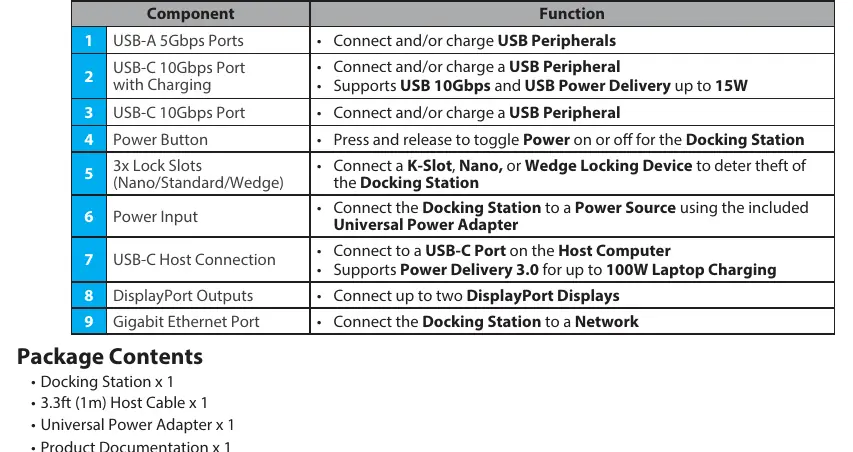
- Front: USB-A 5Gbps ports, USB-C 10Gbps ports (one with charging), and the Power Button.
- Rear: Power Input, USB-C Host Connection, DisplayPort Outputs, and Gigabit Ethernet Port.
- Side: Lock slots (K-Slot, Nano, Wedge) for security.
Installation
- Connect the Power Adapter to the Power Input Port on the dock and plug it into an AC outlet.
- Connect a network cable from your network device to the Gigabit Ethernet Port.
- Connect USB devices or peripherals to the USB-A and USB-C ports.
- Connect up to two DisplayPort displays to the DisplayPort Outputs on the back of the dock.
- Connect the included 3.3ft (1m) Host Cable from the USB-C Host Connection on the dock to your laptop's USB-C port.
- Press the Power Button on the front to turn on the docking station.
- The host computer will automatically detect the docking station and install the required drivers.
Package Contents
- 1x Docking Station
- 1x 3.3ft (1m) Host Cable
- 1x Universal Power Adapter
- Product Documentation
Official resources from the manual
Practical help
Common problems
Docking station not functioning or video not displaying
Ensure the host computer's USB-C port supports Power Delivery and DisplayPort Alt Mode.
Before use
- Verify host computer USB-C port supports Power Delivery and DisplayPort Alt Mode
- Ensure you have the included Universal Power Adapter
- Ensure you have the included 3.3ft Host Cable
- Check that you have available AC power for the adapter
Show more Show less
Specs in practice
- DisplayPort Alt Mode
- Required for the USB-C port to transmit video signals to external displays
- USB-C 10Gbps
- High-speed data transfer rate for peripherals
Images and diagrams
- Front view identifies USB-A and USB-C ports and the power button
- Rear view identifies power input, host connection, display outputs, and ethernet port
- Side view identifies security lock slots
Model compatibility
- Video support and performance depend on the host computer and video card
- Host computer must support Power Delivery and DisplayPort Alt Mode

Manual page author
David Miller
Documentation analyst