Electronics / USB Hubs & Docking
User Manual for StarTech 12S-CABLE-LACING-BAR 1U Adjustable Cable Lacing Bar
Quick-start guide for the StarTech 12S-CABLE-LACING-BAR. Learn how to assemble, adjust the depth, and mount this 1U cable lacing bar in your server rack, along with best practices for cable management.
Table of contents
Quick Guide from the Manual
The StarTech 12S-CABLE-LACING-BAR is designed to provide structural support and organization for cables within a server rack. Before beginning, ensure you have a Phillips Head Screwdriver, Hook and Loop Ties or Plastic Ties, and a Cage Nut Tool (optional). The unit requires 1U of mounting space in your rack.
Product Overview
The lacing bar consists of several key components:
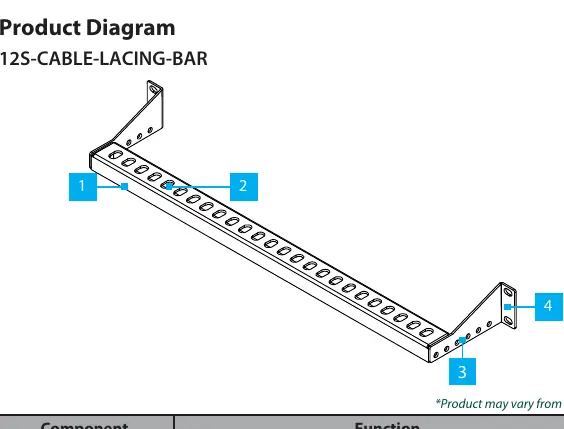
- Lacing Bar: The main body that provides structural rigidity to support cables.
- Lacing Points: Specific points used to pass ties through for organized cable bundling.
- Adjustable Depth Holes: Allow you to change the depth of the bar inside the rack.
- Mounting Brackets: Used to attach the bar to the rack's mounting posts.
Installation
Follow these steps to assemble and mount the cable lacing bar:
- Determine the required mounting depth for your application.
- Align the lacing bar's mounting holes with the adjustable depth holes on the mounting brackets.
- Insert the M4 screws through the adjustable depth holes and into the lacing bar. Tighten securely with a Phillips Head Screwdriver.
- Repeat the process on the opposite side of the lacing bar.
- Locate a suitable 1U space on your rack.
- Install the included M6 cage nuts onto the rack's mounting posts following the rack manufacturer's instructions.
- Place the lacing bar onto the rack and align the mounting brackets with the mounting posts.
- Insert the M6 screws through the plastic washers, the mounting brackets, and into the rack's mounting posts. Tighten securely.
Cable Management
To effectively manage your cables:
- Plan your cable routing by identifying the path from source to destination.
- Group cables based on function or destination.
- Use Hook and Loop Ties or Plastic Ties to create cable bundles.
- Note: Always leave a bit of slack in each cable bundle to accommodate future adjustments without causing strain.
- Secure the bundles to the lacing bar using the lacing points.
- Consider labeling each cable or bundle for easier identification.
Safety and Warranty
Assemble the product according to the instructions provided. Ensure the manual is fully understood before assembly. This product is backed by a two-year warranty. For further information on warranty terms, visit the official StarTech website.
Practical help
Common problems
Difficulty installing cage nuts
Use a cage nut tool or the rack manufacturer's preferred installation method.
Cable strain or tension
Leave a bit of slack in each cable bundle to allow for future adjustments.
Before use
- Phillips Head Screwdriver
- Hook and Loop Ties or Plastic Ties
- 1U of available mounting space in the rack
- Cage nuts and screws (provided or from rack manufacturer)
Specs in practice
- Adjustable Depth
- Allows the bar to be positioned at different depths within the rack.
Images and diagrams
- Lacing Bar: Main body for cable support.
- Lacing Points: Slots for securing ties.
- Adjustable Depth Holes: Used to set the bar depth.
- Mounting Brackets: Attach the bar to the rack posts.
Model compatibility
- Requires 1U of rack space.
- Compatible with standard rack mounting posts.

Manual page author
Michael Turner
Technical manual editor
Reviews PDF manuals for structure, safety notes, and practical product details so readers can find the right information quickly.