Automotive / Lighting Accessories
Installation Guide for Stinger HEXCORE 2-Inch LED Pod Light STL2PDL
Comprehensive installation guide for the Stinger HEXCORE 2-Inch LED Pod Light (STL2PDL). Includes detailed wiring diagrams, mounting hardware lists, and technical specifications for proper setup.
Quick answers from the manual
Quick answer
- The Stinger STL2PDL is a 2-inch LED pod light. Installation involves mounting the brackets to a vibration-free surface and wiring the 6-pin connector to 12V switches for Hi/Low beam and halo functions. p. 2, 3, 4, 5
Key actions
- Mounting the light p. 4
- Wiring the light p. 3, 5
Technical specifications
| Parameter | Value | Meaning | Pages |
|---|---|---|---|
| Voltage | 9-32V DC | Operating voltage range | p. 2 |
| IP Rating | IP69 | Ingress protection rating | p. 2 |
Show 1 more answers Show less
Where to find it in the PDF
- Installation Guide p. 2, 3, 4, 5
Table of contents
Manual images
Click an image to enlargeQuick guide from the manual
The Stinger HEXCORE 2-Inch LED Pod Light (STL2PDL) is a high-output lighting solution designed for off-road and harsh environments. This guide covers the installation process, including mounting hardware, wiring pinouts, and technical requirements. Ensure you have the necessary tools and a 12V DC power source before beginning installation.
Box Contents
- Two (2) LED Pod lights
- Two (2) 18-inch harnesses with Deutsch connectors
- Two (2) Stinger Black-out covers
- Two (2) Amber lens covers
- Two (2) Pod light mounting brackets
- Mounting hardware
Technical Specifications
- Operating Voltage: 9-32V DC
- Light Source: High-intensity LEDs
- Housing Material: Die-cast aluminium
- Lens Material: Polycarbonate
- Ingress Protection: IP69
- Operating Temperature: -40°F to 140°F (-40°C to 60°C)
Required Tools
- 13mm wrench or 13mm socket and ratchet
- Number 3mm Allen wrench
- Wire crimpers or cutters
Mounting Instructions
Follow these steps to mount the pod lights securely:
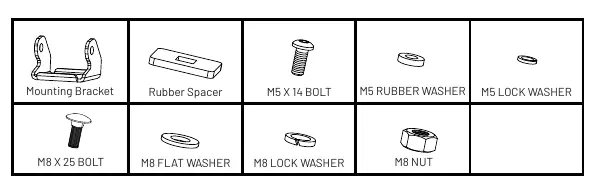
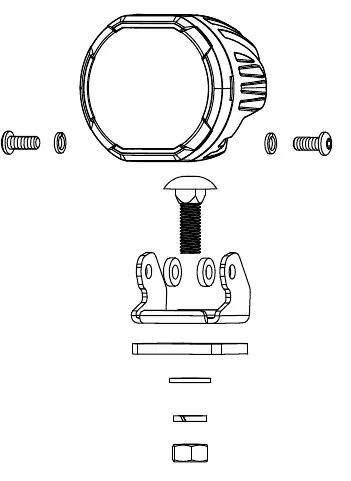
- Choose a secure, vibration-free mounting surface such as a bumper, roof rack, or A-pillar.
- Ensure the chosen location does not obstruct airflow, visibility, or other vehicle components.
- Attach the mounting brackets to the pod light using the provided hardware.
- Loosely secure the hardware to allow for beam adjustment.
- Mount the assembly to the vehicle using the provided hardware.
Wiring Instructions
The pod lights use a 6-pin connector. Connect the wires to external 12V switches as follows:
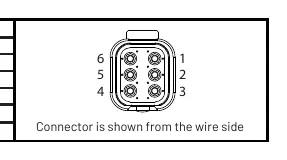
- Pin 1 (Red): Hi beam power
- Pin 2 (Black): Chassis ground
- Pin 3 (N/C): No connection
- Pin 4 (Green): Low beam switch
- Pin 5 (White): White halo
- Pin 6 (Yellow): Amber halo
Dimensions
The unit measures 3.6in (92mm) in height and 2.5in (64mm) in width. The included harness is 18in (457mm) long.
Practical help
Common problems
Light does not turn on
Verify the ground connection (Pin 2) is attached to a clean chassis ground and that the 12V switch is receiving power.
Halo function not working
Ensure the White (Pin 5) or Yellow (Pin 6) wires are connected to a switched 12V source.
Before use
- Verify all box contents are present
- Gather 13mm wrench, 3mm Allen wrench, and wire crimpers
- Identify a vibration-free mounting surface
- Ensure mounting location does not obstruct airflow or vehicle components
Show more Show less
Specs in practice
- Operating Voltage
- The light requires a 9-32V DC power source.
- Operating Temperature
- Safe to operate between -40°C and 60°C.
Images and diagrams
- Wiring diagram shows the 6-pin connector layout viewed from the wire side.
- Dimensions diagram illustrates the 2.5in width and 3.6in height of the pod.
Model compatibility
- Requires external 12V switches for operation.
- Designed for 12V DC vehicle electrical systems.

Manual page author
Emily Carter
User documentation editor