Tools / Hose Reels
User Manual for Style Selections 200-Ft Capacity Portable Hose Reel Cart SGY-GAR4
Quick guide for the Style Selections 200-Ft Capacity Portable Hose Reel Cart (SGY-GAR4). Includes assembly instructions, installation steps, operation, and maintenance tips.
Quick answers from the manual
Quick answer
- The Style Selections SGY-GAR4 is a portable hose reel cart with a 200-ft capacity. It requires a Phillips screwdriver for assembly and should be connected to water supplies under 100 PSI. p. 1, 4
Key actions
- Assemble the handle and crank p. 5
- Connect the leader hose p. 6
First start
- Assemble the unit, attach the leader hose to the reel and water supply, then attach your garden hose. p. 5, 6, 7
Problems and fixes
Leaking
Check rubber washers and re-tighten connections.
p. 7Maintenance and reset
- Store indoors during winter; drain all water to prevent freezing damage. p. 8
Technical specifications
| Parameter | Value | Meaning | Pages |
|---|---|---|---|
| Hose Capacity | 200-ft | Maximum length of 5/8-inch vinyl hose | p. 4 |
Where to find it in the PDF
- Assembly Instructions p. 5
- Installation p. 7
Table of contents
Manual images
Click an image to enlargeQuick guide from the manual
The Style Selections 200-Ft Capacity Portable Hose Reel Cart (SGY-GAR4) is designed to store and transport standard garden hoses. Before using, ensure your water supply pressure is below 100 PSI. The unit requires a Phillips screwdriver for assembly. Always release water pressure when the hose is not in use and store the unit indoors during freezing conditions to prevent damage.
Package Contents
Ensure all parts are present before beginning assembly:
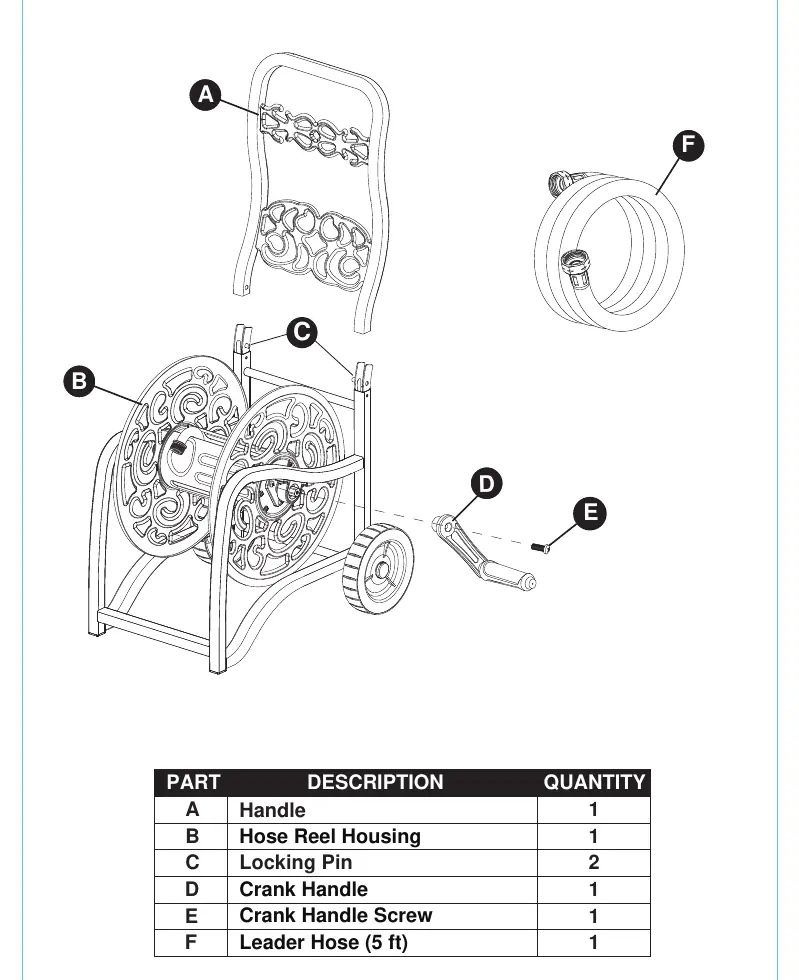
- A: Handle (1)
- B: Hose Reel Housing (1)
- C: Locking Pin (2)
- D: Crank Handle (1)
- E: Crank Handle Screw (1)
- F: Leader Hose (5 ft) (1)
Assembly Instructions
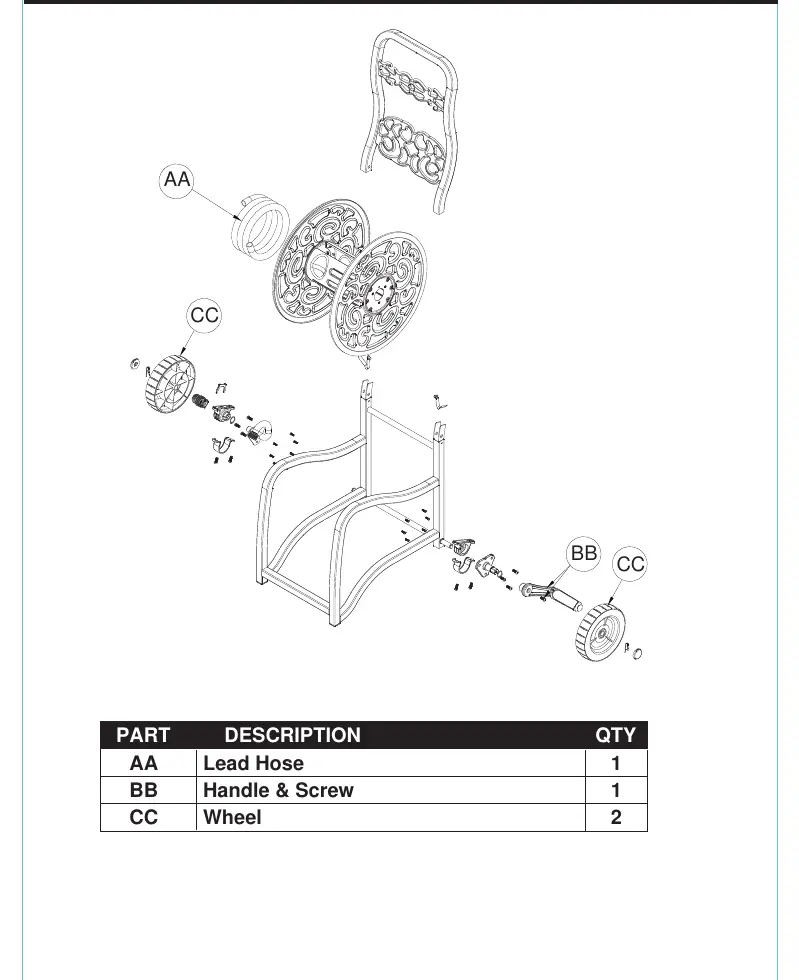
- Assemble the Cabinet: Attach the handle (A) to the hose reel housing (B). Push down until it reaches the locking pins (C). Push in one pin and push down on the handle until it covers the pin. Repeat for the other side. Push down until both pins lock into the holes on the handle. Ensure the decorative side of the handle assembly faces the hose reel.
- Install Crank Handle: Use a Phillips screwdriver to secure the crank handle (D) with the screw (E).
Installation
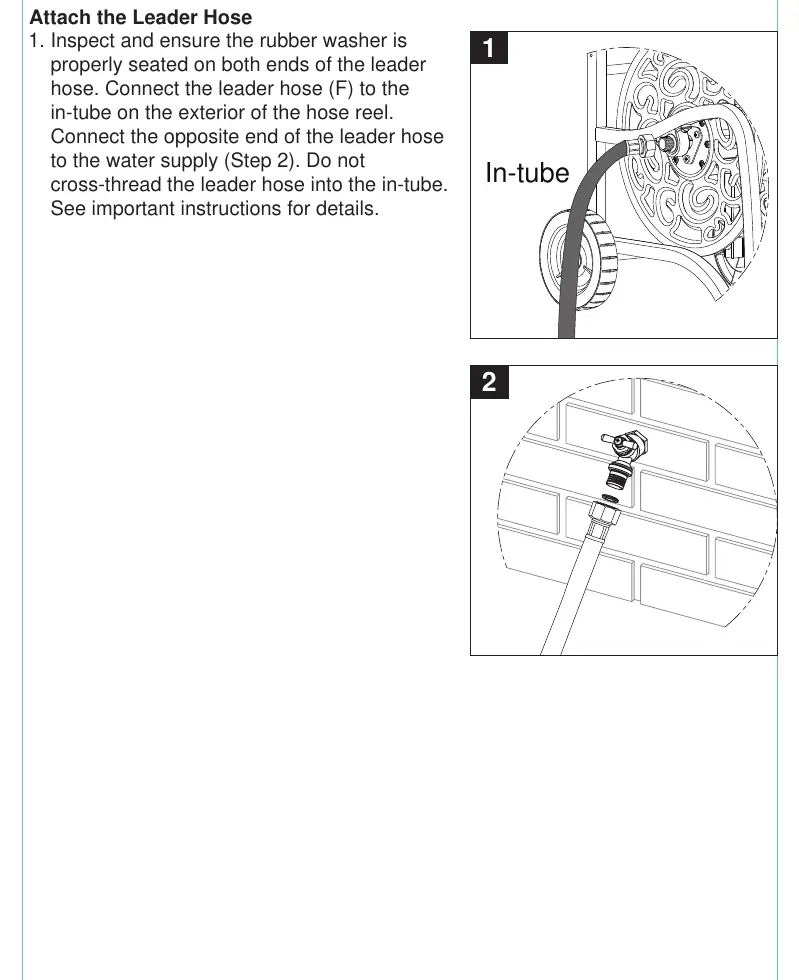
Attach the Leader Hose: Inspect the rubber washers on both ends of the leader hose (F). Connect one end to the in-tube on the exterior of the hose reel and the other to your water supply. Do not cross-thread.
Attach the Water Hose: Ensure the rubber washer is inside the fitting. Connect your garden hose (not included) to the water system outlet. Turn on the water supply and check for leaks; re-tighten if necessary.
Operation
- Remove the required length of hose from the unit.
- Turn on the water supply at the faucet.
- To unwind, pull the hose out in a straight line.
- To rewind, walk the end back to the reel so the hose forms a "U" shape in front of the reel, which makes rewinding easier.
Moving or Storing
Store the hose reel indoors during colder months. If the unit must be left in freezing conditions, disconnect the hose from the faucet and drain all water from the hose and reel to prevent damage to the reel, hose, or pipes.
Care and Maintenance
Always operate the product with care by following the operating instructions. If you have questions or missing parts, contact customer service at 877-888-8225 or via email at [email protected].
Practical help
Common problems
Leaking connections
Ensure rubber washers are properly seated in the fittings and re-tighten connections.
Missing parts
Contact customer service at 877-888-8225 or [email protected] before returning to the retailer.
Before use
- Verify all parts listed in the package contents are present.
- Ensure you have a Phillips screwdriver available.
- Check that rubber washers are seated in both ends of the leader hose.
- Confirm water supply pressure is below 100 PSI.
Specs in practice
- Hose Capacity
- Holds up to 200-ft of 5/8-inch standard vinyl hose.
- Max Pressure
- Do not exceed 100 PSI.
Images and diagrams
- The manual provides exploded views of the assembly process, including handle attachment and crank handle installation.
- Diagrams illustrate the correct 'U' shape positioning for easier hose rewinding.
Model compatibility
- Designed for standard 5/8-inch vinyl garden hoses.
- Not for use with water pressure exceeding 100 PSI.

Manual page author
Emily Carter
User documentation editor
Prepares concise manual descriptions and highlights the most useful setup, operation, and maintenance information for readers.